Getting Started with the Cosmic Frog for Excel App Builder
To enable users to build basic Cosmic Frog for Excel Applications to interact directly with Cosmic Frog from within Excel without needing to write any code, Optilogic has developed the Cosmic Frog for Excel Application Builder (also referred to as App Builder in this documentation). In this App Builder, users can build their own workflows using common actions like creating a new model, connecting to an existing model, importing & exporting data, creating & running scenarios, and reviewing outputs. Once a workflow has been established, the App can be deployed so it can be shared with other users. These other users do not need to build the workflow of the App again, they can just use the App as is. In this documentation we will take a user through the steps of a complete workflow build, including App deployment.
Get the App Builder from the Resource Library
You can download the Cosmic Frog for Excel – App Builder from the Resource Library. A video showing how the App Builder is used in a nutshell is included; this video is recommended viewing before reading further. After downloading the .zip file from the Resource Library and unzipping it on your local computer, you will find there are 2 folders included: 1) Cosmic_Frog_For_Excel_App_Builder, which contains the App Builder itself and this is what this documentation will focus on, and 2) Cosmic_Frog_For_Excel_Examples, which contains 3 examples of how the App Builder can be used. This documentation will not discuss these examples in detail; users are however encouraged to browse through them to get an idea of the types of workflows one can build with the App Builder.
The Cosmic_Frog_For_Excel_App_Builder folder contains 1 subfolder and 1 Macro-enabled Excel file (.xlsm):

- The “working_files_do_not_change” folder. This folder and its contents do not need to be touched at all while building and deploying your Apps, and they need to be kept in the same folder as the .xlsm file.
- A Macro-enabled Excel file named Cosmic_Frog_For_Excel_App_Builder_v1.xlsm. To ensure the App Builder will work fine, you may need to do one of the following on opening this file:
- Work through several Enable Content and/or Enable Macros messages & warnings.
- If you cannot work through the messages without the warnings about Macros/Content being disabled going away, you likely need to: close the .xlsm file, go to the folder where it is saved, right-click on it, select Properties, check the checkbox that says “Unblock” at the bottom, and click on OK. Then re-open the .xlsm file.
When ready to start building your first own basic App, open the Cosmic_Frog_For_Excel_Builder_v1.xlsm file; the next section will describe the steps a user needs to take to start building.
Building your App Workflow from Actions
When you open the Cosmic_Frog_For_Excel_App_Builder_v1.xlsm file in Excel, you will find there are 2 worksheets present in the workbook, Start and Workflow. The top of the Start worksheet looks like this:

- App Keys are used to authenticate the user of the App Builder on the Optilogic platform. To get an App Key that you can enter into your Excel Apps, see this Help Center Article on Generating App and API Keys. During the first run of the App Builder, the App Key will be copied from the cell it is entered into to an app.key file in the same folder as the Excel .xlsm file, and it will be removed from the worksheet. User can then keep running the App without having to enter the App Key again unless the workbook or app.key file is moved elsewhere. It is important to emphasize that App Keys should not be saved into Excel Apps/the App Builder as they can easily be accidentally shared when the .xlsm files themselves are shared. Individual users need to authenticate with their own App Key.
- The App Builder will attempt to retrieve the local path of where the App Builder .xlsm file is saved. However, if the file is saved in a Cloud Drive, this may fail, and the user will need to specify the path to the workbook in this field. User will be prompted to do so when attempting a run if this is the case.
- Clicking on this “Sync your Optilogic Account” button will gather information from user’s Optilogic account, like for example lists of models and templates stored in the user’s account. It is recommended that you synchronize your account, so that drop-downs of model names, template names, etc. can be pre-populated with those present in the user’s account. This avoids typos and gives user an easy way to configure the actions that together make up a workflow.
- Clicking on the “Build Workflow” button will take user to the Workflow worksheet. This is where the actual App building takes place.
Going to the Workflow worksheet and clicking on the Cosmic Frog tab in the ribbon, we can see the actions that are available to us to create our basic Cosmic Frog for Excel Applications:

- We are in the App Builder Excel file named Cosmic_Frog_For_Excel_App_Builder_v1.xlsm.
- Click on the Cosmic Frog tab in the ribbon to view the actions available to build a workflow for an App.
- On the left-hand side the Workflow Actions are grouped together. More detailed descriptions and screenshots of these will follow further below, but quick descriptions of these are:
- Connect To Or Create Model: often the first step of a workflow is to create a new Cosmic Frog model or connect to an existing Cosmic Frog model.
- Import Data: this action imports data from a worksheet in the App into a table in the Cosmic Frog model that we are creating/connecting to.
- Export Data: this action exports data from a table in the Cosmic Frog model that we are connecting to into a worksheet in the App.
- Create Scenario: this action creates a new scenario in the Cosmic Frog model we are creating/connecting to.
- Create Item: this action creates a new scenario item in a scenario in the Cosmic Frog model we are creating/connecting to.
- Run Scenario: this action will run the scenario that is specified in the action using the chosen Cosmic Frog engine (e.g. Neo for network optimization, Throg for simulation, etc.).
- Run Utility: this action enables a user to run a Cosmic Frog Utility (a Python script), which could be a System Utility like looking up SMC3 LTL rates or a Utility specifically built for the App.
- Upload File: this action uploads a .csv file from the user’s computer to their Optilogic account.
- Download File: this action downloads a .csv or .txt file from the user’s Optilogic account into a specified worksheet of the App.
- Next are 2 Run Control actions:
- Run Workflow: this action will run all the actions of the workflow that has been built.
- Run Actions: this action lets a user run a subset of the actions that are part of the workflow that has been built.
- There are also 2 Editing actions:
- Move an Action: the order of actions can be changed by moving them to a different spot in the workflow using this action.
- Delete an Action: actions can be deleted using this action.
- Lastly, there is the Deploy App Action in the Deployment section of the Cosmic Frog ribbon. Use this once the complete workflow of the App has been built and tested to share the finished App out to other users.
Building a Simple App
We will now walk through building and deploying a simple App to illustrate the different Actions and their configurations. This workflow will: connect to a Greenfield model in my Optilogic account, add records to the Customer and CustomerDemand tables, create a new scenario with 2 new scenario items in it, run this new scenario, and then export the Greenfield Facility Summary output table from the Cosmic Frog model into a worksheet of the App. As a last step we will also deploy the App.
On the Workflow worksheet, we will start building the workflow by first connecting to an existing model in my Optilogic account:
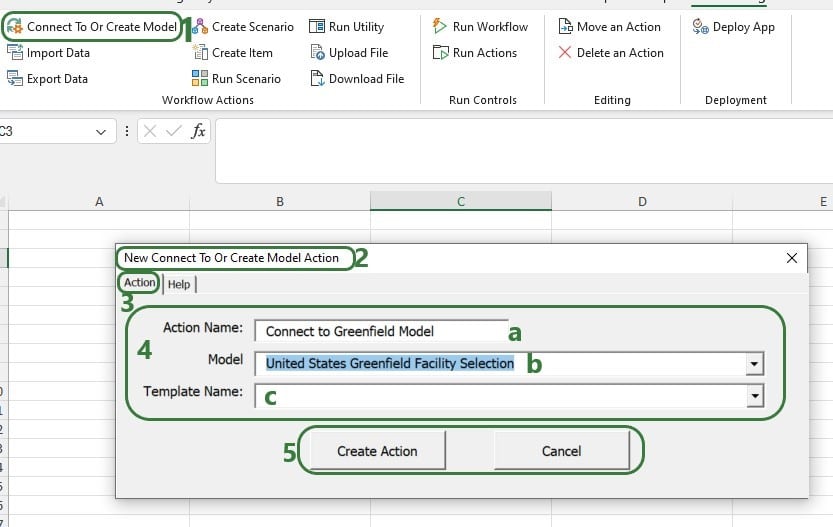
- Click on the “Connect To Or Create Model” action in the Workflow Actions section of the Cosmic Frog tab.
- The “New Connect To Or Create Model Action” form opens up.
- In each action there are 2 tabs, 1 named Action and 1 named Help. We are currently on the Action tab where we can configure the action. We will discuss the Help tab in the next screenshot below.
- This is where we configure the action:
- Action Name: a user-defined unique name for the action, here we named the action “Connect to Greenfield Model”.
- If you have synchronized your Optilogic account (see above), then the Model field contains a drop-down list of all models present in the account. User can pick from this list to connect to this model. Alternatively, user can specify a new model name here in which case a new model with that name will be created in the user’s Optilogic account. In this case, we are connecting to an existing model of the name “United States Greenfield Facility Selection”.
- Template Name: if a new model is being created under bullet b, then a template from the Resource Library can be used for this. A copy of this template in the Resource Library is then created in the user’s Optilogic account. If a new model is created and template name is left blank, an empty new model is created. In this case this is left blank as we are connecting to an existing model and not creating a new one.
- Once all the fields have been configured as desired, click on Create Action to finish setting up this action and it will then be added to the Workflow. User can also Cancel out if needed.
The following screenshot shows the Help tab of the “Connect To Or Create Model Action”:
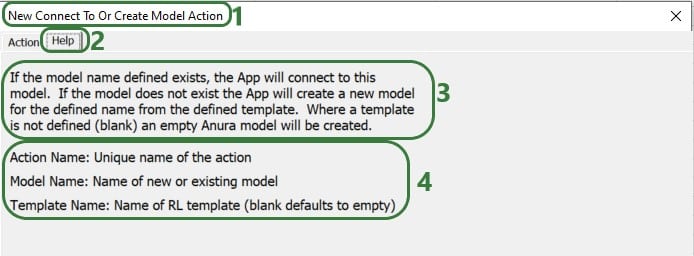
- The “New Connect To Or Create Model Action” form is open.
- In each Action there are 2 tabs, 1 named Action and 1 named Help. We are currently on the Help tab where information on how to configure the action is provided. The Action tab was discussed above.
- Here a description of what the action will do is given.
- For each individual part of the action a short description of how to configure it is given too.
In the remainder of the documentation, we will not show the Help tab of each action. Users are however encouraged to use these to understand what the action does and how to configure it.
After creating an action, the details of it will be added to 2 columns in the Workflow worksheet, see screenshot below. The first action of the workflow will use columns A & B, the next action C & D, etc. When adding actions, the placement on the Workflow worksheet is automatic and user does not need to do or change anything. Blue fields contain data that cannot be changed, white fields are user inputs when setting up the action and can be changed in the worksheet itself too.

- Column A contains the names of the inputs into this action. These cannot be changed by the user.
- The Action Type is set to ConnectToOrCreateModel based on the action that was used to create this step of the workflow. It sets up the code that will be run when this action is executed. This also cannot be changed by the user.
- These are the user inputs into the action that were entered through the “New Connect To Or Create Model Action” form seen in the screenshot a bit further above. These can be changed by the user. Note however that model and template names that exist in a user’s Optilogic account are not automatically populated as drop-downs here, also not for accounts that have been synchronized. To prevent typos when wanting to use existing model and template names, it is preferred to set these fields through the action’s input form rather than typing text into the Workflow worksheet itself.
- Several fields have comments associated with them that contain an explanation of the field and what type of input is expected. These pop up when hovering over the red triangle in the right top corner of the field. We will not mention these or show screenshots of these in the subsequent documentation, users are however encouraged to use these to help with configuring the actions of the workflow.
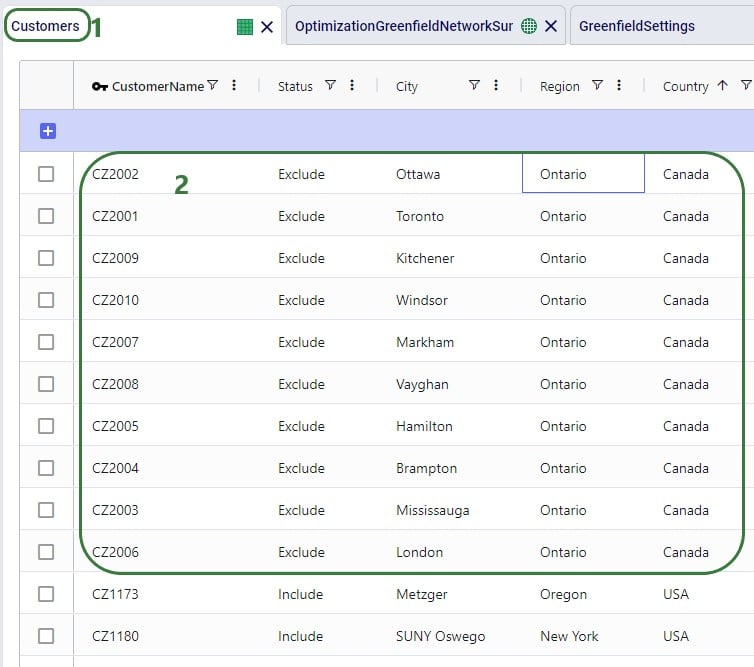
The United States Greenfield Facility Selection model we are connecting to contains about 1.3k customer locations in the US which have demand for 3 products: Rockets, Space Suits, and Consumables. As part of this workflow, we will add 10 customers located in the state of Ontario in Canada to the Customers table and add demand for each of these customers for each product to the CustomerDemand table. The next 2 screenshots show the customer and customer demand data that will be added to this existing model.
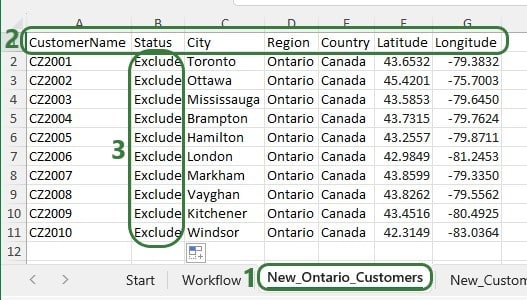
- The New_Ontario_Customers worksheet in the App Builder’s workbook contains the customer data to be added to the Customers table in the existing Cosmic Frog model.
- The column headings need to match those of the table in Cosmic Frog for this new data to be appended to the existing data correctly.
- The Status of these new Customers is set to Exclude, so that existing scenarios will not change if they are being re-run after these customers have been added to the model by running the App.
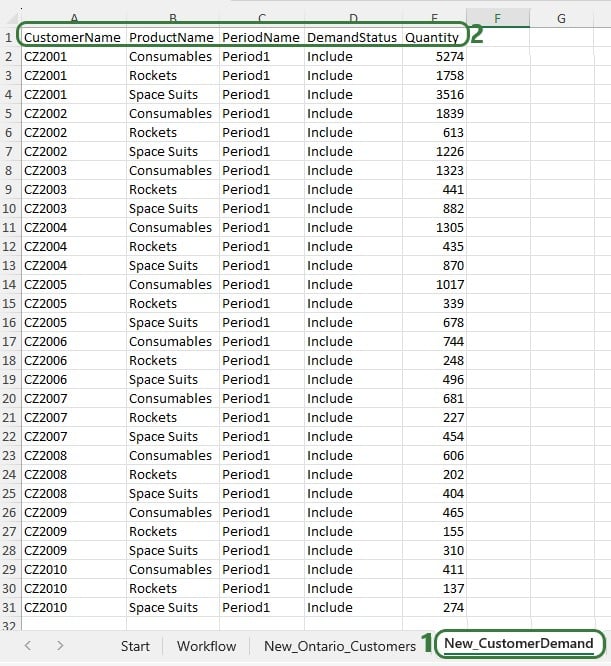
- The New_CustomerDemand worksheet in the App Builder’s workbook contains the demand data to be added to the CustomerDemand table in the existing Cosmic Frog model.
- Again, the column headings need to match those of the table in Cosmic Frog for this new data to be appended to the existing data correctly.
First, we will use an Import Data action to append the new customers to the Customers table in the model we are connecting to:
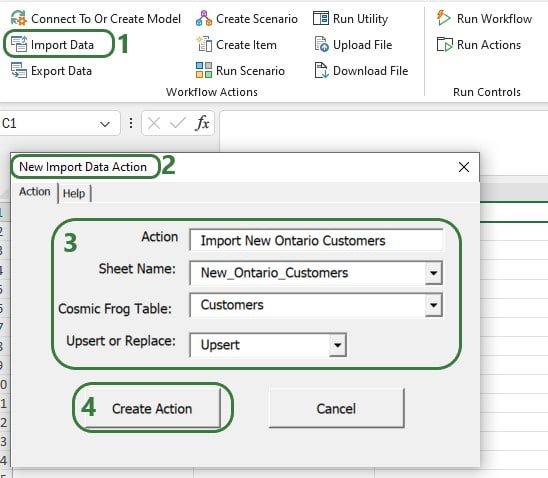
- Click on the Import Data action in the Workflow Actions section of the Cosmic Frog tab.
- This opens the “New Import Data Action” form.
- Configure the action’s inputs:
- Action: unique name of the action, set to “Import New Ontario Customers” here.
- Sheet Name: select the worksheet that contains the data to be imported from the drop-down list. Here, “New_Ontario_Customers” is selected.
- Cosmic Frog Table: select the Cosmic Frog table name the data should be imported into from the drop-down list. As there are many tables in the drop-down, starting to type the table name can help find it quicker.
- Upsert or Replace: choose Upsert if the data needs to be appended to any existing data in the table in the Cosmic Frog model. If there are records in the data that is being upserted that have the same value(s) for the table’s key column(s), the record that is being upserted will replace the whole record that is already present in the existing data. Choose Replace if all data that is already present in the table in the Cosmic Frog model should be cleared out and entirely replaced by the data that is being imported.
- Clicking on Create Action adds this action to the Workflow worksheet, columns C & D.
Next, use the Import Data Action again to upsert the data contained in the New_CustomerDemand worksheet to the CustomerDemand table in the Cosmic Frog model, which will be added to columns E & F. After these 2 Import Data actions have been added, our workflow now looks like this:

- The first Import Data action to import the new Ontario customers into the Customers table is placed in columns C & D and we can review / edit the configuration of it.
- The second Import Data action to import the demand associated with the new Ontario customers into the CustomerDemand table is placed in columns E & F and we can review / edit the configuration of it.
Now that the new customers and their demand have been imported into the model, we will add several actions to create a new scenario where the new customers will be included. In this scenario, we will also remove the Max Number of New Facilities value, so the Greenfield algorithm can optimize the number of new facilities just based on the costs specified in the model. After setting up the scenario, an action will be added to run it.
Use the Create Scenario action to add a new scenario to the model:
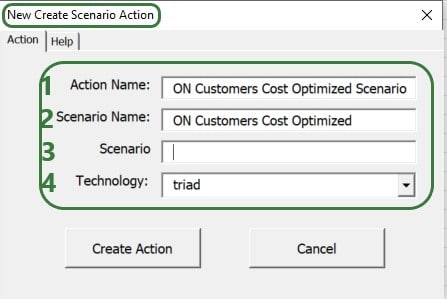
- Action Name: set the unique name of the action, here it is set to “ON Customers Cost Optimized Scenario”.
- Scenario Name: the name of the scenario that is being created, here set to “ON Customers Cost Optimized”. If the scenario name already exists in the model, it will be replaced by this one and its parameters. Any scenario items assigned to the existing scenario will also be assigned to this new scenario.
- Scenario: an optional description of the scenario, left blank here.
- Technology: the Cosmic Frog technology that should be run for this scenario. Options are:
- Neo – network optimization
- Hopper – transportation optimization
- Triad – Intelligent Greenfield
- Dendro – inventory optimization
- Throg – simulation
Then, use 2 Create Item Actions to 1) include the Ontario customers and 2) remove the Max Number Of New Facilities value:
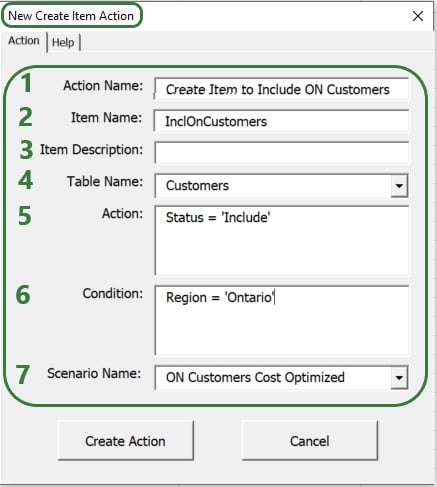
- Action Name: unique name of the action, here set to “Create Item to Include ON Customers”.
- Item Name: the unique name of the scenario item, here set to “InclOnCustomers”. If a scenario item of the same name already exists in the model, it will be replaced by this new item. If the item name already exists in the scenario that is specified (bullet #7), then the new item will overwrite the already existing item, also if it is already assigned to 1 or multiple already existing scenarios (e.g. those items in the already existing scenarios will be updated to this new one).
- Item Description: optional description of the scenario item.
- Table Name: the name of the Cosmic Frog table the scenario item will change, here the Customers table.
- Action: the change that will be made to the table. Here the value of the Status column will be changed to Include.
- Condition: the condition (or “filter”) used – only the records in the table that match this condition will be changed, the others will remain unchanged. Here set to filter for Region = ‘Ontario’. This way, the status of all US customers remains unchanged.
- Scenario Name: the scenario to which this item is applied. Can be selected from the drop-down which is populated from the scenarios that have been set up as part of the workflow. Here set to the scenario that was created in the previous action, “ON Customers Cost Optimized”. If the scenario name is set to an already existing scenario name in the model, the scenario item will be created and assigned to this existing scenario if the scenario item name is not the same as the name of an already existing scenario item assigned to different scenario(s).
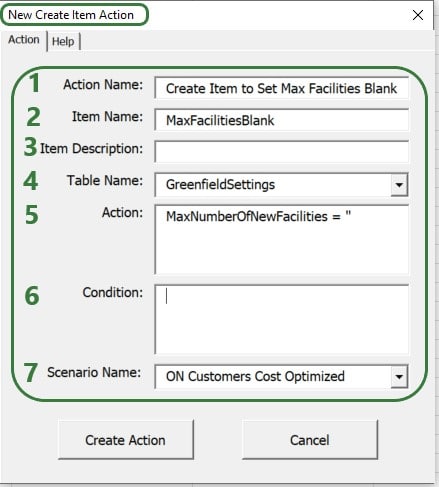
- Action Name: unique name of the action, here set to “Create Item to Set Max Facilities Blank”
- Item Name: the unique name of the scenario item, here set to “MaxFacilitiesBlank”
- Item Description: optional description of the scenario item.
- Table Name: the name of the Cosmic Frog table the scenario item will change, here the GreenfieldSettings table.
- Action: the change that will be made to the table. Here the value of the MaxNumberOfNewFacilities column will be changed to be blank (empty string), which is done by typing MaxNumberOfNewFacilities = ‘’ into this field.
- Condition: the condition (or “filter”) used – only the records in the table that match this condition will be changed, the others will remain unchanged. Here no condition is used which means the change is applied to all records (which is only 1 in the GreenfieldSettings table).
- Scenario Name: the scenario to which this item is applied. Can be selected from the drop-down which is populated from the scenarios that have been set up as part of the workflow. Here set to the scenario that was created 2 actions ago, “ON Customers Cost Optimized”.
After setting up the scenario and its 2 items, the next step of the workflow will be to run it. We add a Run Scenario action to the workflow to do so:
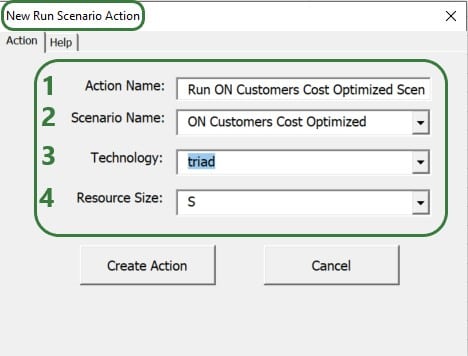
The configuration of this action takes following inputs:
- Action Name: unique name of the action, here set to “Run ON customers Cost Optimized Scenario”
- Scenario Name: the scenario to run, can be chosen from the drop-down, which contains the scenarios that have been created as part of this workflow, or user can type in the name of an already existing scenario in the model.
- Technology: the Cosmic Frog technology that should be used when running this scenario. Options are:
- Neo – network optimization
- Hopper – transportation optimization
- Triad – Intelligent Greenfield
- Dendro – inventory optimization
- Throg – simulation
- Resource Size: choose the size of the resource (in terms of number of cores and amount of memory (RAM)) on the Optilogic platform to use when running this scenario, ranging form Mini to 4XL. Read more about choosing an initial resource size and evaluating resource sizes in this Help Center article.
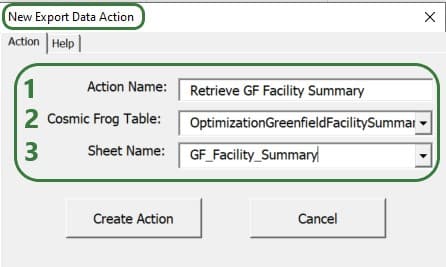
We now have a workflow that connects to an existing US Greenfield model, adds Ontario customers and their demand to this model, then creates and runs a new scenario with 2 items in this Cosmic Frog model. After running the scenario, we want to export the Optimization Greenfield Facility Summary output table from the Cosmic Frog model and load it into a new worksheet in the App. We do so by adding an Export Data Action to the workflow:
- Action Name: a unique name for the action, here set to “Retrieve GF Facility Summary”
- Cosmic Frog Table: the table in the Cosmic Frog model to export and then load into a worksheet in the App
- Sheet Name: the name of the worksheet to load the exported table into. This can be into an existing worksheet that can be selected from the drop-down list, or a new one by typing its name into the field without using the drop-down list.
After adding the above actions to the workflow, the workflow worksheet now looks like the following 2 screenshots from column G onwards (columns A-F contain the first 3 actions as shown in a screenshot further above):
Columns G-H contain the details of the action that created the new ON Customers Cost Optimized scenario, and columns I-J & K-L contain the details of the actions that added the 2 scenario items to this scenario.
Columns M-N contain the details of the action that will run the scenario that was added and columns O-P those of the action that will export the selected output table (Optimization Greenfield Facility Summary) into the GF_Facility_Summary worksheet of the App.
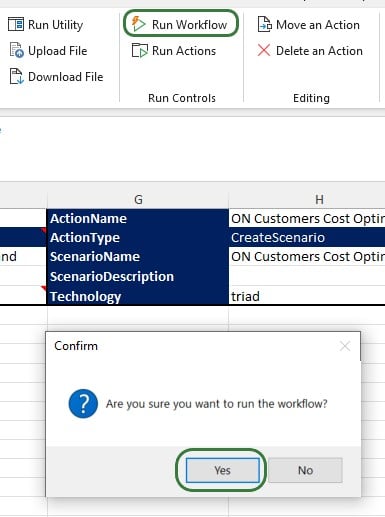
To run the completed Workflow, all we need to do is click on the Run Workflow action and confirm we want to run it:
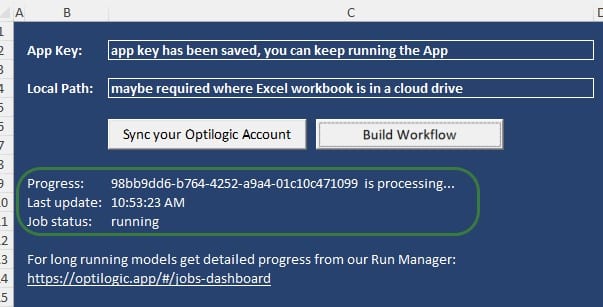
After kicking off the workflow, if we switch to the Start worksheet, details of the run and its progress are shown in rows 9-11:
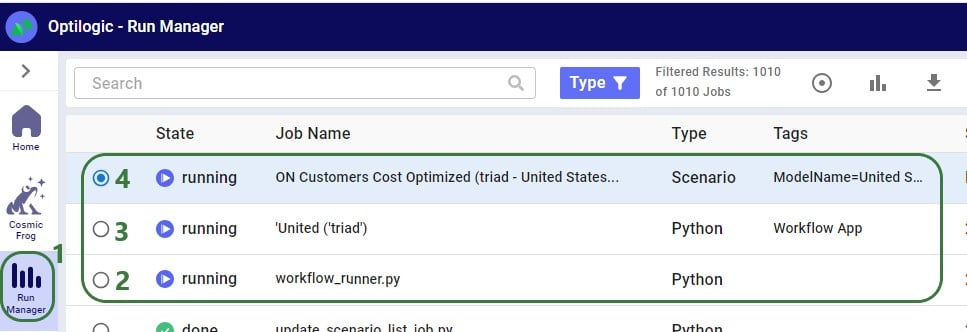
Looking on the Optilogic Platform, we can also check the progress of the App run and the Cosmic Frog model changes:
- After logging into cosmicfrog.com, go to the Run Manager application in the list on the left.
- There are 3 jobs that a run of the App creates on the Optilogic platform, the first one is running the Python script associated with the App Builder, called workflow_runner.py.
- The ‘United (‘triad’) job runs the model associated with the workflow set up in the App Builder.
- This run of Type = Scenario runs the specific scenario that was created in the workflow: the ON Customers Cost Optimized scenario.
Once the run is done all 3 jobs will have their State changed to Done, unless an error occurred in which case the State will say Error.
Checking the United Stated Greenfield Facility Selection model itself in the Cosmic Frog application on cosmicfrog.com:
- This is the Customers table in this United States Greenfield Facility Selection model in the Cosmic Frog app on cosmicfrog.com.
- Notice that the 10 customers in Ontario Canada have been successfully added to the Customers table.
Once the App is finished running, we see that a worksheet named GF_Facility_Summary was added to the App Builder:
- We are on the added worksheet named GF_Facility_Summary.
- Filtering the scenarioname (column A) for the scenario that was run, ON Customers Cost Optimized, we can review the outputs of this scenario: how many Greenfield Facilities were selected in this scenario, how much of the demand does each location serve and what is the location (latitude & longitude) of each Greenfield facility.
Additional Available Actions
There are several other actions that users of the App Builder can incorporate into a workflow or use to facilitate workflow building. We will cover these now. Feel free to skip ahead to the “Deploying the App” section if your workflow is complete at this stage.
Additional actions that can be incorporated into workflows are the Run Utility, Upload File, and Download File actions. The Run Utility action can be used to run a Cosmic Frog Utility (a Python script), which currently can be a Utility downloaded from the Resource Library or a Utility specifically built for the App.
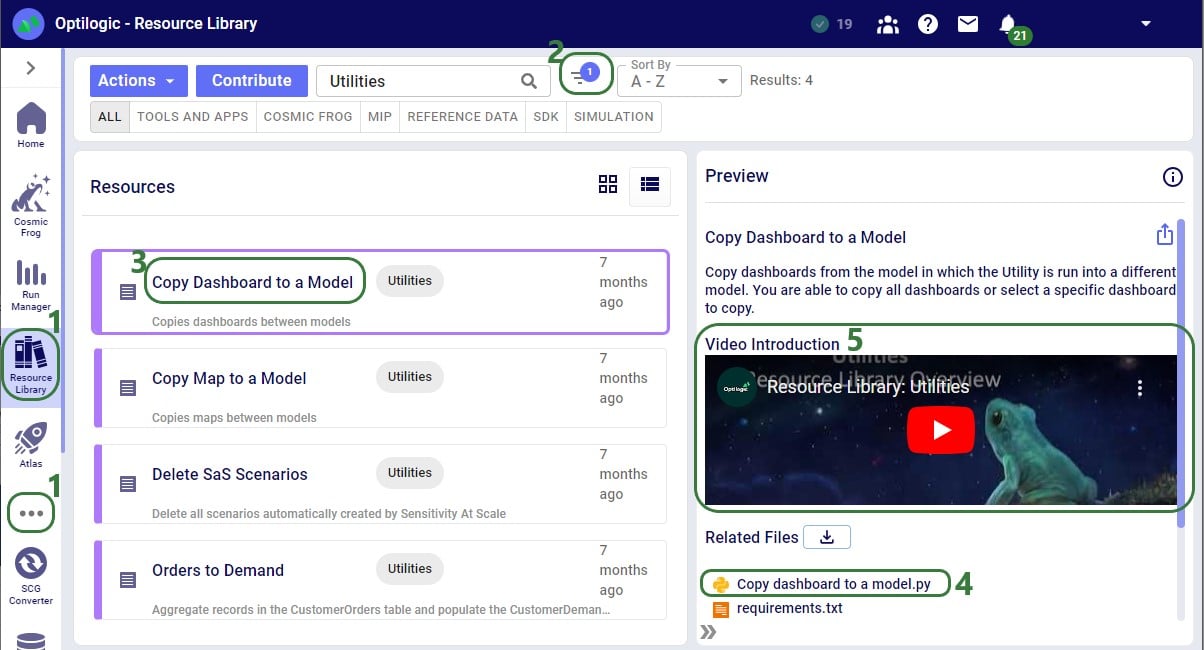
There are currently 4 Utilities available in the Resource Library:
- On the Optilogic platform, navigate to the Resource Library. If you do not see the icon on the left-hand side of the screen, then click on the icon with the 3 dots, which will then show the icons of all applications on the left-hand side of the screen.
- Click on the tag filter icon and scroll down and check the checkbox for the Utilities tag, you will now see 4 resources in the list.
- The Copy Dashboard to a Model Utility is selected in this screenshot. A description of this Utility is provided in the Preview section on the right, together with a Video Introduction and Related Files section.
- If you want to use this Utility, then download the .py file from here.
- The video with this Utility is also listed with the other Utilities that are available in the Resource Library and is recommended viewing if you want to modify any of these Utilities or build your own entirely.
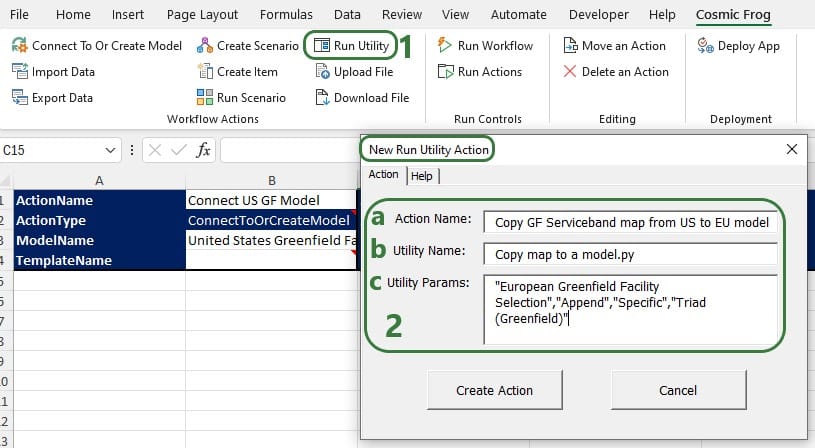
After downloading the Python file of the Utility you want to use in your workflow, you need to copy it into the working_files_do_not_change folder that is located in the same folder as where you saved the App Builder. Now you can start using it as part of the Run Utility action. In the below example, we will use the Python script from the Copy Map to a Model Resource Library Utility to copy a map and all its settings from one model (“United States Greenfield Facility Selection”, the model connected to in a previous action) to another (“European Greenfield Facility Selection”):
- Click on the Run Utility action in the Workflow Actions section of the Cosmic Frog tab.
- Configure the inputs of the Run Utility action:
- Action Name: unique name of the action, set to “Copy GF Serviceband map from US to EU model” here.
- Utlity Name: name of the Python file of the Utility which is placed in the working_files_do_not_change folder. Ensure the name is exactly the same as the name of the file, including the .py extension.
- Utility Params: specify the parameters of the utility here in a comma separated format, enclosing the value of each paramter in double quotes. For this specific utility, the parameters are:
- Destination Model: the name of the model to copy the map to, set to “European Greenfield Facility Selection” here.
- Replace or Append maps: Replace will overwrite the map in the destination model if a map with the same name already exists in that model; Append will add a new, automatically renamed map. Set to “Append” here.
- Copy All or a Specific Map: setting this parameter to “All” will copy all maps from the model that the workflow has connected to to the destination model; setting it to “Specific” will only copy the map specified in the next parameter. Set to “Specific” here.
- Specific Map to Copy: if the third parameter (previous bullet) is set to “Specific”, then this parameter needs to be set to the name of the map to be copied, in this case it is set to “(Triad) Greenfield”. If the previous bullet is set to “All” then this parameter can be left blank by just typing “” for it.
The parameters of the Copy Dashboard to a Model Utility are the same as those of the Copy Map to a Model Utility:
- First paramter: Destination Model – name of the model to copy the dashboard(s) to
- Second parameter: Replace or Append Dashboards – type “Replace” or “Append”)
- Third parameter: Copy All or a Specific Dashboard – type “All” or “Specific”
- Fourth parameter: Specific Dashboard To Copy – name of the dashboard to copy if third parameter is set to “Specific”, or leave blank by typing “” if third parameter is set to “All”
The Orders to Demand and Delete SaS Scenarios utilities do not have any parameters that need to be set, so the Utility Params part of the Run Utility action can be left blank when using these utilities.
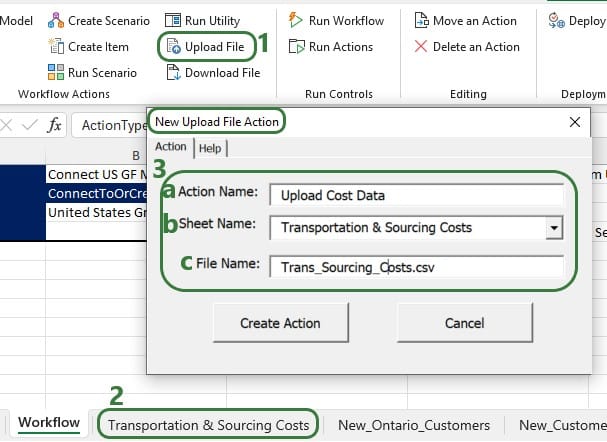
The Upload File action can be used to take a worksheet in the App Builder and upload it as a .csv file to the Optilogic platform:
- Click on the Upload File action in the Workflow Actions section of the Cosmic Frog tab.
- The data we want to upload needs to be in a worksheet in the App Builder, here it is located on the worksheet named “Transportation & Coursing Costs”.
- Configure the inputs of the Upload File action:
- Action Name: unique name of the action, here set to “Upload Cost Data”.
- Sheet Name: the name of the worksheet to be uploaded, can be chosen from the drop-down list.
- File Name: the name of the .csv file that will be uploaded; this file will contain the data from the worksheet specified as Sheet Name (previous bullet).
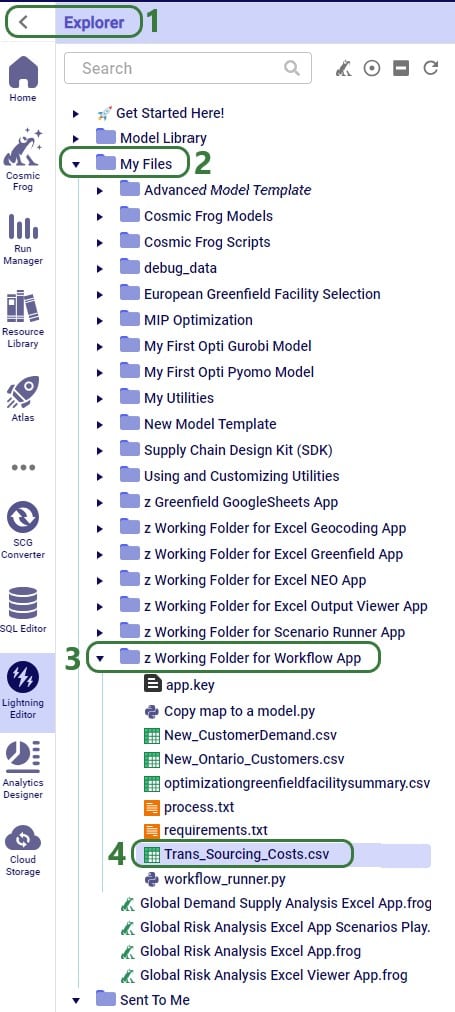
Files that get uploaded to the Optilogic platform are placed in a specific working folder related to the App Builder, the name and location of which are shown in this screenshot:
- On the Optilogic platform, if the Explorer is not open yet, open it by clicking on the > button at the top left of the screen.
- Expand the “My Files” folder.
- Scroll down to find the “z Working Folder for Workflow App” folder and expand it. This is the folder on the Optilogic platform where all files related to the App Builder will be stored.
- The file that was just uploaded through the Upload File action, Trans_Sourcing_Costs.csv is therefore also located in this folder.
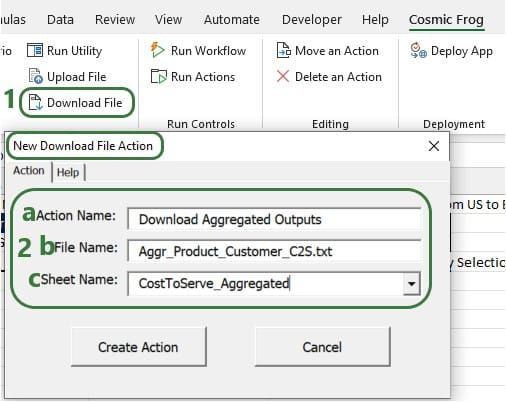
The Download File action can be used to download a .txt file from the Optilogic platform and load it into a worksheet in the App:
- Click on the Download File action in the Workflow Actions section of the Cosmic Frog tab.
- Configure the inputs of the Download File action:
- Action Name: unique name of the action, here set to “Download Aggregated Outputs”.
- File Name: name of the .txt file on the Optilogic platform to be downloaded. This file needs to be in the “z Working Folder for Workflow App” folder under your “My Files” folder, see screenshot a bit further above.
- Sheet Name: name of the worksheet to load the data from the .txt file into, can be chosen from the drop-down list.
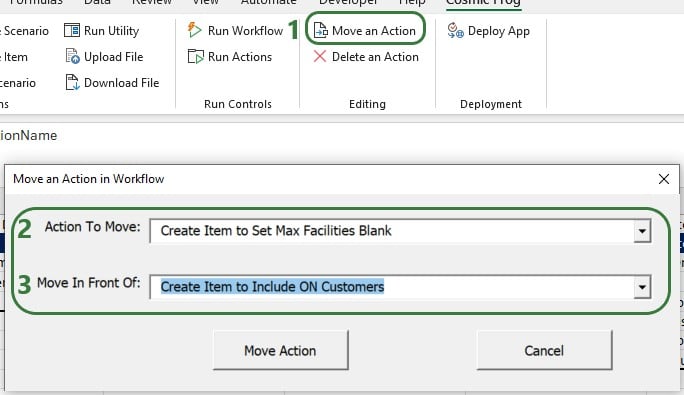
Other actions that facilitate workflow building are the Move an Action, Delete an Action, and Run Actions actions, which will be discussed now. If the order of some actions needs to be changed, you do not need to remove and re-add them, you can use the Move an Action action to move them around:
- Click on the Move an Action icon in the Editing section of the Cosmic Frog tab.
- Action To Move: from the drop-down list, choose the Action that needs to be moved.
- Move In Front Of: from the drop-down list, choose the Action in front of which the Action that is being moved needs to be placed.
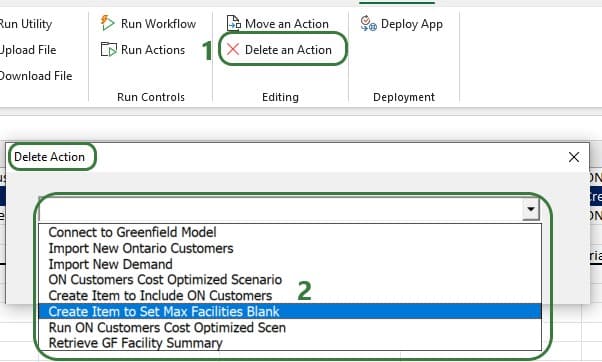
It is also possible that an action needs to be removed from a Workflow. For this, the “Delete an Action” action can be used, rather than manually deleting it from the Workflow worksheet and trying to move other actions in its place:
- Click on the Delete an Action icon in the Editing section of the Cosmic Frog tab.
- From the drop-down list, choose the action that needs to be deleted.
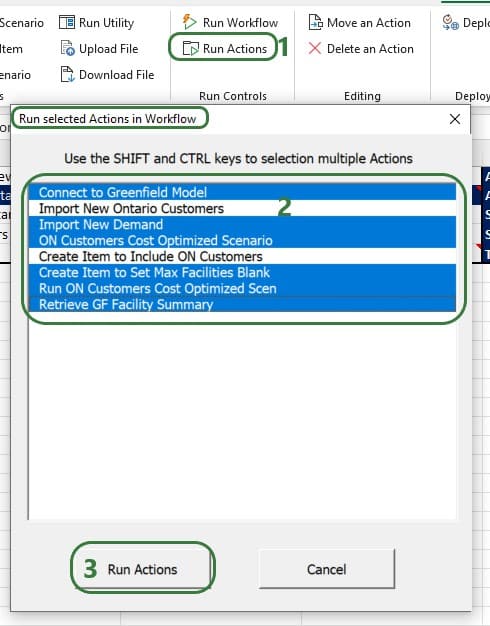
Instead of running a complete workflow, it is also possible to only run a subset of the actions that are part of the workflow:
- Click on Run Actions in the Run Controls section of the Cosmic Frog tab.
- In the list, select the Action(s) that you want to run. If you want to select multiple actions, you can hold down the Shift and Ctrl keys on your computer, while clicking on the Actions you want to include in the run.
Deploying your App
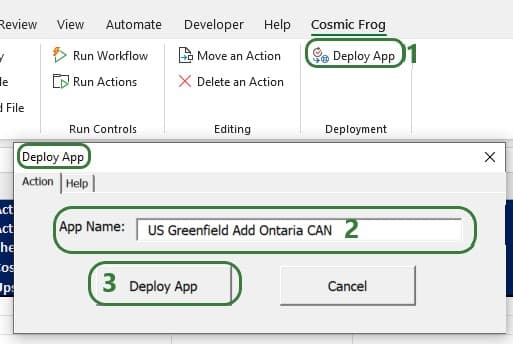
Once a workflow has been completed in the Cosmic Frog for Excel App Builder, it can be deployed so other users can run the same workflow without having to build it first. This section covers the Deployment steps.
- Click on the Deploy App option in the Deployment section of the Cosmic Frog tab.
- App Name: enter the name you want to give to the deployed application; we have called our App “US Greenfield Add Ontaria CAN” here.
- Click on Deploy App.
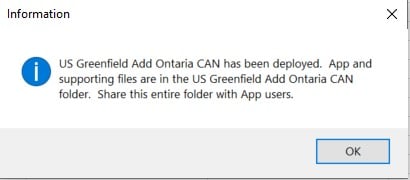
The following message will come up after the app had been deployed:
Looking in the folder mentioned in this message, we see the following contents:
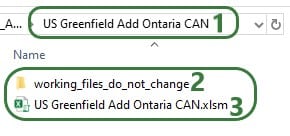
- We have navigated to the US Greenfield Add Ontaria CAN folder in our File Explorer, which is a folder inside the folder where the App Builder is saved.
- There is a subfolder here called working_files_do_not_change which users should leave as is and as the message says copy along with the other contents of the folder when sharing with other users.
- The deployed App, named US greenfield Add Ontaria CAN.xlsm. When sharing the App with other users, this is the file they will open and run the App from, see also next screenshot:
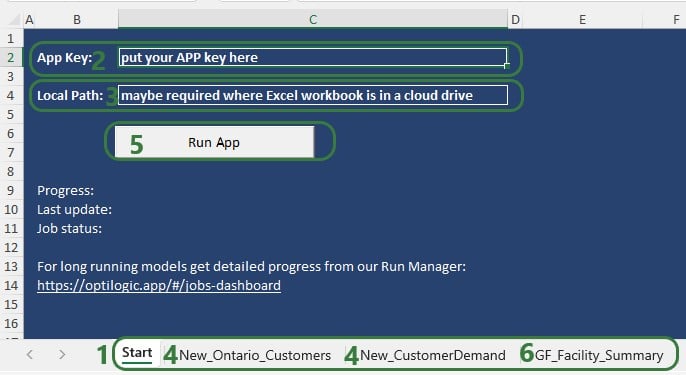
- We are on the Start worksheet of the deployed App.
- Users need to add their own App Key, see this Help Center Article on Generating App and API Keys to learn how to generate your own App Key.
- If the Excel workbook is in the Cloud, users may need to add the path to the workbook here. If this is needed, user will be prompted to do so when trying to first run the App.
- On the New_Ontario_Customers and New_CustomerDemand worksheets, users can update the Ontario data that needs to be upserted to the model.
- Once ready to run the app, user can click on the Run App button, progress will be shown in rows 9-11 while the App is running (or user can have a look in the Run Manager on the Optilogic platform too).
- Once the run is completed, the updated Optimization Greenfield Facility Summary table will be loaded into the GF_Facility_Summary worksheet.
Congratulations on building & deploying your own Cosmic Frog for Excel App!
If you want to build Apps that go beyond what can be done using the App Builder, you can do so too. This may require some coding using Excel VBA, Python, and/or SQL. Detailed documentation walking through this can be found in this Getting Started with Cosmic Frog for Excel Applications article on Optilogic’s Help Center.
