We love for our users to connect, keep up to date, learn from and share with other Cosmic Frog users & experts through the Frogger Pond Community! If you have an Optilogic account (see this page on how to create your free account if you do not have one yet), you can use that same account to log into the Frogger Pond Community.
Here, we will describe what the Frogger Pond Community consists of, how to interact with, search, sort, and contribute to Topics, and how to manage your account. Recommended reads for new users are included in the last section too.
1. Frogger Pond Community Homepage
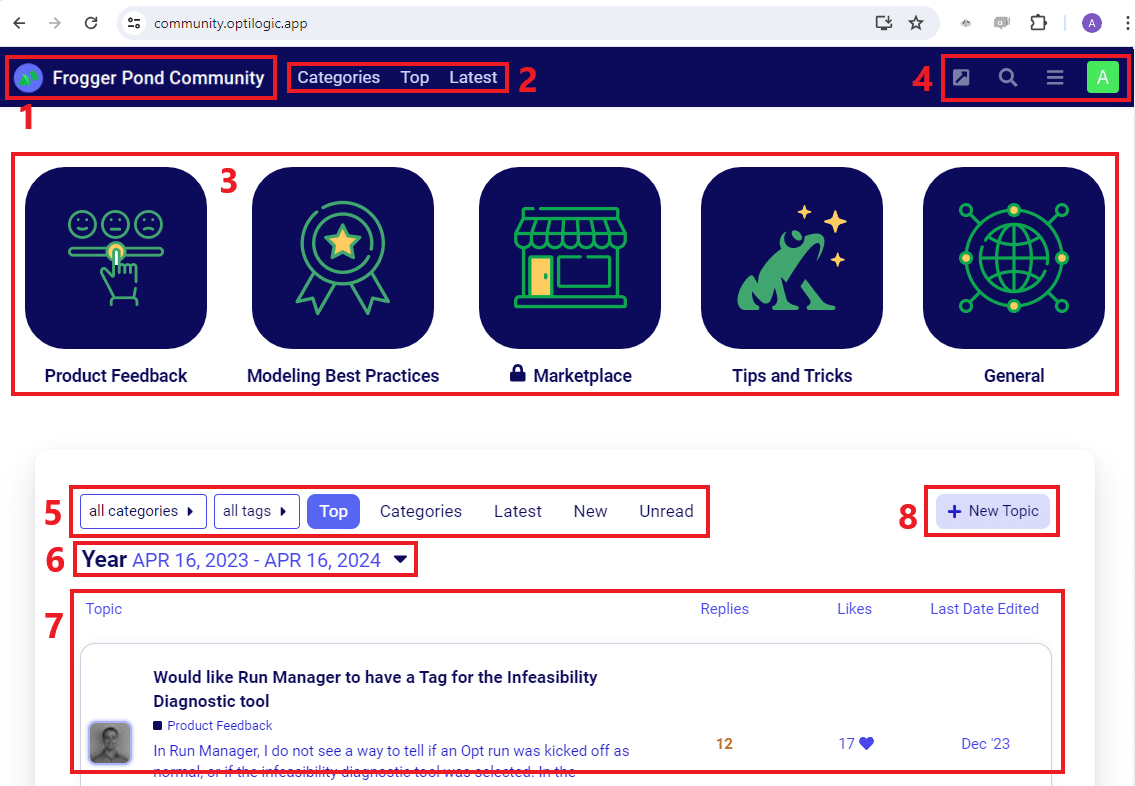
When you login to the Frogger Pond Community, the homepage you see will look similar to the screenshot below:
Clicking on the Frogger Pond Community button at the left top of the screen will take you back to this homepage if you are on any other page within the community.
You can choose how the Topics list is shown to you: you will see all 5 categories if you click on Categories and you can then choose the one you want to explore. The topics will be ordered by most active posts if you click on Top; if you click on Latest, they will be ordered by most recent activity. By default, the Top option is used, which you can also see as the one highlighted in blue in box 5 and is described in bullet 5 further below.
There are 5 categories of Topics in the Frogger Pond Community:
Product Feedback – we love to hear your feedback on the software here, both good and bad! Feature requests can be posted here too.
Modeling Best Practices – if you are new to supply chain design, you can learn from experienced designers and ask your questions here. If you are very experienced and can share your insights on how to model certain aspects of a supply chain, please do so here!
Marketplace – have a look here if you are looking for the next step in your supply chain design career. Or, in case you have an interesting opportunity to offer, you can post that here too. You can create new topics in the Marketplace category if you are part of the Professional user group.
Tips and Tricks – share your best shortcuts, videos, and insights on how you use Cosmic Frog, Atlas and the overall Optilogic platform here.
General – for questions or posts that do not fit into the other 4 categories. You are also encouraged to link to interesting articles or posts in this category.
At the right top there are a few buttons as follows:
The arrow button takes you to the Optilogic platform.
The magnifying glass button opens a search box where you can type your search term to find topics of interest. You can also click on the icon on the right side in the search box that takes you to an advanced search form where you can for example filter for certain tags, a certain date range, etc.
The button with 3 horizontal bars opens a menu where you can quickly go to different parts of the Frogger Pond Community. We will discuss the options here in section “4. Options from the Menu” further below.
The 4th button is your profile picture and here you can get to your Notifications, Bookmarks, Messages, and Preferences. Section “5. Managing your User Account” covers this in more detail.
In this area you can filter out and sort the topics that are being shown.
The first filter on the left can be used to look at 1 of the 5 categories only or to look at topics from all categories.
The second filter can be used to select or search for certain tags so that only topics with those tags are shown in the topics list.
You can click on any of the next 5 buttons to order the list of topics differently, the one that is selected will appear as a blue box with white letters.
Top: shows you the most active topics in the last year, month, week, or day.
Categories: shows all topics grouped by category.
Latest: shows the topics ordered by most recent posts.
New: shows the topics created in the last few days. By default, this is set to the last 2 days, you can change this in your Preferences.
Unread: will show topics that you are watching or tracking that have unread posts. Again, you can change what is considered Unread in your Preferences.
If you have selected Top as the way to order the Topics list (see previous bullet), then you can change if you want to look at the top comments over all time or over the last year, quarter, month, week, or day here.
This is the Topics list itself, where you can click on any of the Topics to open them and start interacting with them. You can sort the topics list by clicking on Replies, Likes or Date Last Edited at the right top of the Topics list. Clicking once will order them in descending number of replies / likes order and most recent date to last edited; clicking on them again will reverse the order to number of replies / likes in ascending order and from last to most recent date edited. We will discuss what you see and how to interact within a topic in the next section titled “2. Interacting with a Topic”.
Click on this “+ New Topic” button if you want to create a new topic yourself. The form that opens up and how to fill it out is detailed in section “3. Creating a New Topic”.
2. Interacting with a Topic
Once you have clicked on a topic that you want to read and possibly interact with, you will see something similar to the following screenshot:
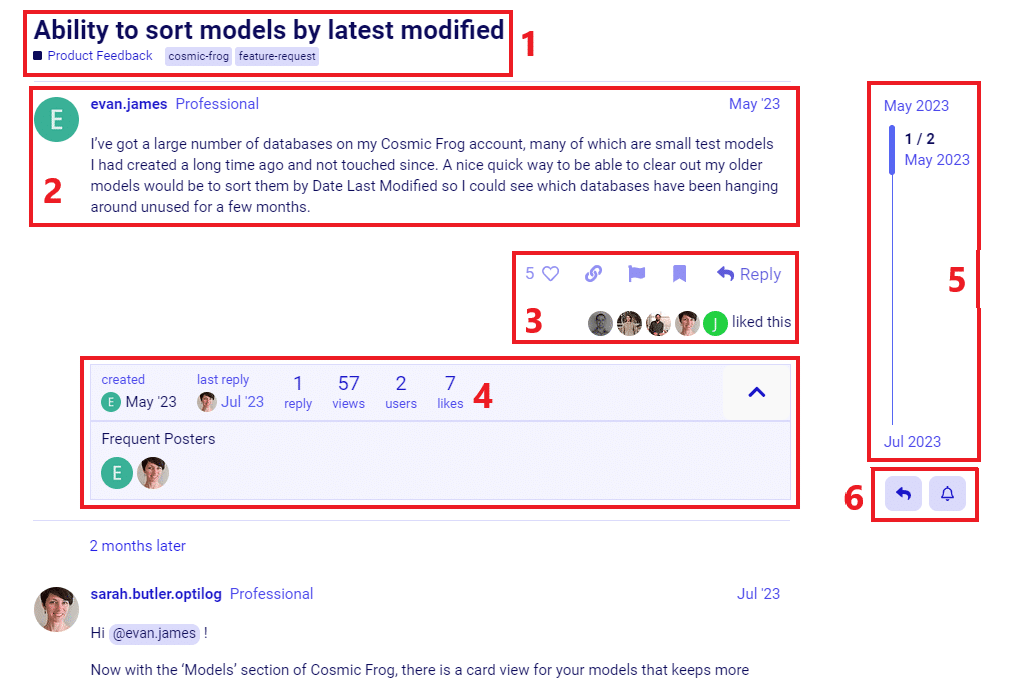
At the top, the title of the Topic is shown; here, the topic “Ability to sort models by latest modified” is being viewed. Underneath the title, we can see the category this topic is posted in, which is Product Feedback in this case. Next to the category, the tags that are associated with this topic are shown. In this case the topic is tagged with the cosmic-frog and feature-request tags.
Then the original post by the original poster is shown, which has the user name (evan.james), the group(s) the user is part of (Professional) and the date when the topic was created (May ’23) at the top and then the text of the post itself. As you will see in the next section, besides text you can also use images, hyperlinks, bullet lists, and other formatting in your posts.
Underneath the text of the post, there are multiple options to interact with this topic as follows, from left to right (note that you may not see the flag and bookmark icons, but an icon with 3 dots instead; click on the icon with 3 dots to see all icons):
Click on the heart icon to like the post.
Click on the chain icon to share a hyperlink of this post. In the pop-up window that comes up you can copy the link, share it via email or create a New Linked Topic on the Frogger Pond Community that links to this post.
Click on the flag icon to privately flag this post for attention to the community staff or to send a private notification to the poster. In the pop-up window that comes up you can choose to do one of the following: send the original poster a private message or notify staff privately that the post is either off-topic, inappropriate, spam or requires attention for another reason.
Click on the bookmark icon to bookmark this post. You can quickly go back to Bookmarked posts from your user account.
Click on the Reply icon to post a reply to this post. You can type your reply, add links and images, use formatting, etc. in the window that pops up. Once your reply is ready click on the Reply button at the left bottom. If you do not want to post it (yet) you can click on Close next to the Reply button and your reply will be saved as a draft.
At the bottom of the post, some statistics around when the topic was created, when the last reply was posted, and how many replies, views, users and likes there have been on this topic are shown. If this part is expanded with the button on the right-hand side, then Frequent Posters in this topic are shown too. You can collapse this part by clicking on the ^ icon.
On the right-hand side of the topic a timeline of the posts within the topic is shown. You can drag this up or down to go to the original post (drag up) or to the most recent reply (drag down) while scrolling through all replies. The timeline will also indicate which post of how many in total within this topic you are currently viewing.
Underneath the topic’s timeline, there are 2 icons:
You can use the curved arrow icon to start a Reply to this topic, which will bring up the same Reply window as the one described under bullet 3.e. above.
You can click on the bell icon to start watching or tracking this topic or to mute it. You have 4 options that pop up when you click on the icon, see the screenshot below. By default, this is set to Normal for all topics.
3. Creating a New Topic
After you click on the “+ New Topic” button, the following window will pop-up at the bottom of your browser:
At the right top of this window, you have the options to make this composer window full screen by clicking on the icon with the 2 arrows pointing out and to minimize the composer window by clicking on the collapse icon (upside down caret).
Type the title of your topic in this box or if this is a topic linked to another one, paste the hyperlink to that other topic here.
Choose one of the 5 categories that this topic belongs to from the list that pops up when you click on the “category…” box.
Click on the “optional tags” box to select and/or search for any tags to associate with your new topic. Tagging topics is good practice so that other users can easily find topics of their interest.
In the edit toolbar, you can, from left to right:
Quote a whole post or part of a post by clicking on the speech bubble icon.
Make text strong (bold) by clicking on the B icon.
Emphasize text (italics) by clicking on the I
Insert a hyperlink by clicking on the chain icon.
Use blockquotes by clicking on the ” icon to define quotations.
Use preformatted text (like for example HTML) by clicking on the </> icon.
Upload something from your computer (like for example an image) by clicking on the upload icon (arrow pointing up).
Create a bulleted list by clicking on the icon with 3 lines and square bullets.
Create a numbered list by clicking on the icon with 3 lines and number bullets.
Use emojis by clicking on the smiley face icon.
Access settings by clicking on the gear icon.
Enter your text in this area. You can use the icons on the edit toolbar to format, and you can also drag or paste images here.
Once your post is ready, you can click on the Create Topic button to post it. If you do not want to post it yet, you can click on the Close button to save it as a draft to come back to later.
4. Options from the Menu
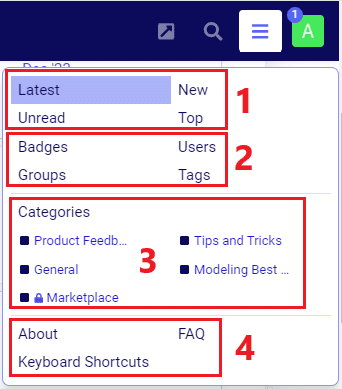
The third icon at the top right of the homepage opens a Menu that you can use to quickly navigate to different parts of the Frogger Pond Community.
In the top part of the menu, you have following options to navigate to:
Latest – takes you to the homepage where the topics are sorted by topics with the most recent posts.
New – takes you to the homepage where only new topics in the last few days are shown. In your Preferences you can change what is considered new.
Unread – takes you to your unread topics. In your Preferences you can change what is considered unread.
Top – takes you to the homepage where the topics are sorted for those with the most activity.
In the second part of the menu, you have options to start exploring following:
Badges – takes you to the Badges page where it is shown which badges users can earn and how. For each badge it also shows you how often the badge has been granted to a user with a counter at the right top. The badges that you have earned yourself already are shown with a green check mark at the left top.
Users – this takes you to a list of users which are sorted by most active in the last week. You can change the timeframe to look at most active users by year, quarter, month, or day instead or over all time of the community. You can sort the list in different ways by clicking on the column headings of username, likes received, likes given, topics created, topics posted, topics viewed, posts read, and days visited. There are also options to filter the list by username or to find the users of any groups. Clicking on a username in this list opens a window with some of the user’s details and the option to private message them. From here, clicking on their username takes you to the user’s profile page where you can view the user’s profile details, Summary, Activity and Badges. Some of this is discussed in more detail in the next section “5. Managing your User Account”.
Groups – takes you to the page where the existing Frogger Pond groups are listed. You can click on a group to see its members, activity, and permissions.
Tags – takes you to a list of all the tags that have been used on any of the topics. You can click on a tag to show you all topics that have that tag associated with them.
In the Categories section of the menu, you can click on one of the 5 categories to be taken to the topics within that category.
From the bottom part of the menu, you can navigate to:
About – here you can find a description of Optilogic and an overview of the Admins, Moderators and Site Statistics for the Frogger Pond Community. From here you can also easily navigate to the FAQ, Terms of Service, and Privacy sections.
FAQ – this takes you to guidelines on how everyone can ensure to be a constructive and civil user of the Frogger Pond Community. This is a recommended read for all new users.
Keyboard Shortcuts –this opens a list of keyboard shortcuts that are available to Frogger Pond Community users. These shortcuts make browsing and interacting with the community easier and quicker.
5. Managing your User Account
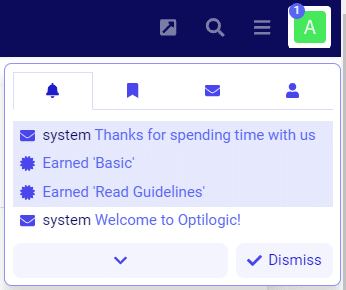
When you click on your profile picture at the top right of the homepage, a small window that gives you quick access to (from left to right) Notifications (bell icon), Bookmarks (bookmark icon), Messages (envelope icon), and Preferences (person icon) opens up:
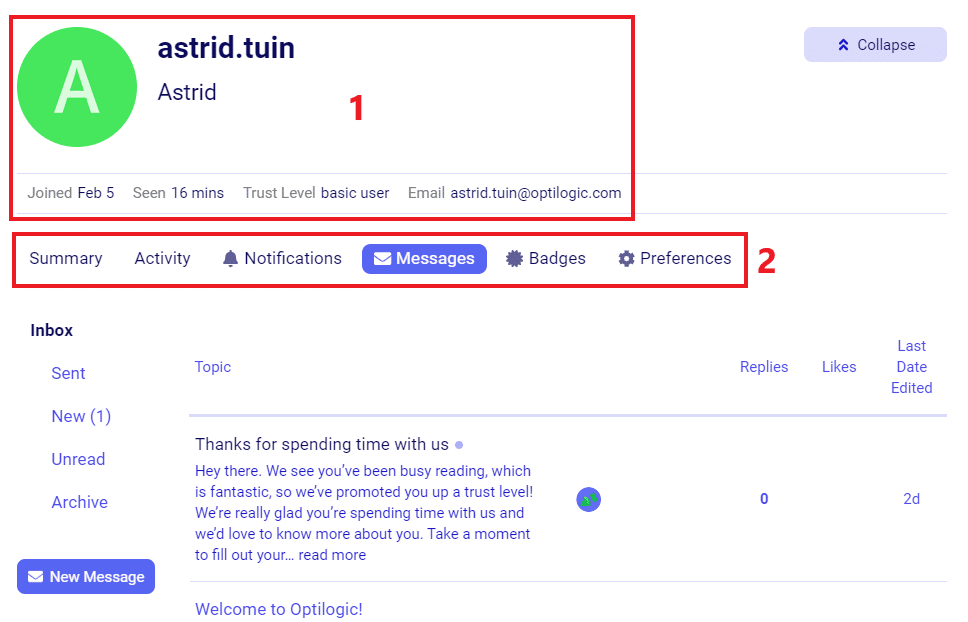
If you click on the upside-down caret at the bottom of notifications, bookmarks, or messages or click on any item in the preferences list, you will be taken to that area of your account. In the following screenshot, we have gone to the Messages section of the user account:
At the top of the Account page the username and profile picture (if any) are shown. If this section is expanded by clicking on the Expand button at the top right, then statistics on when the user joined, when they were last seen, what their trust level is (more on this in the next section “6. Recommended Reading for New Users”), and their email address are shown too.
Users can navigate to different parts of their account here by clicking on:
Summary – here the user’s statistics on how often they have visited, number of topics viewed/read, likes given/received, top replies & topics, top badges, etc. are shown.
Activity – the user’s activity can be viewed and accessed here. From the menu on the left, you can quickly go to your Topics, Replies, Read posts, Drafts, Likes, and Bookmarks.
Notifications – by default All notifications will be shown here which includes emails that have been sent to the user. These can be dismissed if the user so chooses. From the menu on the left the Notifications can be filtered for Responses, Likes, Mentions, and Edits.
Messages – this shows the messages the user has received and sent. By default, the Inbox is shown and from the Menu on the left, user can choose to just look at Sent, New, Unread or Archived messages. You can use the New Message button at the bottom of this menu to send a private message to another user.
Badges – any badges the user has been granted will be shown here.
Preferences – here the Account details of the user will be displayed and can be edited. Accessible here also from the Menu on the left are Security, Profile, Emails, Notifications, and Interface settings. Under Notifications a user can specify what they consider new topics and one can also set up a custom notification schedule here. Users can set up watching / tracking / muting of Categories, Users and Tags in this Notifications section.
6. Recommended Reading for New Users
Using a platform you may not be familiar with can be overwhelming. To help new users getting started, we recommend reading the following items. These are also mentioned in the “Welcome to Optilogic!” message all new users of the Frogger Pond Community receive.
We love for our users to connect, keep up to date, learn from and share with other Cosmic Frog users & experts through the Frogger Pond Community! If you have an Optilogic account (see this page on how to create your free account if you do not have one yet), you can use that same account to log into the Frogger Pond Community.
Here, we will describe what the Frogger Pond Community consists of, how to interact with, search, sort, and contribute to Topics, and how to manage your account. Recommended reads for new users are included in the last section too.
1. Frogger Pond Community Homepage
When you login to the Frogger Pond Community, the homepage you see will look similar to the screenshot below:
Clicking on the Frogger Pond Community button at the left top of the screen will take you back to this homepage if you are on any other page within the community.
You can choose how the Topics list is shown to you: you will see all 5 categories if you click on Categories and you can then choose the one you want to explore. The topics will be ordered by most active posts if you click on Top; if you click on Latest, they will be ordered by most recent activity. By default, the Top option is used, which you can also see as the one highlighted in blue in box 5 and is described in bullet 5 further below.
There are 5 categories of Topics in the Frogger Pond Community:
Product Feedback – we love to hear your feedback on the software here, both good and bad! Feature requests can be posted here too.
Modeling Best Practices – if you are new to supply chain design, you can learn from experienced designers and ask your questions here. If you are very experienced and can share your insights on how to model certain aspects of a supply chain, please do so here!
Marketplace – have a look here if you are looking for the next step in your supply chain design career. Or, in case you have an interesting opportunity to offer, you can post that here too. You can create new topics in the Marketplace category if you are part of the Professional user group.
Tips and Tricks – share your best shortcuts, videos, and insights on how you use Cosmic Frog, Atlas and the overall Optilogic platform here.
General – for questions or posts that do not fit into the other 4 categories. You are also encouraged to link to interesting articles or posts in this category.
At the right top there are a few buttons as follows:
The arrow button takes you to the Optilogic platform.
The magnifying glass button opens a search box where you can type your search term to find topics of interest. You can also click on the icon on the right side in the search box that takes you to an advanced search form where you can for example filter for certain tags, a certain date range, etc.
The button with 3 horizontal bars opens a menu where you can quickly go to different parts of the Frogger Pond Community. We will discuss the options here in section “4. Options from the Menu” further below.
The 4th button is your profile picture and here you can get to your Notifications, Bookmarks, Messages, and Preferences. Section “5. Managing your User Account” covers this in more detail.
In this area you can filter out and sort the topics that are being shown.
The first filter on the left can be used to look at 1 of the 5 categories only or to look at topics from all categories.
The second filter can be used to select or search for certain tags so that only topics with those tags are shown in the topics list.
You can click on any of the next 5 buttons to order the list of topics differently, the one that is selected will appear as a blue box with white letters.
Top: shows you the most active topics in the last year, month, week, or day.
Categories: shows all topics grouped by category.
Latest: shows the topics ordered by most recent posts.
New: shows the topics created in the last few days. By default, this is set to the last 2 days, you can change this in your Preferences.
Unread: will show topics that you are watching or tracking that have unread posts. Again, you can change what is considered Unread in your Preferences.
If you have selected Top as the way to order the Topics list (see previous bullet), then you can change if you want to look at the top comments over all time or over the last year, quarter, month, week, or day here.
This is the Topics list itself, where you can click on any of the Topics to open them and start interacting with them. You can sort the topics list by clicking on Replies, Likes or Date Last Edited at the right top of the Topics list. Clicking once will order them in descending number of replies / likes order and most recent date to last edited; clicking on them again will reverse the order to number of replies / likes in ascending order and from last to most recent date edited. We will discuss what you see and how to interact within a topic in the next section titled “2. Interacting with a Topic”.
Click on this “+ New Topic” button if you want to create a new topic yourself. The form that opens up and how to fill it out is detailed in section “3. Creating a New Topic”.
2. Interacting with a Topic
Once you have clicked on a topic that you want to read and possibly interact with, you will see something similar to the following screenshot:
At the top, the title of the Topic is shown; here, the topic “Ability to sort models by latest modified” is being viewed. Underneath the title, we can see the category this topic is posted in, which is Product Feedback in this case. Next to the category, the tags that are associated with this topic are shown. In this case the topic is tagged with the cosmic-frog and feature-request tags.
Then the original post by the original poster is shown, which has the user name (evan.james), the group(s) the user is part of (Professional) and the date when the topic was created (May ’23) at the top and then the text of the post itself. As you will see in the next section, besides text you can also use images, hyperlinks, bullet lists, and other formatting in your posts.
Underneath the text of the post, there are multiple options to interact with this topic as follows, from left to right (note that you may not see the flag and bookmark icons, but an icon with 3 dots instead; click on the icon with 3 dots to see all icons):
Click on the heart icon to like the post.
Click on the chain icon to share a hyperlink of this post. In the pop-up window that comes up you can copy the link, share it via email or create a New Linked Topic on the Frogger Pond Community that links to this post.
Click on the flag icon to privately flag this post for attention to the community staff or to send a private notification to the poster. In the pop-up window that comes up you can choose to do one of the following: send the original poster a private message or notify staff privately that the post is either off-topic, inappropriate, spam or requires attention for another reason.
Click on the bookmark icon to bookmark this post. You can quickly go back to Bookmarked posts from your user account.
Click on the Reply icon to post a reply to this post. You can type your reply, add links and images, use formatting, etc. in the window that pops up. Once your reply is ready click on the Reply button at the left bottom. If you do not want to post it (yet) you can click on Close next to the Reply button and your reply will be saved as a draft.
At the bottom of the post, some statistics around when the topic was created, when the last reply was posted, and how many replies, views, users and likes there have been on this topic are shown. If this part is expanded with the button on the right-hand side, then Frequent Posters in this topic are shown too. You can collapse this part by clicking on the ^ icon.
On the right-hand side of the topic a timeline of the posts within the topic is shown. You can drag this up or down to go to the original post (drag up) or to the most recent reply (drag down) while scrolling through all replies. The timeline will also indicate which post of how many in total within this topic you are currently viewing.
Underneath the topic’s timeline, there are 2 icons:
You can use the curved arrow icon to start a Reply to this topic, which will bring up the same Reply window as the one described under bullet 3.e. above.
You can click on the bell icon to start watching or tracking this topic or to mute it. You have 4 options that pop up when you click on the icon, see the screenshot below. By default, this is set to Normal for all topics.
3. Creating a New Topic
After you click on the “+ New Topic” button, the following window will pop-up at the bottom of your browser:
At the right top of this window, you have the options to make this composer window full screen by clicking on the icon with the 2 arrows pointing out and to minimize the composer window by clicking on the collapse icon (upside down caret).
Type the title of your topic in this box or if this is a topic linked to another one, paste the hyperlink to that other topic here.
Choose one of the 5 categories that this topic belongs to from the list that pops up when you click on the “category…” box.
Click on the “optional tags” box to select and/or search for any tags to associate with your new topic. Tagging topics is good practice so that other users can easily find topics of their interest.
In the edit toolbar, you can, from left to right:
Quote a whole post or part of a post by clicking on the speech bubble icon.
Make text strong (bold) by clicking on the B icon.
Emphasize text (italics) by clicking on the I
Insert a hyperlink by clicking on the chain icon.
Use blockquotes by clicking on the ” icon to define quotations.
Use preformatted text (like for example HTML) by clicking on the </> icon.
Upload something from your computer (like for example an image) by clicking on the upload icon (arrow pointing up).
Create a bulleted list by clicking on the icon with 3 lines and square bullets.
Create a numbered list by clicking on the icon with 3 lines and number bullets.
Use emojis by clicking on the smiley face icon.
Access settings by clicking on the gear icon.
Enter your text in this area. You can use the icons on the edit toolbar to format, and you can also drag or paste images here.
Once your post is ready, you can click on the Create Topic button to post it. If you do not want to post it yet, you can click on the Close button to save it as a draft to come back to later.
4. Options from the Menu
The third icon at the top right of the homepage opens a Menu that you can use to quickly navigate to different parts of the Frogger Pond Community.
In the top part of the menu, you have following options to navigate to:
Latest – takes you to the homepage where the topics are sorted by topics with the most recent posts.
New – takes you to the homepage where only new topics in the last few days are shown. In your Preferences you can change what is considered new.
Unread – takes you to your unread topics. In your Preferences you can change what is considered unread.
Top – takes you to the homepage where the topics are sorted for those with the most activity.
In the second part of the menu, you have options to start exploring following:
Badges – takes you to the Badges page where it is shown which badges users can earn and how. For each badge it also shows you how often the badge has been granted to a user with a counter at the right top. The badges that you have earned yourself already are shown with a green check mark at the left top.
Users – this takes you to a list of users which are sorted by most active in the last week. You can change the timeframe to look at most active users by year, quarter, month, or day instead or over all time of the community. You can sort the list in different ways by clicking on the column headings of username, likes received, likes given, topics created, topics posted, topics viewed, posts read, and days visited. There are also options to filter the list by username or to find the users of any groups. Clicking on a username in this list opens a window with some of the user’s details and the option to private message them. From here, clicking on their username takes you to the user’s profile page where you can view the user’s profile details, Summary, Activity and Badges. Some of this is discussed in more detail in the next section “5. Managing your User Account”.
Groups – takes you to the page where the existing Frogger Pond groups are listed. You can click on a group to see its members, activity, and permissions.
Tags – takes you to a list of all the tags that have been used on any of the topics. You can click on a tag to show you all topics that have that tag associated with them.
In the Categories section of the menu, you can click on one of the 5 categories to be taken to the topics within that category.
From the bottom part of the menu, you can navigate to:
About – here you can find a description of Optilogic and an overview of the Admins, Moderators and Site Statistics for the Frogger Pond Community. From here you can also easily navigate to the FAQ, Terms of Service, and Privacy sections.
FAQ – this takes you to guidelines on how everyone can ensure to be a constructive and civil user of the Frogger Pond Community. This is a recommended read for all new users.
Keyboard Shortcuts –this opens a list of keyboard shortcuts that are available to Frogger Pond Community users. These shortcuts make browsing and interacting with the community easier and quicker.
5. Managing your User Account
When you click on your profile picture at the top right of the homepage, a small window that gives you quick access to (from left to right) Notifications (bell icon), Bookmarks (bookmark icon), Messages (envelope icon), and Preferences (person icon) opens up:
If you click on the upside-down caret at the bottom of notifications, bookmarks, or messages or click on any item in the preferences list, you will be taken to that area of your account. In the following screenshot, we have gone to the Messages section of the user account:
At the top of the Account page the username and profile picture (if any) are shown. If this section is expanded by clicking on the Expand button at the top right, then statistics on when the user joined, when they were last seen, what their trust level is (more on this in the next section “6. Recommended Reading for New Users”), and their email address are shown too.
Users can navigate to different parts of their account here by clicking on:
Summary – here the user’s statistics on how often they have visited, number of topics viewed/read, likes given/received, top replies & topics, top badges, etc. are shown.
Activity – the user’s activity can be viewed and accessed here. From the menu on the left, you can quickly go to your Topics, Replies, Read posts, Drafts, Likes, and Bookmarks.
Notifications – by default All notifications will be shown here which includes emails that have been sent to the user. These can be dismissed if the user so chooses. From the menu on the left the Notifications can be filtered for Responses, Likes, Mentions, and Edits.
Messages – this shows the messages the user has received and sent. By default, the Inbox is shown and from the Menu on the left, user can choose to just look at Sent, New, Unread or Archived messages. You can use the New Message button at the bottom of this menu to send a private message to another user.
Badges – any badges the user has been granted will be shown here.
Preferences – here the Account details of the user will be displayed and can be edited. Accessible here also from the Menu on the left are Security, Profile, Emails, Notifications, and Interface settings. Under Notifications a user can specify what they consider new topics and one can also set up a custom notification schedule here. Users can set up watching / tracking / muting of Categories, Users and Tags in this Notifications section.
6. Recommended Reading for New Users
Using a platform you may not be familiar with can be overwhelming. To help new users getting started, we recommend reading the following items. These are also mentioned in the “Welcome to Optilogic!” message all new users of the Frogger Pond Community receive.