

The Run Python task allows you to execute Python scripts within a DataStar macro. You select a script, define its inputs (arguments), and run it as part of your workflow. This is ideal when built-in tasks are insufficient or when you want to reuse existing Python logic.
The Run Python task is especially useful when:
This walkthrough uses the end state of the DataStar Quick Start: Creating a Task using Natural Language guide as a starting point. At that point, a raw_shipments table has been imported and a Run SQL task has produced a customers table with unique customers. We will use a Run Python task to transform customer names from the format CZ1, CZ10, CZ100 to Cust_0001, Cust_0010, Cust_0100 - ensuring alphabetical sort matches customer number order and aligning the prefix with other data sources. The transformation steps are:
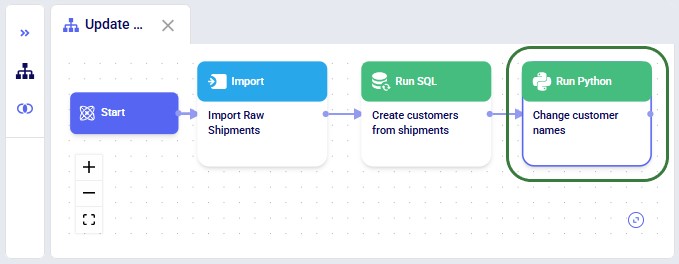
The screenshot below shows the "Change customer names" Run Python task added to the macro:
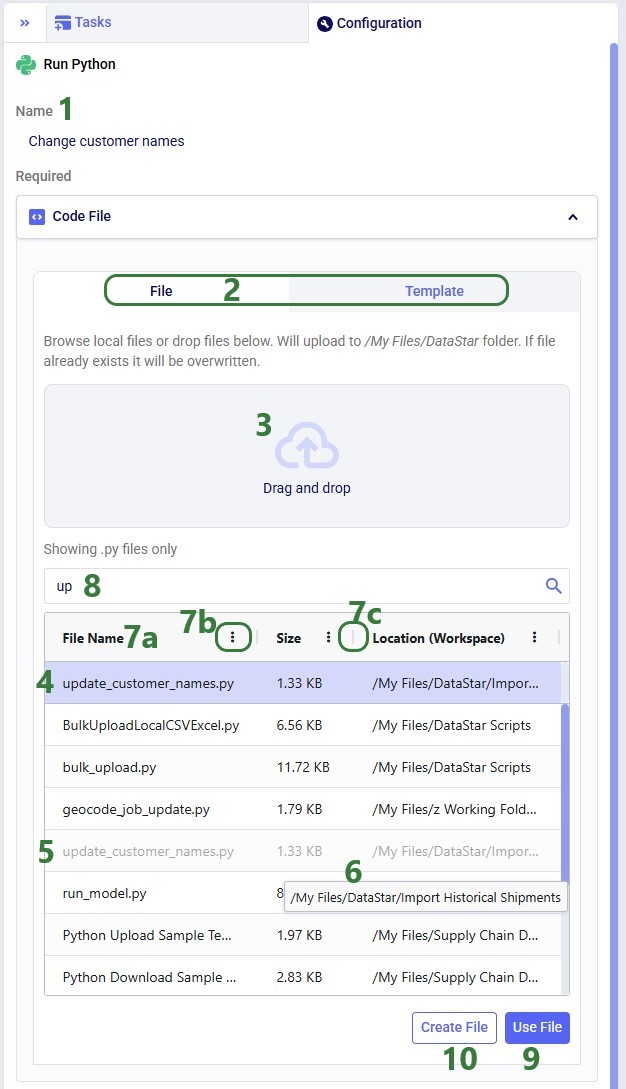
Once a Python task is added to the macro canvas, its configuration tab opens on the right:
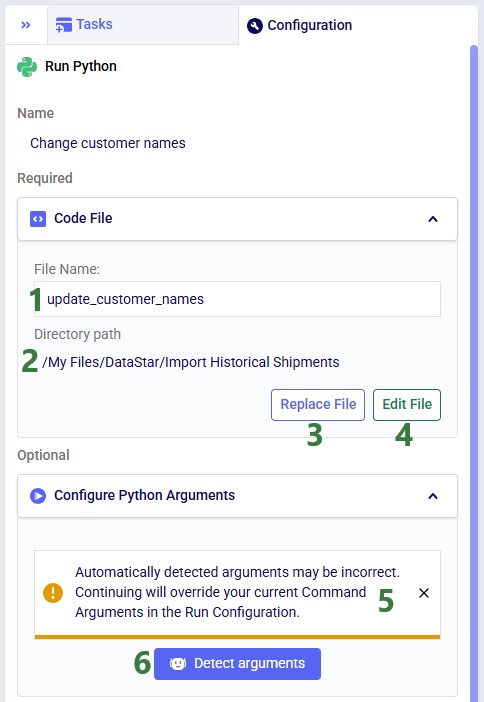
After clicking Use File with update_customer_names.py selected, the configuration updates as follows:
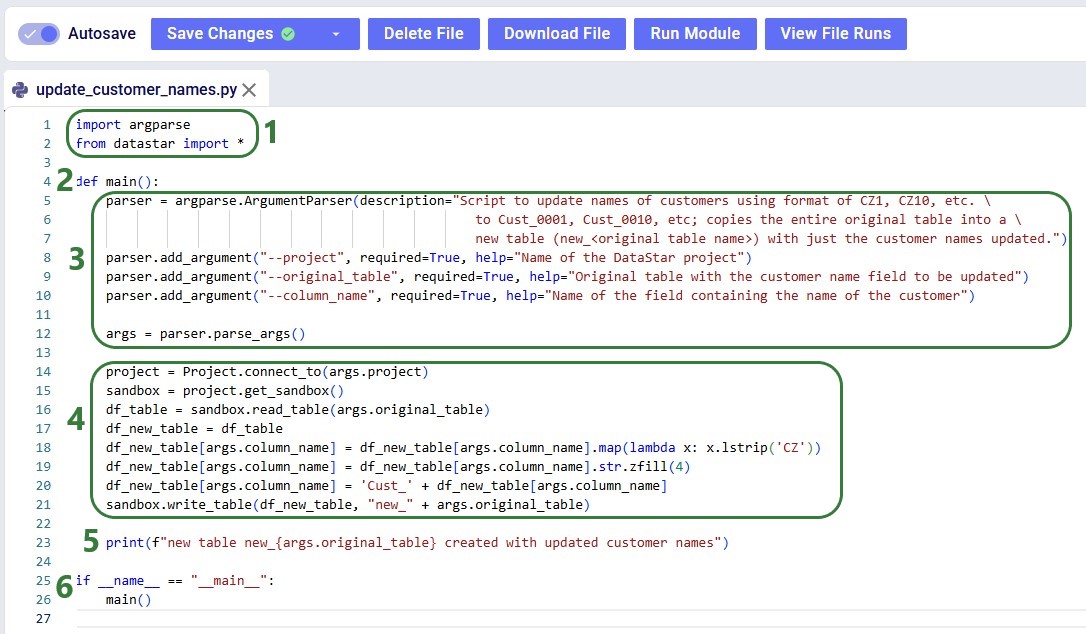
Before configuring arguments, we will cover the update_customer_names.py script. We can review its arguments so we can verify auto-detection is correct and look at the script body to understand what it does. You can copy the full script text from the Appendix.
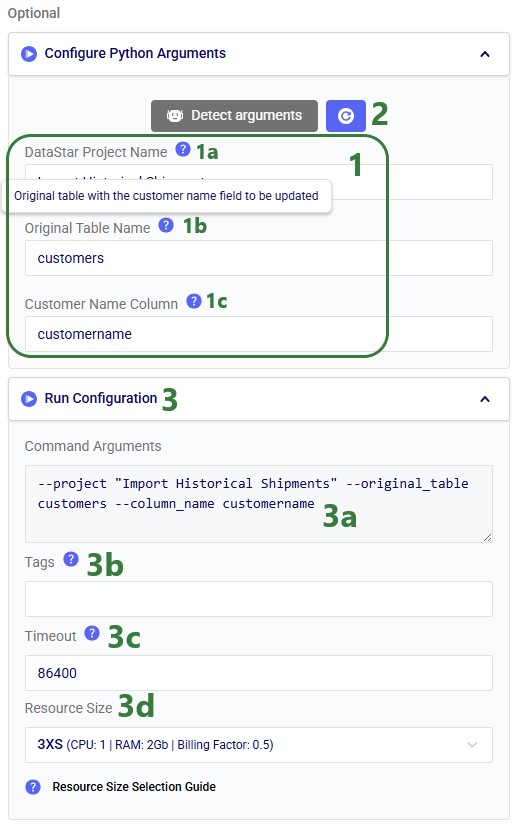
With the script understood, let us use Detect arguments and configure the task:
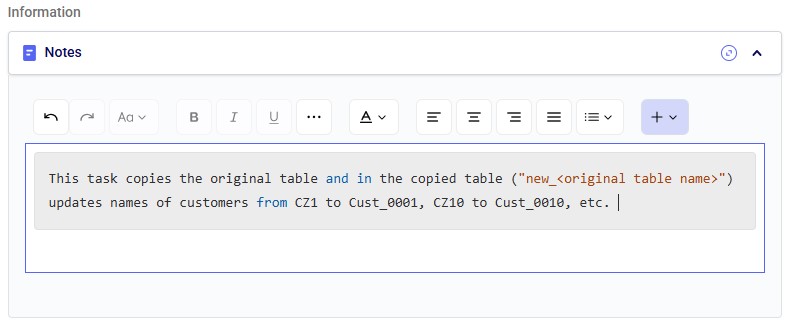
The Notes section is the final configuration area. It is especially valuable for complex tasks or collaborative projects, enabling users to quickly understand what the task does. Formatting options are available above the text box:
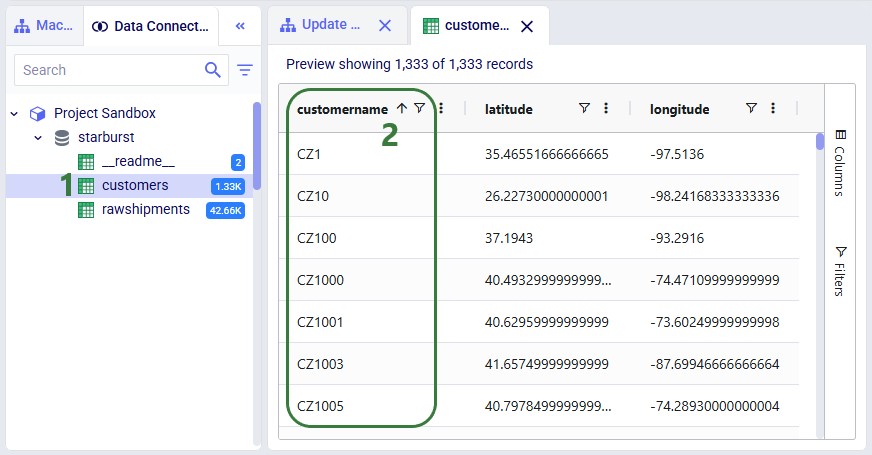
Before running the task, we examine the customers table in the sandbox:
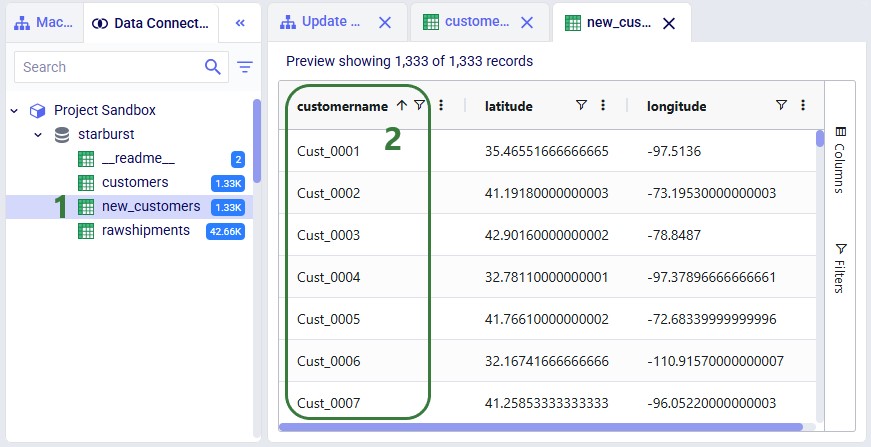
Now run the "Change customer names" task (hover over it on the macro canvas and click the play button) and examine the results:
The Run Manager logs are useful for monitoring progress and troubleshooting:
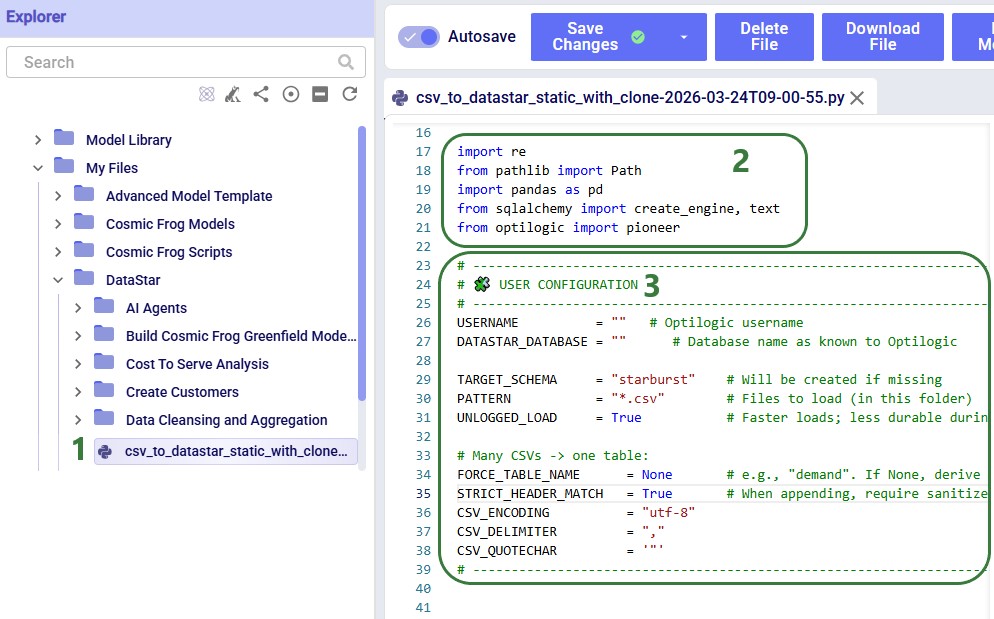
Instead of using an existing file, users can click the Create File button in the Code File area (see bullet 10 underneath the first screenshot of the Code File section) to create a new script directly on the Optilogic platform:
Templates are pre-built scripts available to all users from the Resource Library, covering common import/export patterns. To browse them, open the Resource Library application, filter for DataStar resources (button at the right top) and the Script tag. Clicking a resource also shows available documentation, which can be copied to your Optilogic account or downloaded.
The Python base image used by the Run Python task contains the Python libraries most used in conjunction with DataStar. If your script uses a library that is not included in this base image, you need to create a requirements.txt file and place it in the same location as your Python script. In this file, you need to list the names of the libraries (without quotes), 1 library name per line.
If your script uses a library that is not part of the base image, the Job Error Log of the Python task run will contain the following error: "ModuleNotFoundError: No module named '<module name>'".
Keep the following in mind when developing scripts for Run Python tasks:
As always, our Support team is happy to help with any questions; they can be reached at support@optilogic.com.
Copy the script below into a .py file in your Optilogic account (via the Lightning Editor) and modify it as needed:
import argparse
from datastar import *

def main():
    parser = argparse.ArgumentParser(description="Script to update names of customers using format of CZ1, CZ10, etc. \
                                                    to Cust_0001, Cust_0010, etc; copies the entire original table into a \
                                                    new table (new_<original table name>) with just the customer names updated.")
    parser.add_argument("--project", required=True, help="Name of the DataStar project")
    parser.add_argument("--original_table", required=True, help="Original table with the customer name field to be updated")
    parser.add_argument("--column_name", required=True, help="Name of the field containing the name of the customer")

    args = parser.parse_args()

    project = Project.connect_to(args.project)
    sandbox = project.get_sandbox()
    df_table = sandbox.read_table(args.original_table)
    df_new_table = df_table
    df_new_table[args.column_name] = df_new_table[args.column_name].map(lambda x: x.lstrip('CZ'))
    df_new_table[args.column_name] = df_new_table[args.column_name].str.zfill(4)
    df_new_table[args.column_name] = 'Cust_' + df_new_table[args.column_name]
    sandbox.write_table(df_new_table, "new_" + args.original_table)

    print(f"new table new_{args.original_table} created with updated customer names")

if __name__ == "__main__":
    main()

The Run Python task allows you to execute Python scripts within a DataStar macro. You select a script, define its inputs (arguments), and run it as part of your workflow. This is ideal when built-in tasks are insufficient or when you want to reuse existing Python logic.
The Run Python task is especially useful when:
This walkthrough uses the end state of the DataStar Quick Start: Creating a Task using Natural Language guide as a starting point. At that point, a raw_shipments table has been imported and a Run SQL task has produced a customers table with unique customers. We will use a Run Python task to transform customer names from the format CZ1, CZ10, CZ100 to Cust_0001, Cust_0010, Cust_0100 - ensuring alphabetical sort matches customer number order and aligning the prefix with other data sources. The transformation steps are:
The screenshot below shows the "Change customer names" Run Python task added to the macro:
Once a Python task is added to the macro canvas, its configuration tab opens on the right:
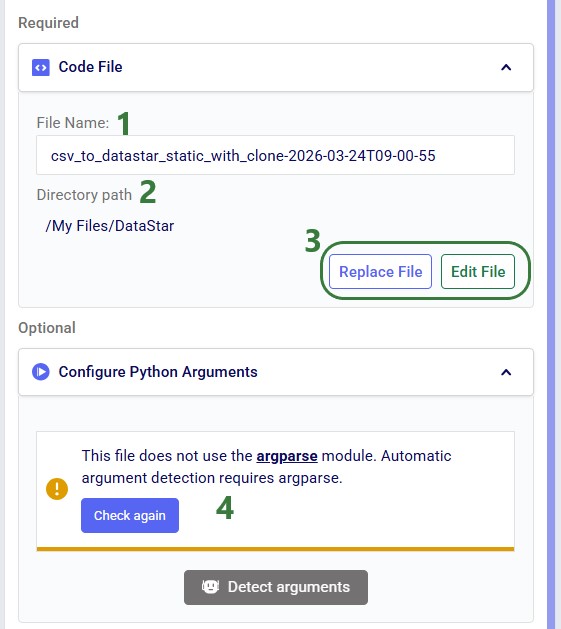
After clicking Use File with update_customer_names.py selected, the configuration updates as follows:
Before configuring arguments, we will cover the update_customer_names.py script. We can review its arguments so we can verify auto-detection is correct and look at the script body to understand what it does. You can copy the full script text from the Appendix.
With the script understood, let us use Detect arguments and configure the task:
The Notes section is the final configuration area. It is especially valuable for complex tasks or collaborative projects, enabling users to quickly understand what the task does. Formatting options are available above the text box:
Before running the task, we examine the customers table in the sandbox:
Now run the "Change customer names" task (hover over it on the macro canvas and click the play button) and examine the results:
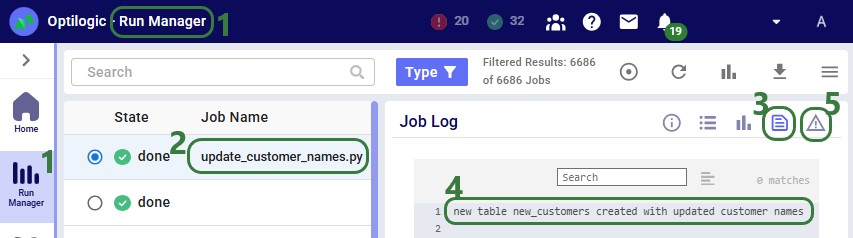
The Run Manager logs are useful for monitoring progress and troubleshooting:
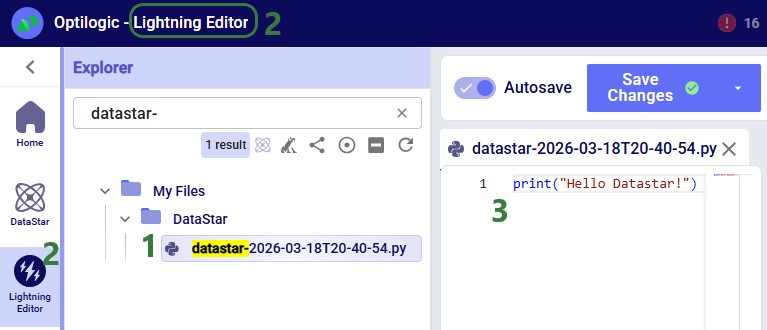
Instead of using an existing file, users can click the Create File button in the Code File area (see bullet 10 underneath the first screenshot of the Code File section) to create a new script directly on the Optilogic platform:
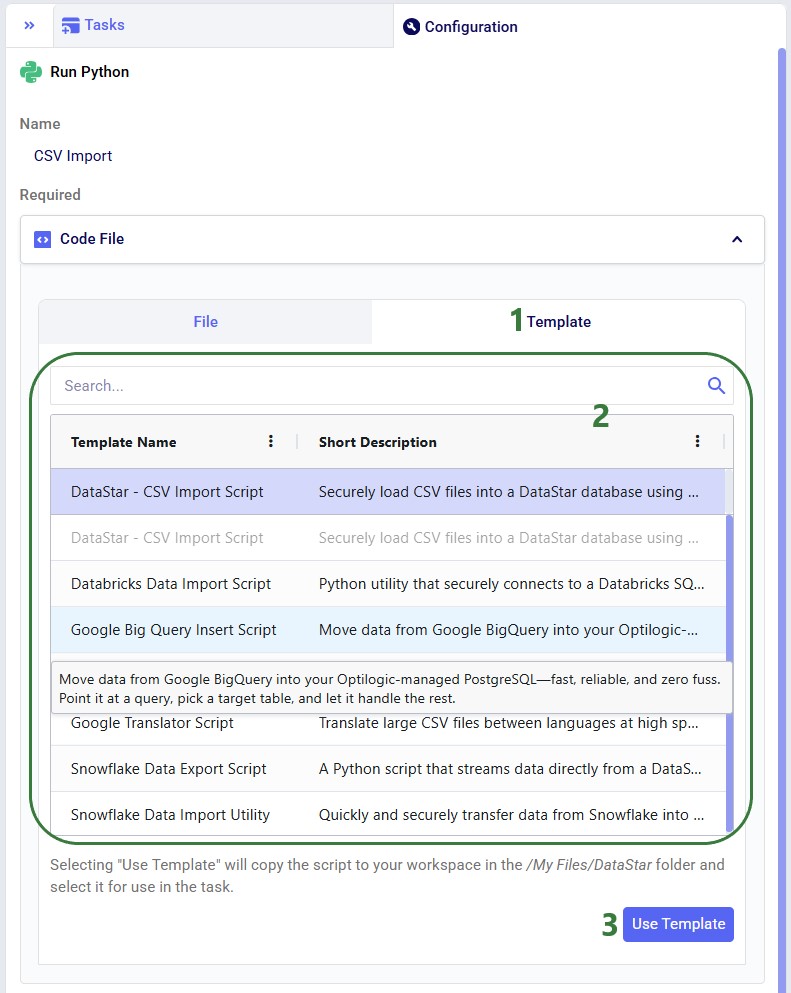
Templates are pre-built scripts available to all users from the Resource Library, covering common import/export patterns. To browse them, open the Resource Library application, filter for DataStar resources (button at the right top) and the Script tag. Clicking a resource also shows available documentation, which can be copied to your Optilogic account or downloaded.
The Python base image used by the Run Python task contains the Python libraries most used in conjunction with DataStar. If your script uses a library that is not included in this base image, you need to create a requirements.txt file and place it in the same location as your Python script. In this file, you need to list the names of the libraries (without quotes), 1 library name per line.
If your script uses a library that is not part of the base image, the Job Error Log of the Python task run will contain the following error: "ModuleNotFoundError: No module named '<module name>'".
Keep the following in mind when developing scripts for Run Python tasks:
As always, our Support team is happy to help with any questions; they can be reached at support@optilogic.com.
Copy the script below into a .py file in your Optilogic account (via the Lightning Editor) and modify it as needed:
import argparse
from datastar import *

def main():
    parser = argparse.ArgumentParser(description="Script to update names of customers using format of CZ1, CZ10, etc. \
                                                    to Cust_0001, Cust_0010, etc; copies the entire original table into a \
                                                    new table (new_<original table name>) with just the customer names updated.")
    parser.add_argument("--project", required=True, help="Name of the DataStar project")
    parser.add_argument("--original_table", required=True, help="Original table with the customer name field to be updated")
    parser.add_argument("--column_name", required=True, help="Name of the field containing the name of the customer")

    args = parser.parse_args()

    project = Project.connect_to(args.project)
    sandbox = project.get_sandbox()
    df_table = sandbox.read_table(args.original_table)
    df_new_table = df_table
    df_new_table[args.column_name] = df_new_table[args.column_name].map(lambda x: x.lstrip('CZ'))
    df_new_table[args.column_name] = df_new_table[args.column_name].str.zfill(4)
    df_new_table[args.column_name] = 'Cust_' + df_new_table[args.column_name]
    sandbox.write_table(df_new_table, "new_" + args.original_table)

    print(f"new table new_{args.original_table} created with updated customer names")

if __name__ == "__main__":
    main()


