This documentation covers how to create and configure DataStar CSV File data connections.
Selecting your Data Source File
After opening DataStar, you can use the Create Data Connection button to add new data connections which can be used by all your DataStar projects:
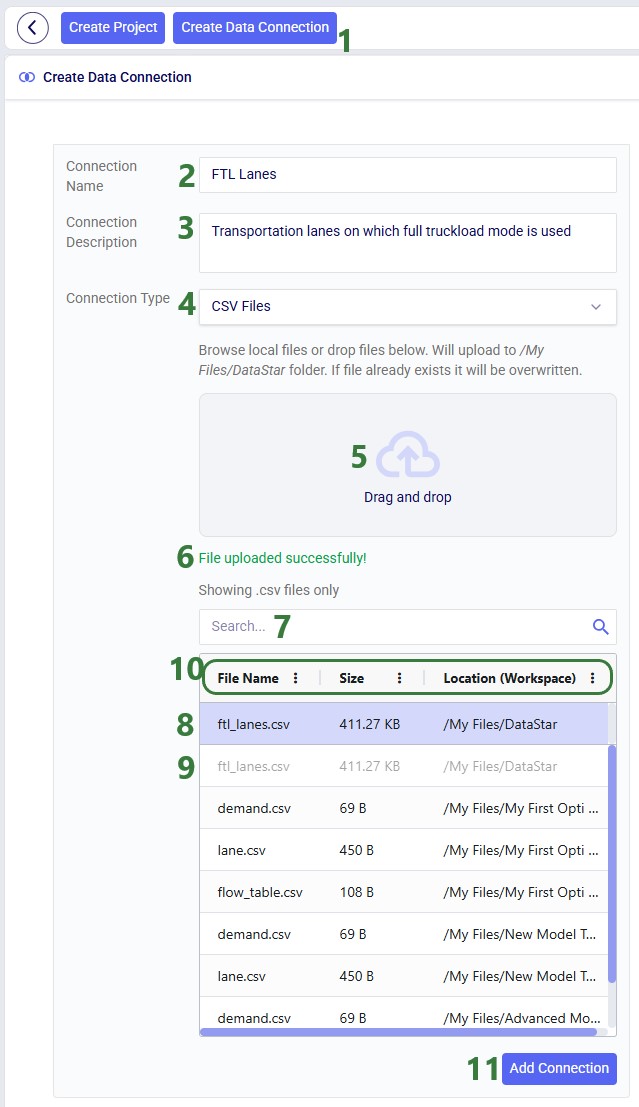
On the DataStar start page, click on the Create Data Connection button which opens the Create Data Connection form.
Type the name for the connection in the Connection Name text box.
Optionally, add a description for the connection in the Connection Description text box. Especially when working with lots of data files and/or collaborating with others, descriptions can be helpful to understand quickly what data is contained in a connection.
Choose the Connection Type from the drop-down list. Options are CSV Files, Excel Files, Cosmic Frog Models, and Postgres Databases. This documentation focuses on the CSV Files connection type.
You can either choose a CSV file already present in your Optilogic account from the list below or drag and drop a file from your local computer on top of this "Drag and Drop" area to upload it to the My Files/DataStar folder in your Optilogic account.
When uploading a file through the drag and drop option, a message confirming successful upload appears here once the upload has completed.
To quickly find the file you want to use for the connection, use this free type Search text box to find CSV files in your account that contain the typed text in their file names.
After clicking on a file in the list, it will appear at the top of the list with a colored background. This is so users can easily see which file they have selected as the file itself could be much further down the list.
The selected file will be greyed out in the list and cannot be clicked on, since it is already the actively selected file.
The list of files contains 3 columns: File Name, Size, and Location. Users can click on the column headings to sort the list by the column's values. Use Ctrl + Shift to sort by multiple columns. Columns can also be resized and dragged to change their order. Click on the 3 vertical dots to bring up a context menu from which additional options for sorting, pinning, auto-sizing, and choosing columns can be accessed.
Once the user has configured the parameters on the right-hand side of the form (not shown in the above screenshot; covered in the screenshots that follow), clicking on the Add Connection button will create the connection.
Configuration Options
On the right-hand side of the Create Data Connection form, configuration options for the creation of the CSV File data connection are available. These will be covered now using the following screenshots.
Parameters
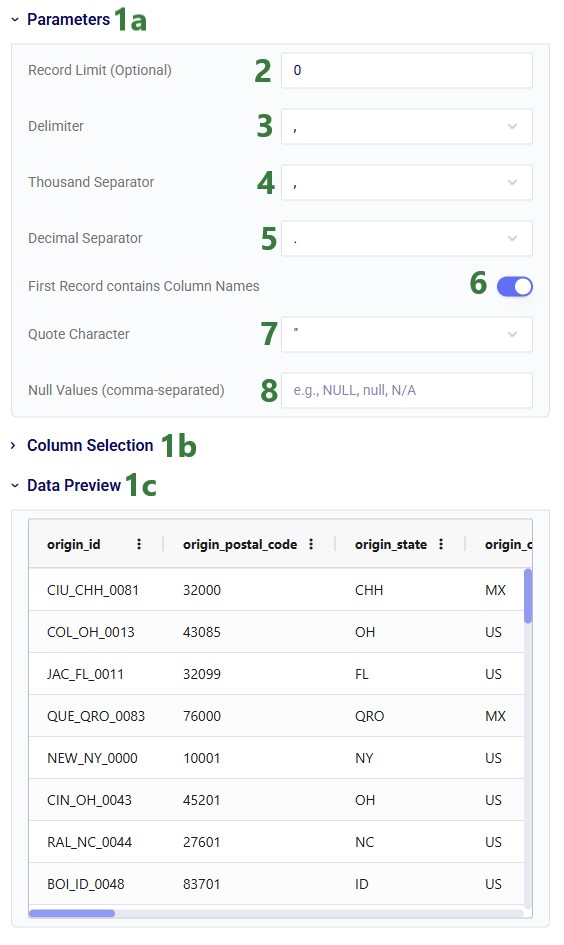
There are 3 different configuration sections; each can be expanded or collapsed by using the caret icon to the left of the section's name.
Parameters - setting these appropriately ensures the data in the CSV file is interpreted correctly.
Column Selection - this allows users to choose a subset of columns to be imported and to change names and data types of columns.
Data Preview - users can see a preview of the data that will be contained in the data connection.
Record Limit (Optional) - if not set or left at the default of 0, all records of the CSV File will be part of the data connection. When setting a limit, for example a limit of 1,000, only the first 1,000 records of the CSV file will be part of the data connection.
Delimiter - choose the character that functions as the character indicating where a column ends and the next begins from the drop-down list. This is most commonly a comma (the default) for CSV files but needs to be updated in case a different character is used.
Thousand Separator - choose the character that is used in the data in the CSV file in numbers over a thousand, in between the 3rd and 4th digit (counting from the first digit before the decimal separator).
Decimal Separator - choose the character that is used in the data in the CSV file in between the last integer digit and first decimal digit.
First Record contains Column Names - when toggled on (the default), the data in the first record in the CSV file will be used as the column names. When off, the columns will be named column_1, column_2, etc., and the first record of the file becomes the first data record in the data connection.
Quote Character - choose the character that is used in the data around string values.
Null Values (comma-separated) - indicate what values in the data should be interpreted as null values. If more than one, use a comma in between them.
Note that when making any changes in these parameters the Data Preview below is immediately updated to take those changes into account. This is helpful to ensure that the parameters are set correctly.
Column Selection
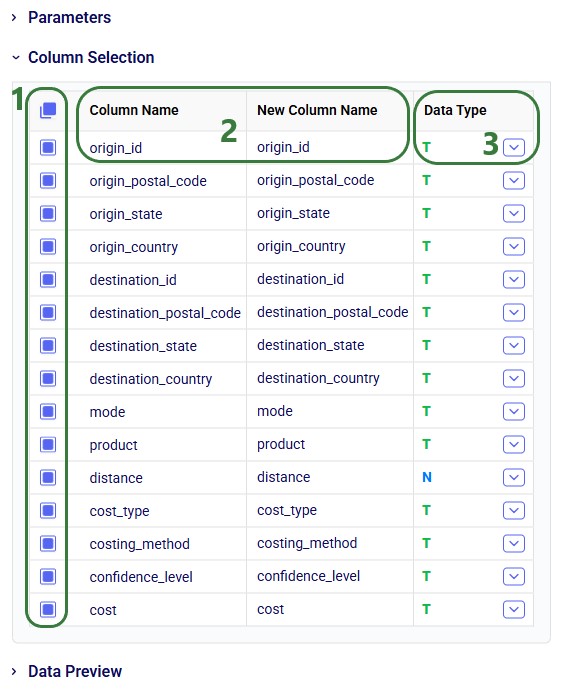
Next, we will look at the Column Selection area, which was collapsed (the default) in the previous screenshot, but is expanded in the next one:
Selection - using these checkboxes, users can indicate which columns to use in the Data Connection. Use the checkbox at the top to simultaneously enable or disable all checkboxes of all columns.
Column Name and New Column Name - this first column shows the name of the column in the original CSV file. In the second column, users can overwrite this original name by typing in a new name. This new name will be used as the column name in the data connection.
Data Type - the current data type of the column is shown here: t for text, n for number, b for Boolean, and d for date. The data type can be changed to a different one by selecting the new data type from the drop-down list, see the next screenshot.
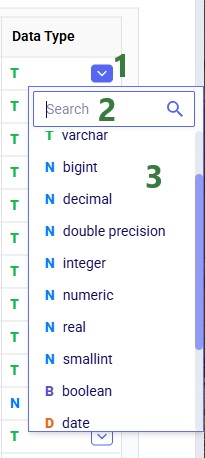
The drop-down list that comes up when clicking on the caret icon in a data type field is shown in this screenshot:
Open the drop-down list by clicking on the caret icon.
To quickly find the data type of interest, users can type part of the name of the data type they are looking for in this Search text box.
Part of the list of available data types is shown here. Note that multiple different text, number, and date types are available.
Just as with the Parameters section, making changes in this Column Selection section updates the Data Preview automatically.
Data Preview
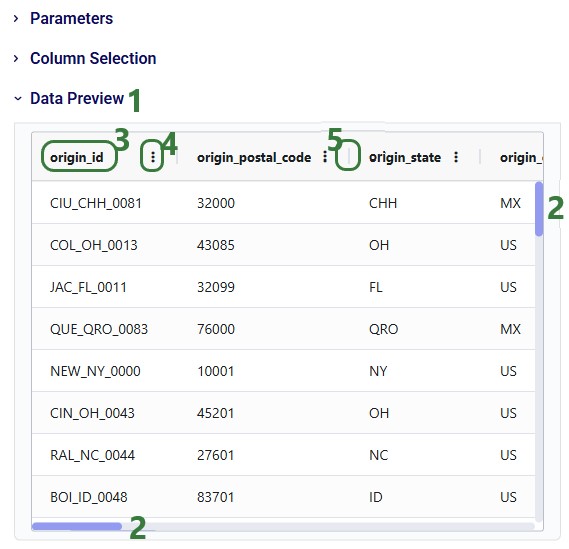
Finally, the Data Preview section shows a preview of the data as it is currently configured based on the Parameters and Column Selection sections:
The Data Preview section is expanded.
You may need to use the horizontal and vertical scroll bars to see the whole Data Preview.
The column order can be changed by dragging and dropping the column headers. The data can also be sorted by clicking on the column headers. To sort by multiple columns, hold down Ctrl + Shift when clicking on the column headers that you want to sort by.
Click on the icon with 3 vertical dots to bring up a context menu which gives access to additional column sort, pin, auto-size, and selection options.
To adjust column width, hover over the vertical field divider until the cursor becomes 2 arrows pointing away from each other, then click and move the cursor left or right to make the field narrower or wider.
Once the configuration of the data connection is finalized, click on the blue Add Connection button, shown in the first screenshot above, to create the CSV data connection.
Other Helpful Resources
Learn all about DataStar from the Navigating DataStar section on Optilogic's Help Center.
This documentation covers how to create and configure DataStar CSV File data connections.
Selecting your Data Source File
After opening DataStar, you can use the Create Data Connection button to add new data connections which can be used by all your DataStar projects:
On the DataStar start page, click on the Create Data Connection button which opens the Create Data Connection form.
Type the name for the connection in the Connection Name text box.
Optionally, add a description for the connection in the Connection Description text box. Especially when working with lots of data files and/or collaborating with others, descriptions can be helpful to understand quickly what data is contained in a connection.
Choose the Connection Type from the drop-down list. Options are CSV Files, Excel Files, Cosmic Frog Models, and Postgres Databases. This documentation focuses on the CSV Files connection type.
You can either choose a CSV file already present in your Optilogic account from the list below or drag and drop a file from your local computer on top of this "Drag and Drop" area to upload it to the My Files/DataStar folder in your Optilogic account.
When uploading a file through the drag and drop option, a message confirming successful upload appears here once the upload has completed.
To quickly find the file you want to use for the connection, use this free type Search text box to find CSV files in your account that contain the typed text in their file names.
After clicking on a file in the list, it will appear at the top of the list with a colored background. This is so users can easily see which file they have selected as the file itself could be much further down the list.
The selected file will be greyed out in the list and cannot be clicked on, since it is already the actively selected file.
The list of files contains 3 columns: File Name, Size, and Location. Users can click on the column headings to sort the list by the column's values. Use Ctrl + Shift to sort by multiple columns. Columns can also be resized and dragged to change their order. Click on the 3 vertical dots to bring up a context menu from which additional options for sorting, pinning, auto-sizing, and choosing columns can be accessed.
Once the user has configured the parameters on the right-hand side of the form (not shown in the above screenshot; covered in the screenshots that follow), clicking on the Add Connection button will create the connection.
Configuration Options
On the right-hand side of the Create Data Connection form, configuration options for the creation of the CSV File data connection are available. These will be covered now using the following screenshots.
Parameters
There are 3 different configuration sections; each can be expanded or collapsed by using the caret icon to the left of the section's name.
Parameters - setting these appropriately ensures the data in the CSV file is interpreted correctly.
Column Selection - this allows users to choose a subset of columns to be imported and to change names and data types of columns.
Data Preview - users can see a preview of the data that will be contained in the data connection.
Record Limit (Optional) - if not set or left at the default of 0, all records of the CSV File will be part of the data connection. When setting a limit, for example a limit of 1,000, only the first 1,000 records of the CSV file will be part of the data connection.
Delimiter - choose the character that functions as the character indicating where a column ends and the next begins from the drop-down list. This is most commonly a comma (the default) for CSV files but needs to be updated in case a different character is used.
Thousand Separator - choose the character that is used in the data in the CSV file in numbers over a thousand, in between the 3rd and 4th digit (counting from the first digit before the decimal separator).
Decimal Separator - choose the character that is used in the data in the CSV file in between the last integer digit and first decimal digit.
First Record contains Column Names - when toggled on (the default), the data in the first record in the CSV file will be used as the column names. When off, the columns will be named column_1, column_2, etc., and the first record of the file becomes the first data record in the data connection.
Quote Character - choose the character that is used in the data around string values.
Null Values (comma-separated) - indicate what values in the data should be interpreted as null values. If more than one, use a comma in between them.
Note that when making any changes in these parameters the Data Preview below is immediately updated to take those changes into account. This is helpful to ensure that the parameters are set correctly.
Column Selection
Next, we will look at the Column Selection area, which was collapsed (the default) in the previous screenshot, but is expanded in the next one:
Selection - using these checkboxes, users can indicate which columns to use in the Data Connection. Use the checkbox at the top to simultaneously enable or disable all checkboxes of all columns.
Column Name and New Column Name - this first column shows the name of the column in the original CSV file. In the second column, users can overwrite this original name by typing in a new name. This new name will be used as the column name in the data connection.
Data Type - the current data type of the column is shown here: t for text, n for number, b for Boolean, and d for date. The data type can be changed to a different one by selecting the new data type from the drop-down list, see the next screenshot.
The drop-down list that comes up when clicking on the caret icon in a data type field is shown in this screenshot:
Open the drop-down list by clicking on the caret icon.
To quickly find the data type of interest, users can type part of the name of the data type they are looking for in this Search text box.
Part of the list of available data types is shown here. Note that multiple different text, number, and date types are available.
Just as with the Parameters section, making changes in this Column Selection section updates the Data Preview automatically.
Data Preview
Finally, the Data Preview section shows a preview of the data as it is currently configured based on the Parameters and Column Selection sections:
The Data Preview section is expanded.
You may need to use the horizontal and vertical scroll bars to see the whole Data Preview.
The column order can be changed by dragging and dropping the column headers. The data can also be sorted by clicking on the column headers. To sort by multiple columns, hold down Ctrl + Shift when clicking on the column headers that you want to sort by.
Click on the icon with 3 vertical dots to bring up a context menu which gives access to additional column sort, pin, auto-size, and selection options.
To adjust column width, hover over the vertical field divider until the cursor becomes 2 arrows pointing away from each other, then click and move the cursor left or right to make the field narrower or wider.
Once the configuration of the data connection is finalized, click on the blue Add Connection button, shown in the first screenshot above, to create the CSV data connection.
Other Helpful Resources
Learn all about DataStar from the Navigating DataStar section on Optilogic's Help Center.