

DataStar users can take advantage of the datastar Python library, which gives users access to DataStar projects, macros, tasks, and connections through Python scripts. This way users can build, access, and run their DataStar workflows programmatically. The library can be used in a user’s own Python environment (local or on the Optilogic platform), and it can also be used in Run Python tasks in a DataStar macro.
In this documentation we will cover how to use the library through multiple examples. At the end, we will step through an end-to-end script that creates a new project, adds a macro to the project, and creates multiple tasks that are added to the macro. The script then runs the macro while giving regular updates on its progress.
Before diving into the details of this article, it is recommended to read this “Setup: Python Scripts for Cosmic Frog and DataStar” article first; it explains what users need to do in terms of setup before they can run Python scripts using the datastar library. To learn more about the DataStar application itself, please see these articles on Optilogic’s Help Center.
Succinct documentation in PDF format of all datastar library functionality can be downloaded here (please note that the long character string at the beginning of the filename is expected). This includes a list of all available properties and methods for the Project, Macro, Task, and Connection classes at the end of the document.
All Python code that is shown in the screenshots throughout this documentation is available in the Appendix, so that you can copy-paste from there if you want to run the exact same code in your own Python environment and/or use these as jumping off points for your own scripts.
If you have reviewed the “Setup: Python Scripts for Cosmic Frog and DataStar” article and are set up with your local or online Python environment, we are ready to dive in! First, we will see how we can interrogate existing projects and macros using Python and the datastar library. We want to find out which DataStar projects are already present in the user’s Optilogic account.
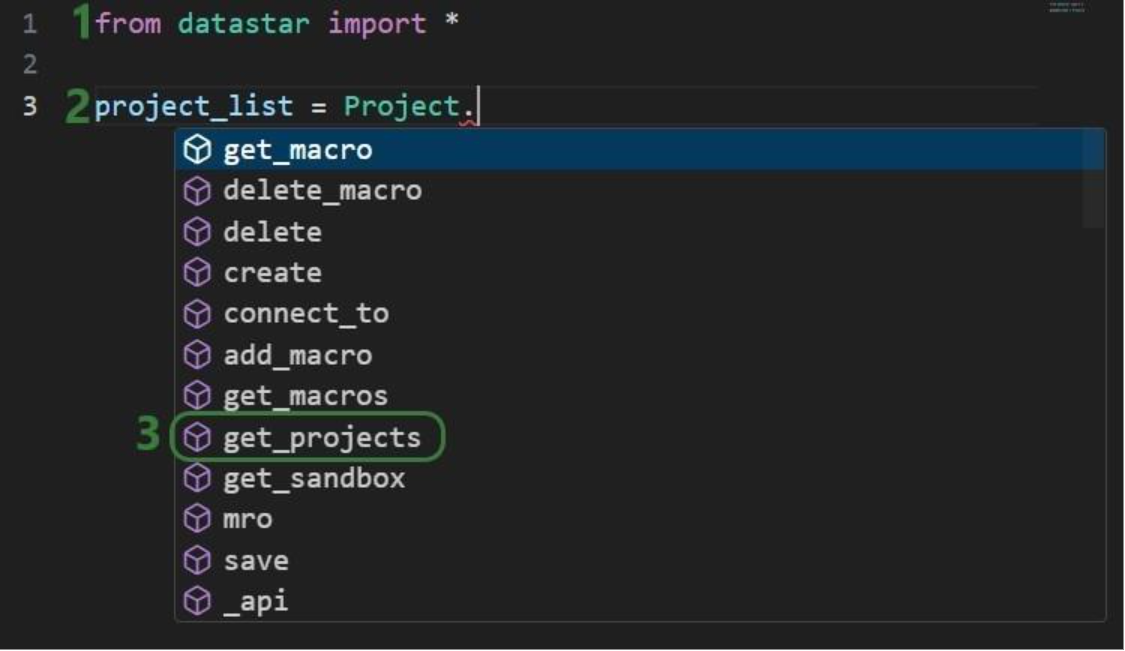

Once the parentheses are typed, hover text comes up with information about this function. It tells us that the outcome of this method will be a list of strings, and the description of the method reads “Retrieve all project names visible to the authenticated user”. Most methods will have similar hover text describing the method, the arguments it takes and their default values, and the output format.
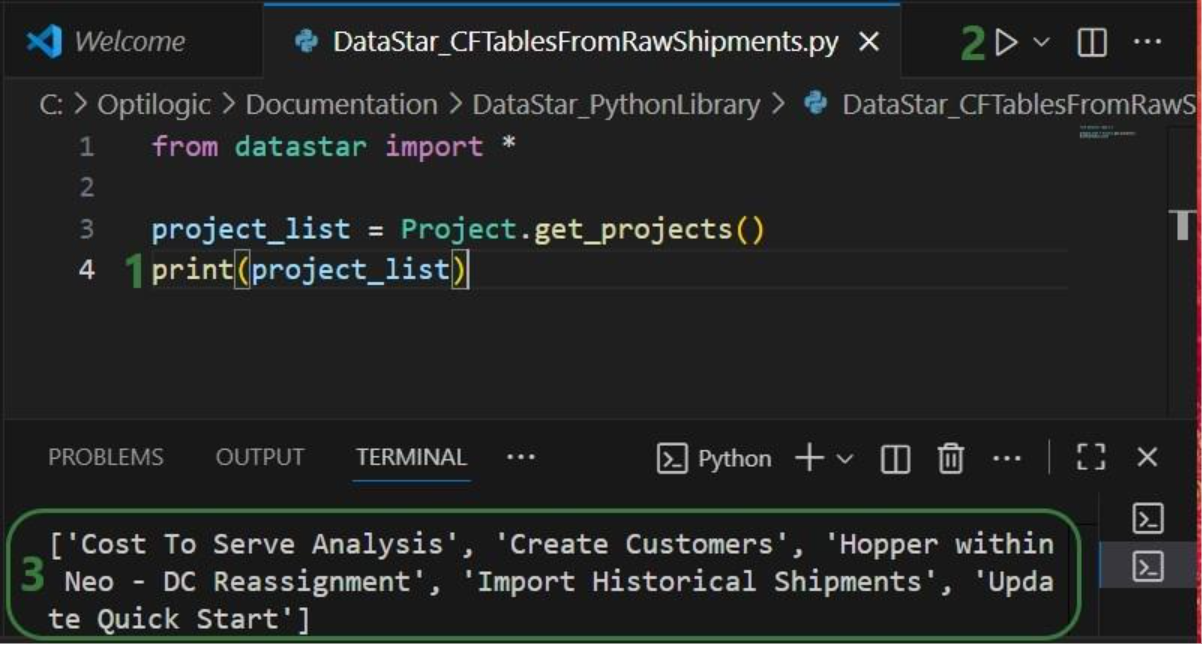
Now that we have a variable that contains the list of DataStar projects in the user account, we want to view the value of this variable:
Next, we want to dig one level deeper and for the “Import Historical Shipments” project find out what macros it contains:

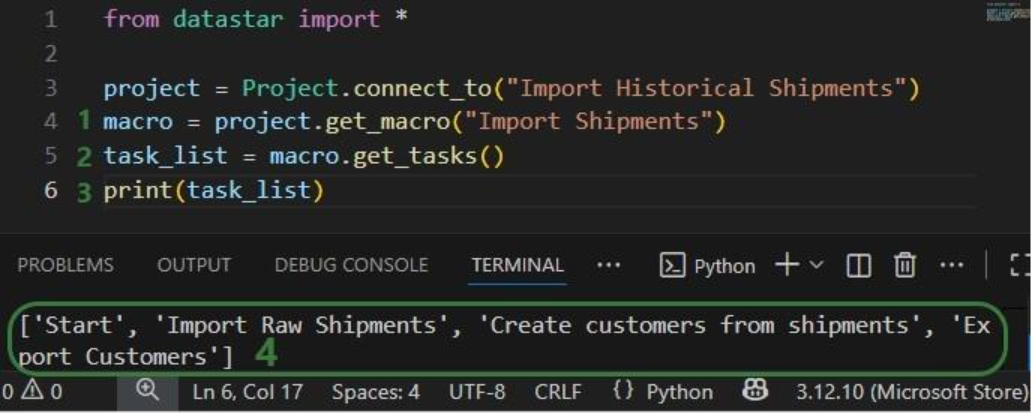
Finally, we will retrieve the tasks this “Import Shipments” macro contains in a similar fashion:
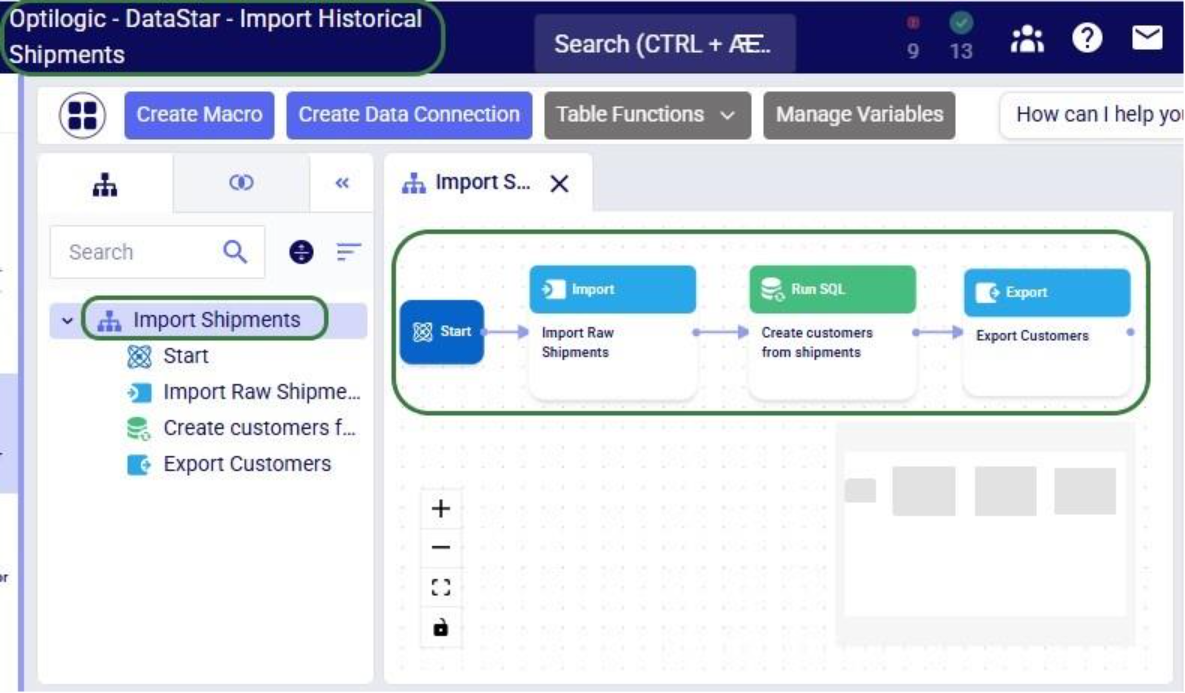
In addition, we can have a quick look in the DataStar application to see that the information we are getting from the small scripts above matches what we have in our account in terms of projects (first screenshot below), and the “Import Shipments” macro plus its tasks in the “Import Historical Shipments” project (second screenshot below):

Besides getting information about projects and macros, other useful methods for projects and macros include:
Note that when creating new objects (projects, macros, tasks or connections) these are automatically saved. If existing objects are modified, their changes need to be committed by using the save method.
Macros can be copied, either within the same project or into a different project. Tasks can also be copied, either within the same macro, between macros in the same project, or between macros of different projects. If a task is copied within the same macro, its name will automatically be suffixed with (Copy).
As an example, we will consider a macro called “Cost Data” in a project named “Data Cleansing and Aggregation NA Model”, which is configured as follows:

The North America team shows this macro to their EMEA counterparts who realize that they could use part of this for their purposes, as their transportation cost data has the same format as that of the NA team. Instead of manually creating a new macro with new tasks that duplicate the 3 transportation cost related ones, they decide to use a script where first the whole macro is copied to a new project, and then the 4 tasks which are not relevant for the EMEA team are deleted:

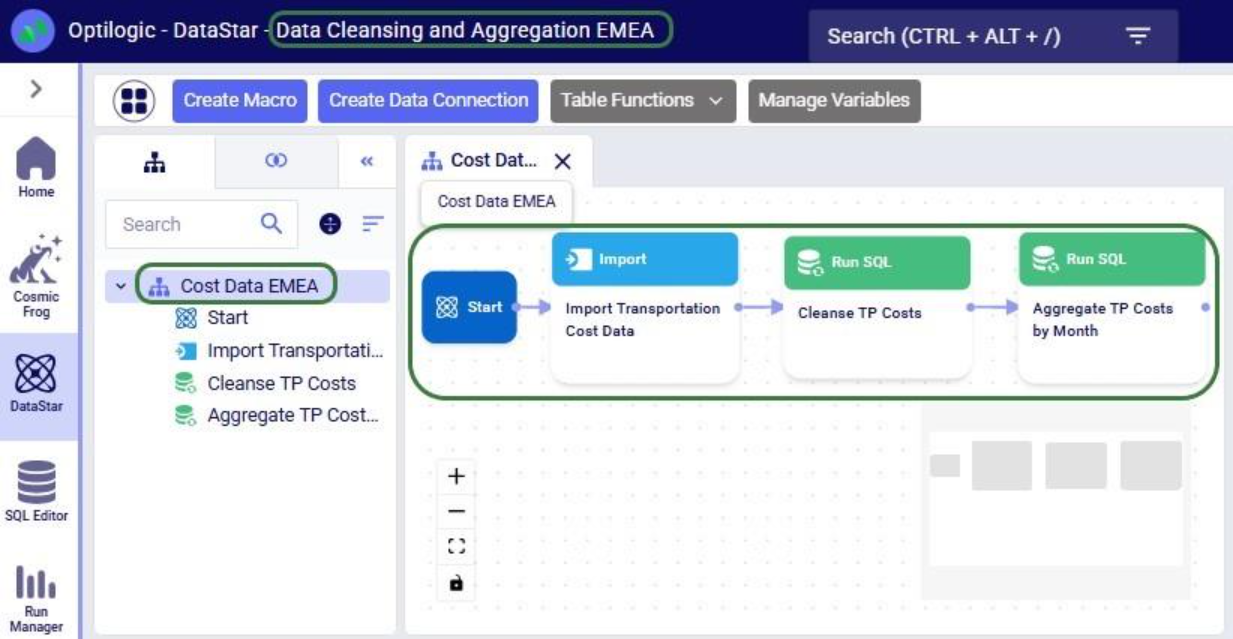
After running the script, we see in DataStar that there is indeed a new project named “Data Cleansing and Aggregation EMEA” which has a “Cost Data EMEA” macro that contains the 3 transportation cost related tasks that we wanted to keep:
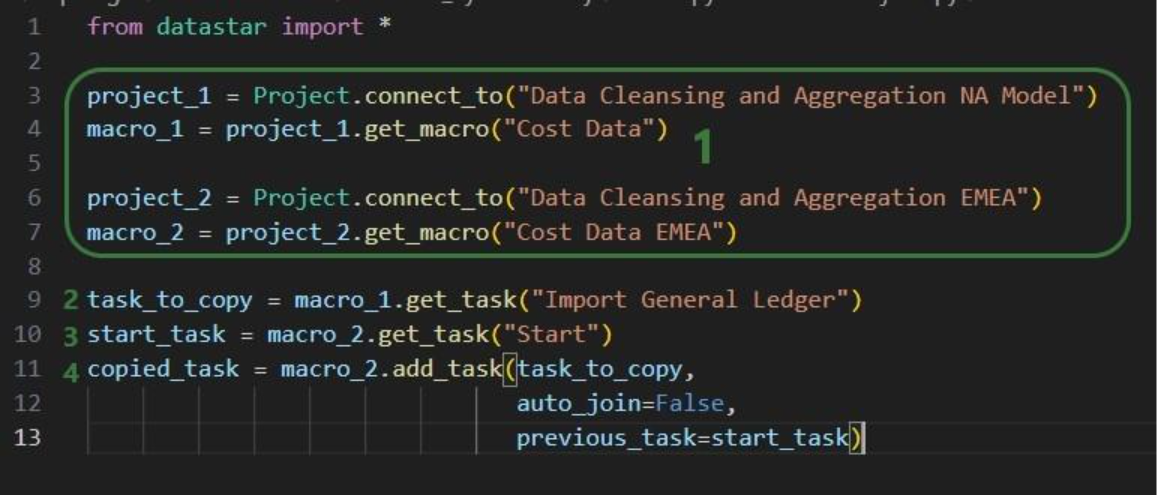
Note that another way we could have achieved this would have been to copy the 3 tasks from the macro in the NA project to the new macro in the EMEA project. The next example shows this for one task. Say that after the Cost Data EMEA macro was created, the team finds they also have a use for the “Import General Ledger” task that was deleted as it was not on the list of “tasks to keep”. In an extension of the previous script or a new one, we can leverage the add_task method of the Macro class to copy the “Import General Ledger” task from the NA project to the EMEA one:
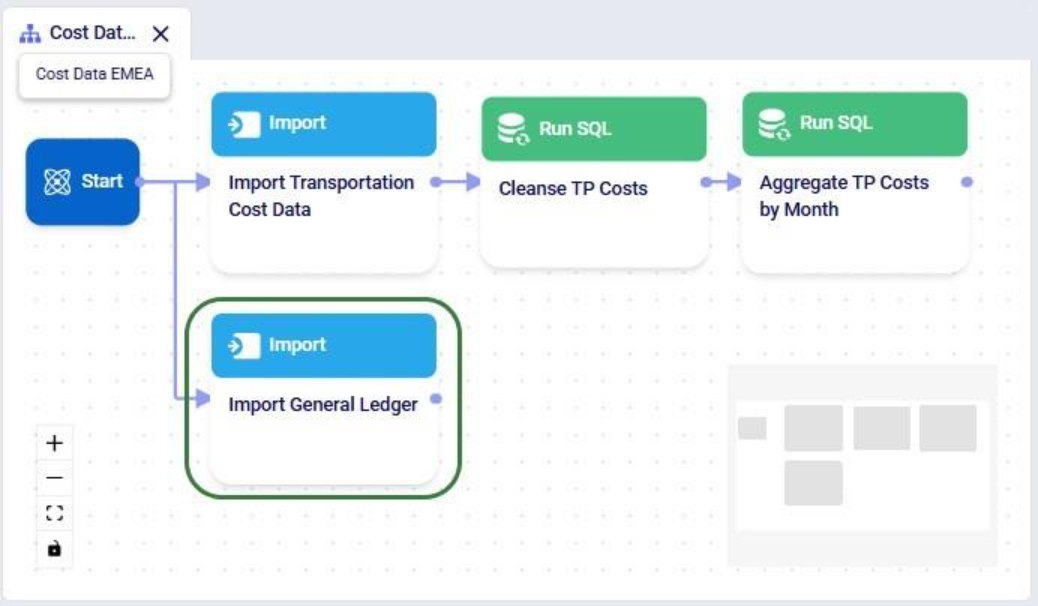
After running the script, we see that the “Import General Ledger” task is now part of the “Cost Data EMEA” macro and is connected to the Start task:
Several additional helpful features on chaining tasks together in a macro are:
DataStar connections allow users to connect to different types of data sources, including CSV-files, Excel files, Cosmic Frog models, and Postgres databases. These data sources need to be present on the Optilogic platform (i.e. visible in the Explorer application). They can then be used as sources / destinations / targets for tasks within DataStar.
We can use scripts to create data connections:
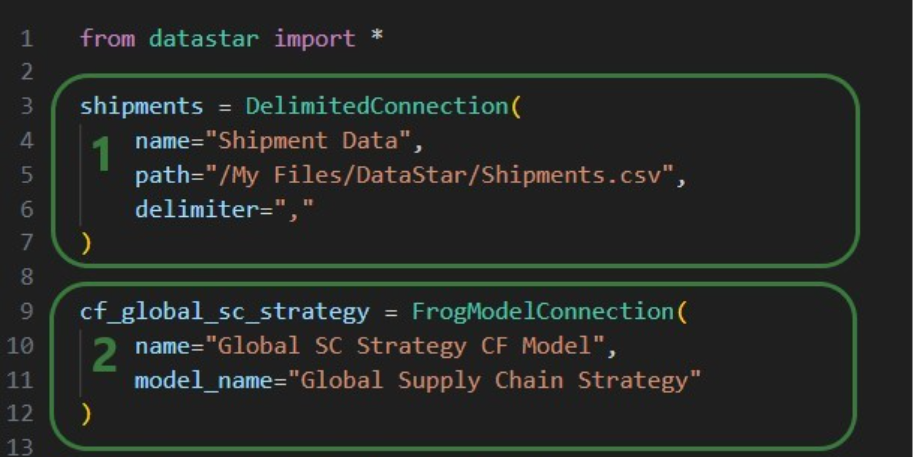
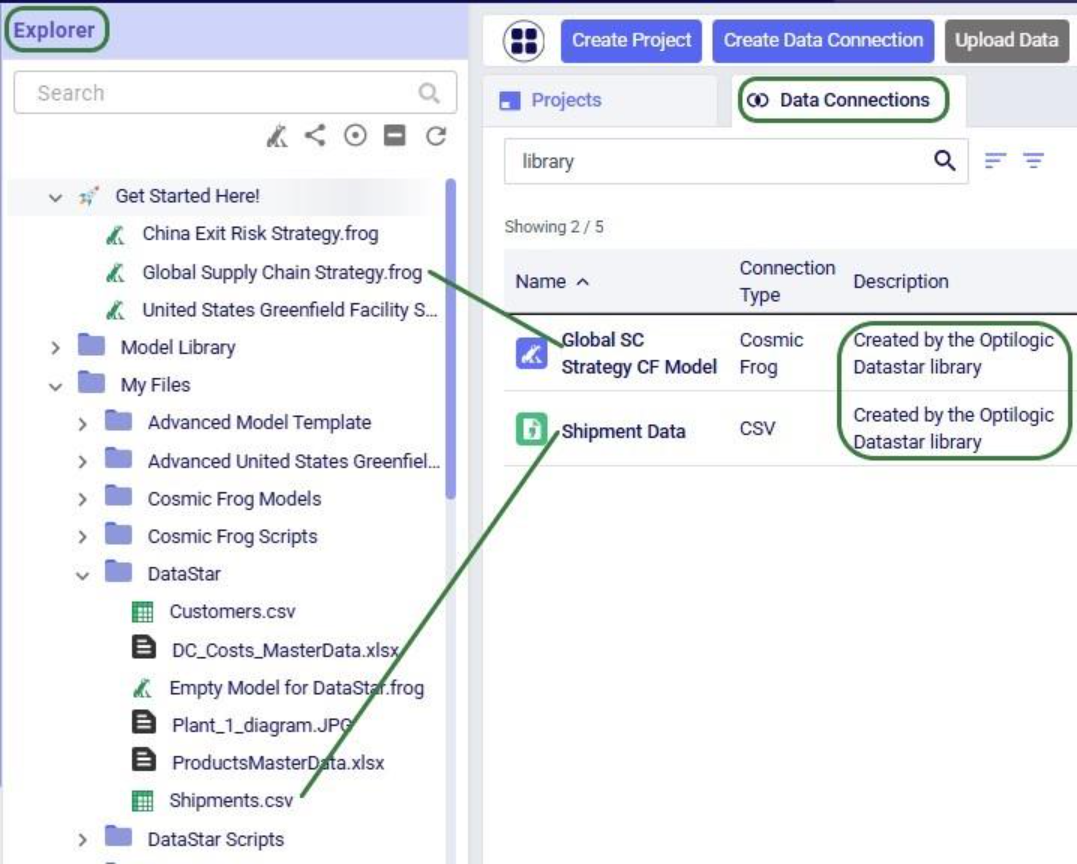
After running this script, we see the connections have been created. In the following screenshot, the Explorer is on the left, and it shows the Cosmic Frog model “Global Supply Chain Strategy.frog” and the Shipments.csv file. The connections using these are listed in the Data Connections tab of DataStar. Since we did not specify any description, an auto-generated description “Created by the Optilogic Datastar library” was added to each of these 2 connections:
In addition to the connections shown above, data connections to Excel files (.xls and .xlsx) and PostgreSQL databases which are stored on the Optilogic platform can be created too. Use the ExcelConnection and OptiConnection classes to set up such these types of connections up.
Each DataStar project has its own internal data connection, the project sandbox. This is where users perform most of the data transformations after importing data into the sandbox. Using scripts, we can access and modify data in this sandbox directly instead of using tasks in macros to do so. Note that if you have a repeatable data workflow in DataStar which is used periodically to refresh a Cosmic Frog model where you update your data sources and re-run your macros, you need to be mindful of making one-off changes to the project sandbox through a script. When you change data in the sandbox through a script, macros and tasks are not updated to reflect these modifications. When running the data workflow the next time, the results may be different if that change the script made is not made again. If you want to include such changes in your macro, you can add a Run Python task to your macro within DataStar.
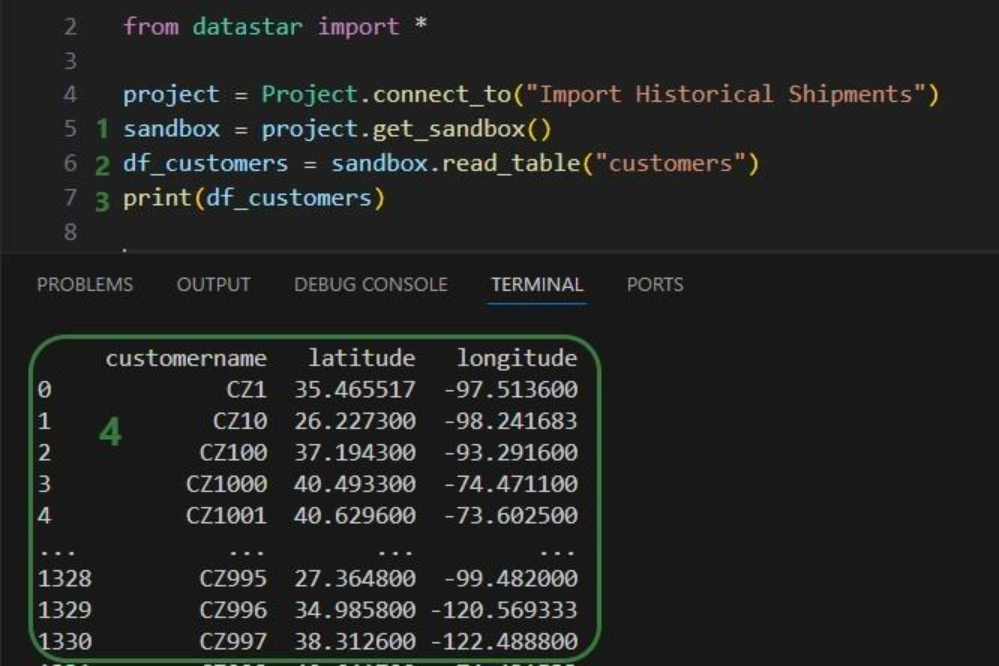
Our “Import Historical Shipments” project has a table named customers in its project sandbox:

To make the customers sort in numerical order of their customer number, our goal in the next script is to update the number part of the customer names with left padded 0’s so all numbers consist of 4 digits. And while we are at it, we are also going to replace the “CZ” prefix with a “Cust_” prefix.
First, we will show how to access data in the project sandbox:
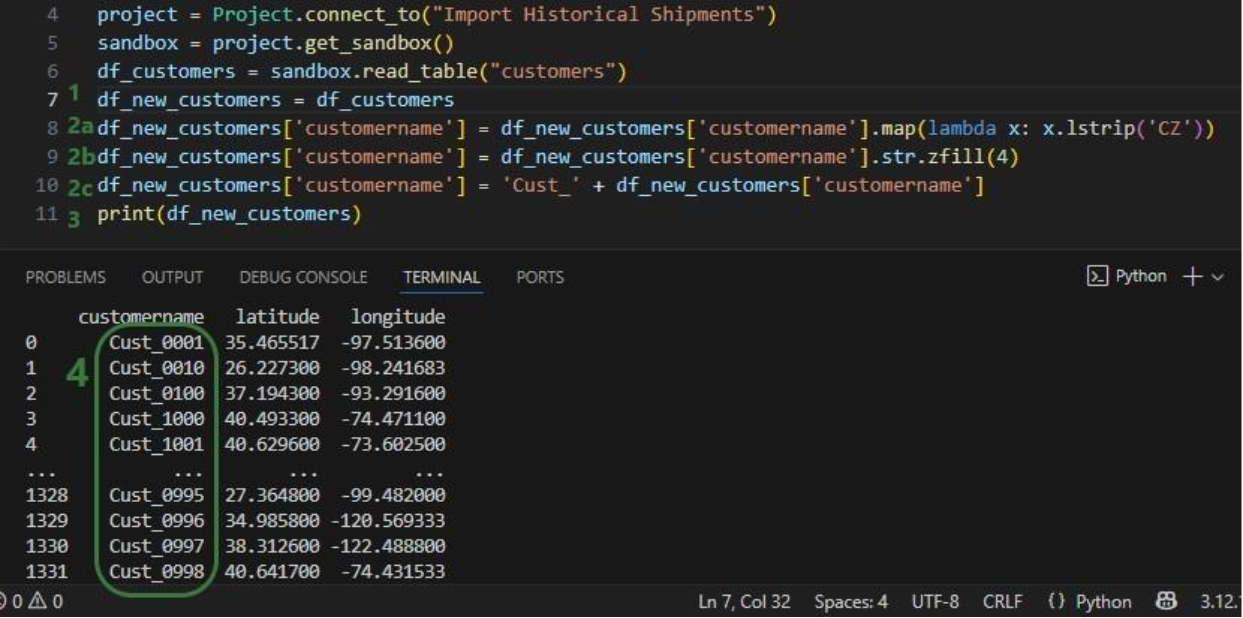
Next, we will use functionality of the pandas Python library (installed as a dependency when installing the datastar library) to transform the customer names to our desired Cust_xxxx format:
As a last step, we can now write the updated customer names back into the customers table in the sandbox. Or, if we want to preserve the data in the sandbox, we can also write to a new table as is done in the next screenshot:
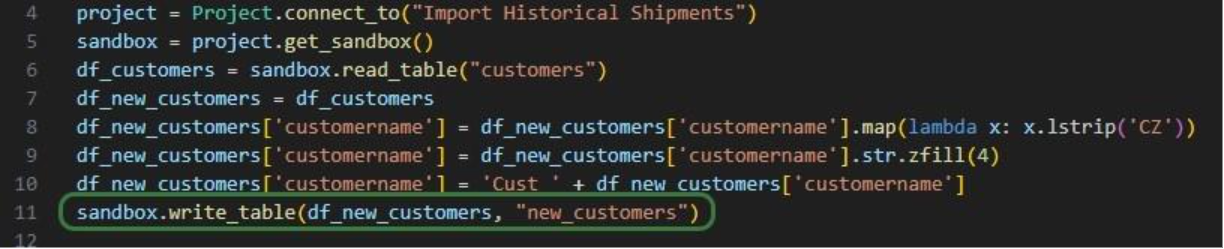
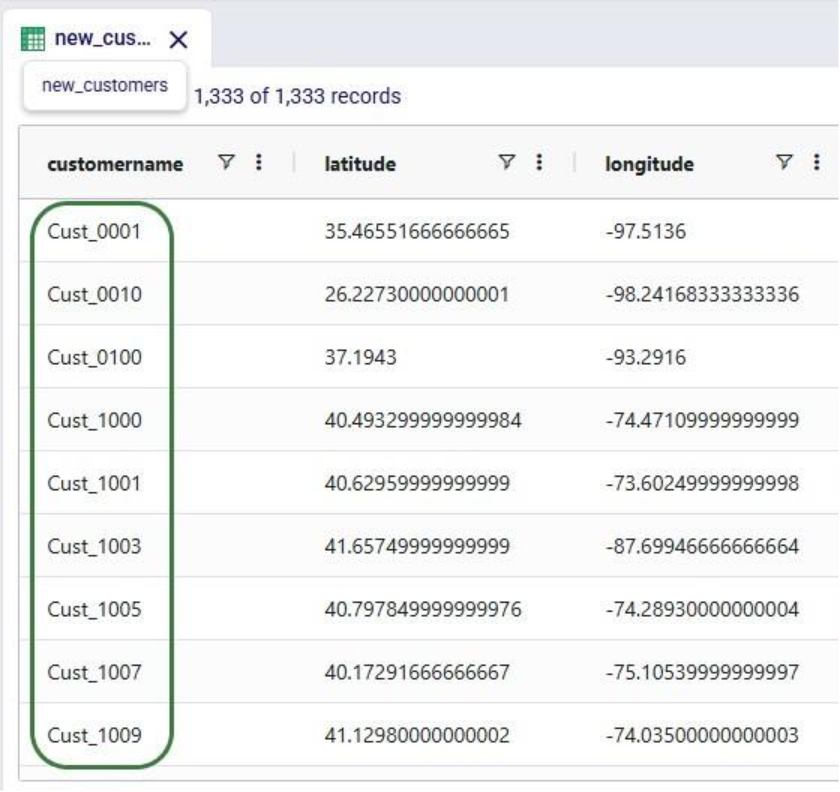
We use the write_table method to write the dataframe with the updated customer names into a new table called “new_customers” in the project sandbox. After running the script, opening this new table in DataStar shows us that the updates worked:
Finally, we will put everything we have covered above together in one script which will:
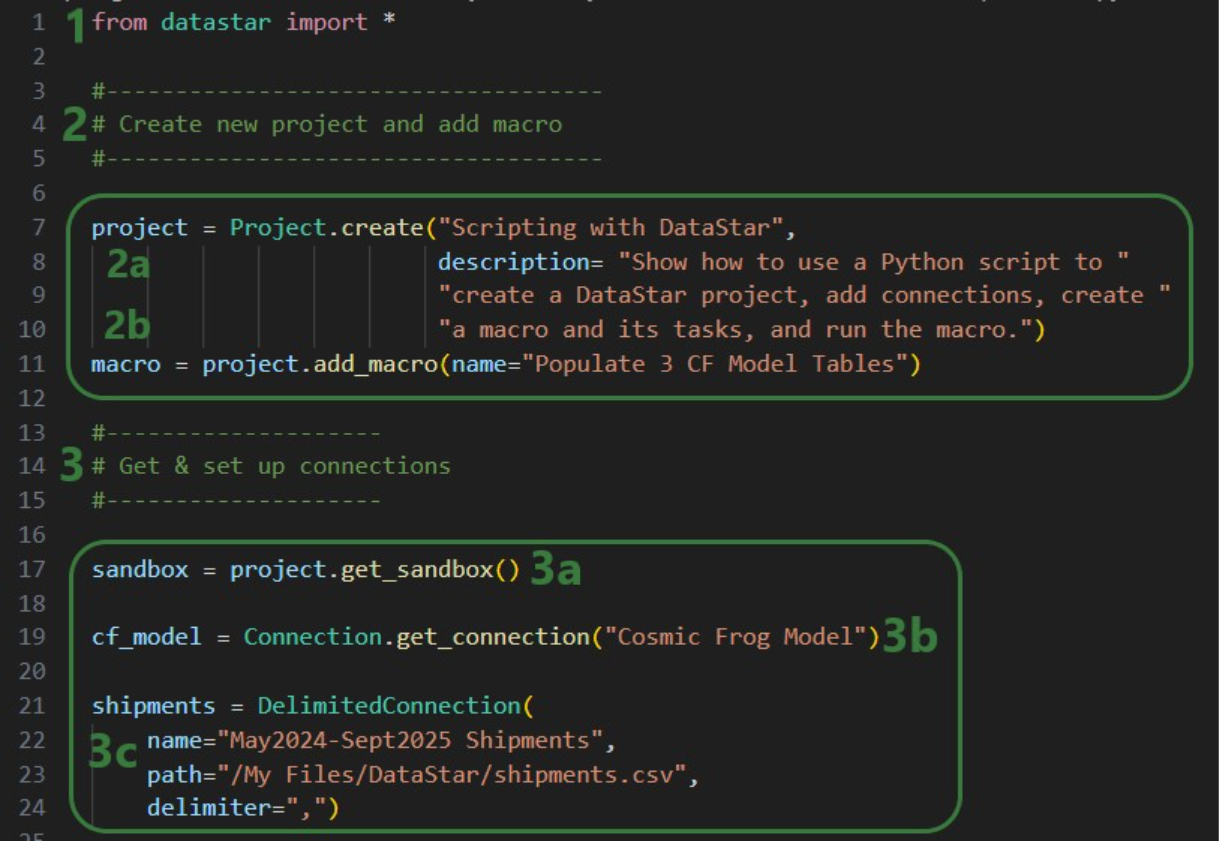
We will look at this script through the next set of screenshots. For those who would like to run this script themselves, and possibly use it as a starting point to modify into their own script:

Next, we will create 7 tasks to add to the “Populate 3 CF Model Tables” macro, starting with an Import task:
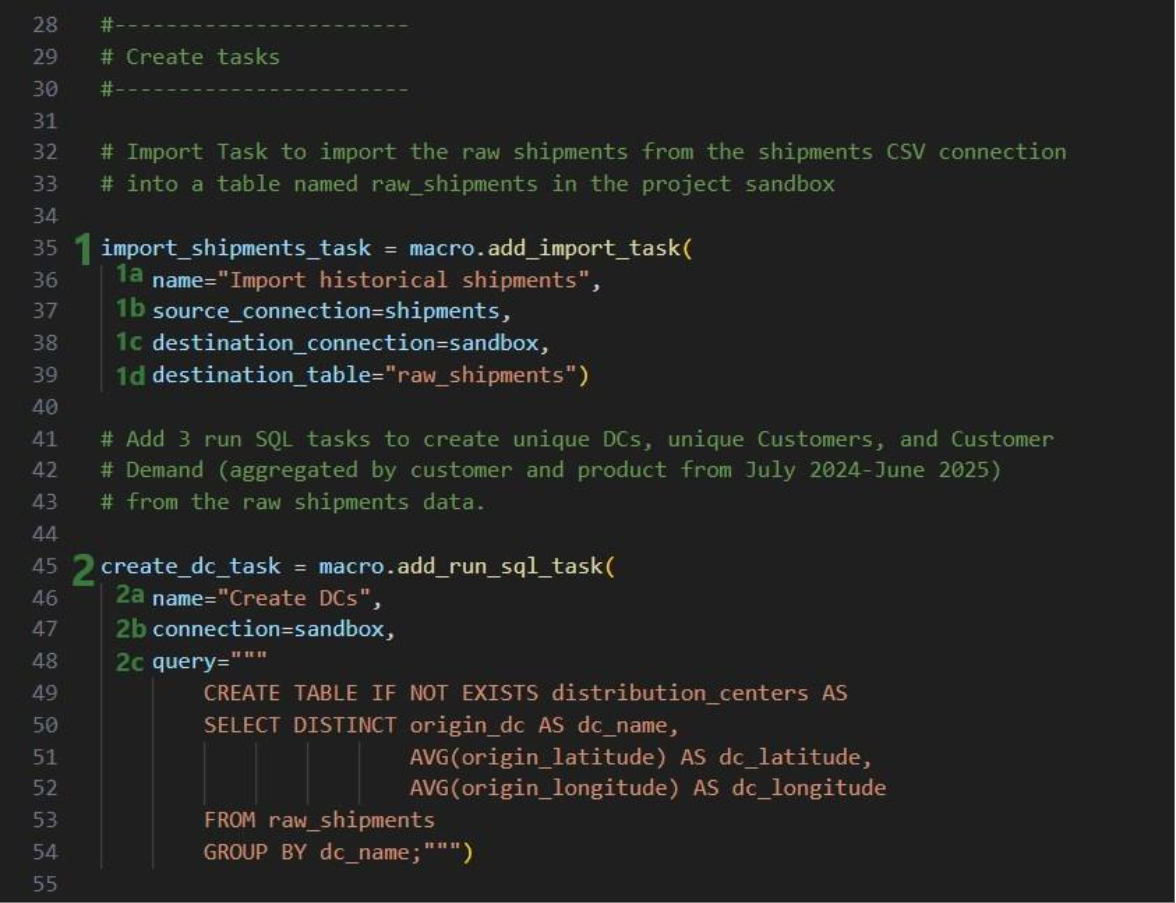
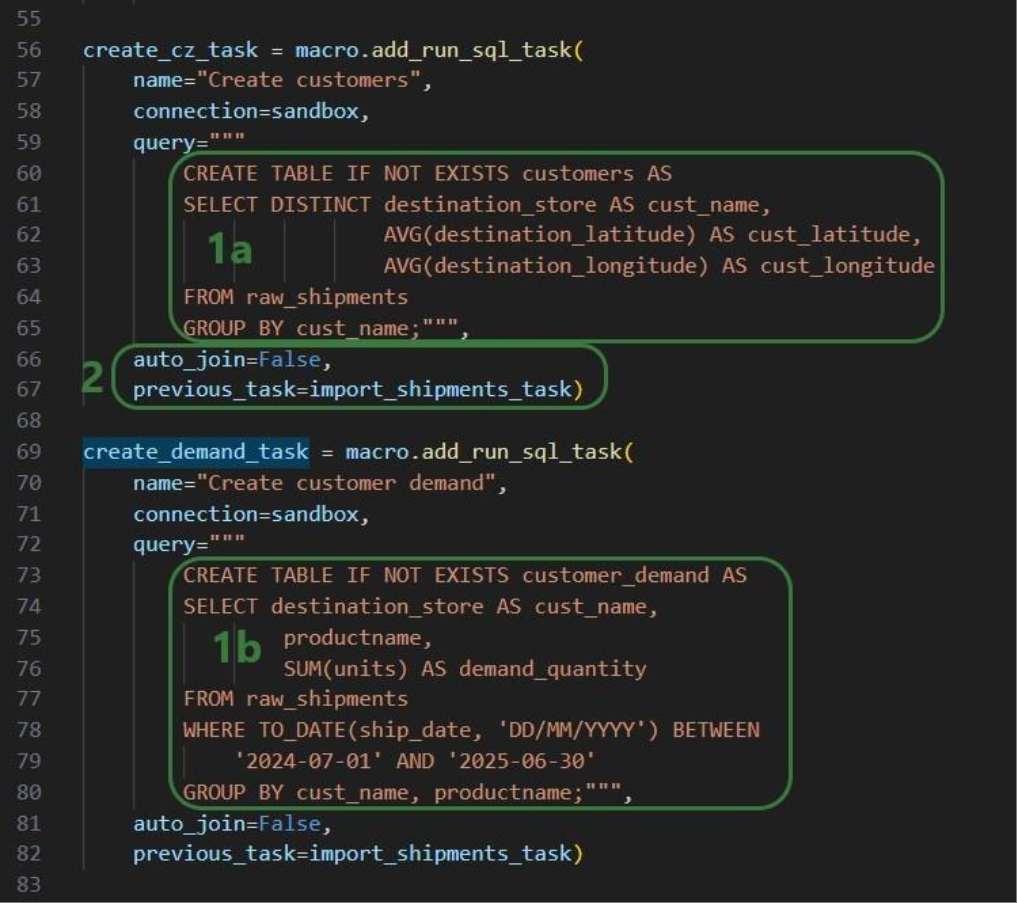
Similar to the “create_dc_task” Run SQL task, 2 more Run SQL tasks are created to create unique customers and aggregated customer demand from the raw_shipments table:
Now that we have generated the distribution_centers, customers, and customer_demand tables in the project sandbox using the 3 SQL Run tasks, we want to export these tables into their corresponding Cosmic Frog tables (facilities, customers, and customerdemand) in the empty Cosmic Frog model:
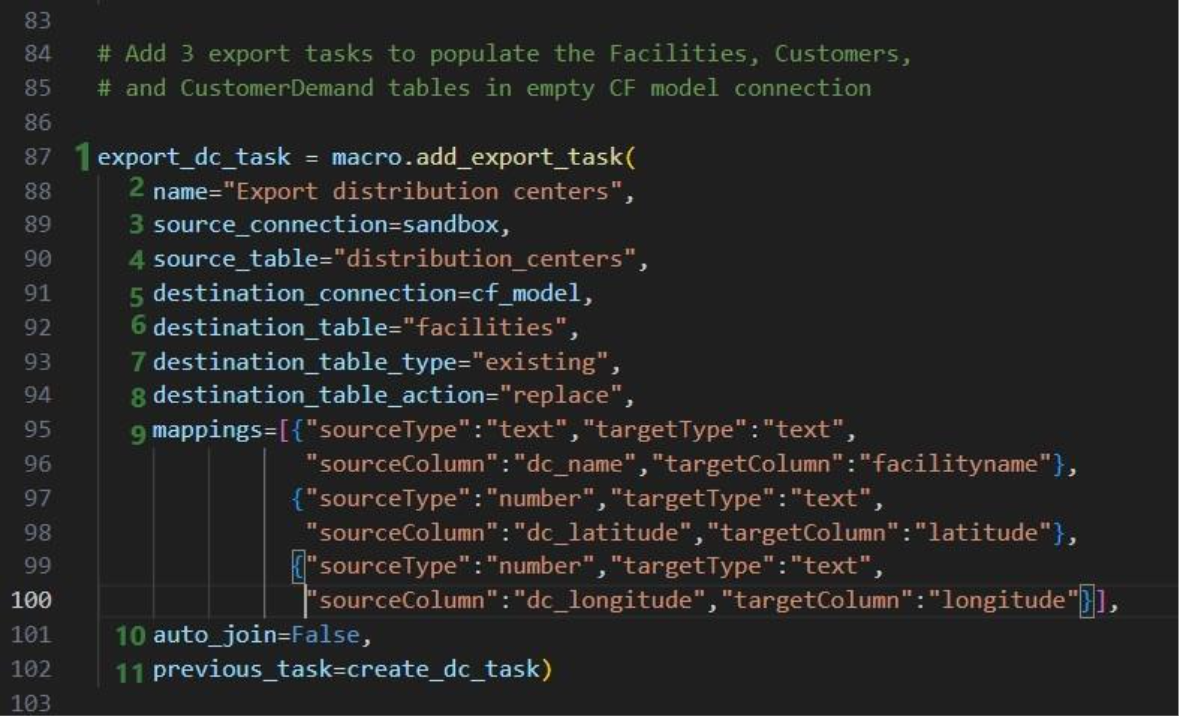
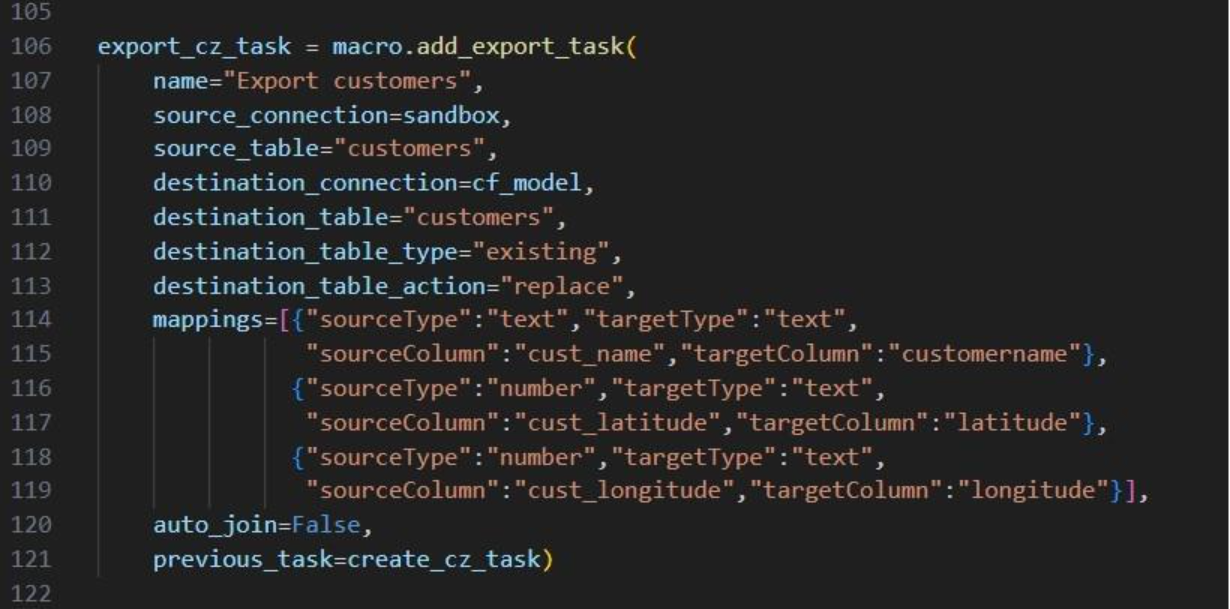
The following 2 Export tasks are created in a very similar way:
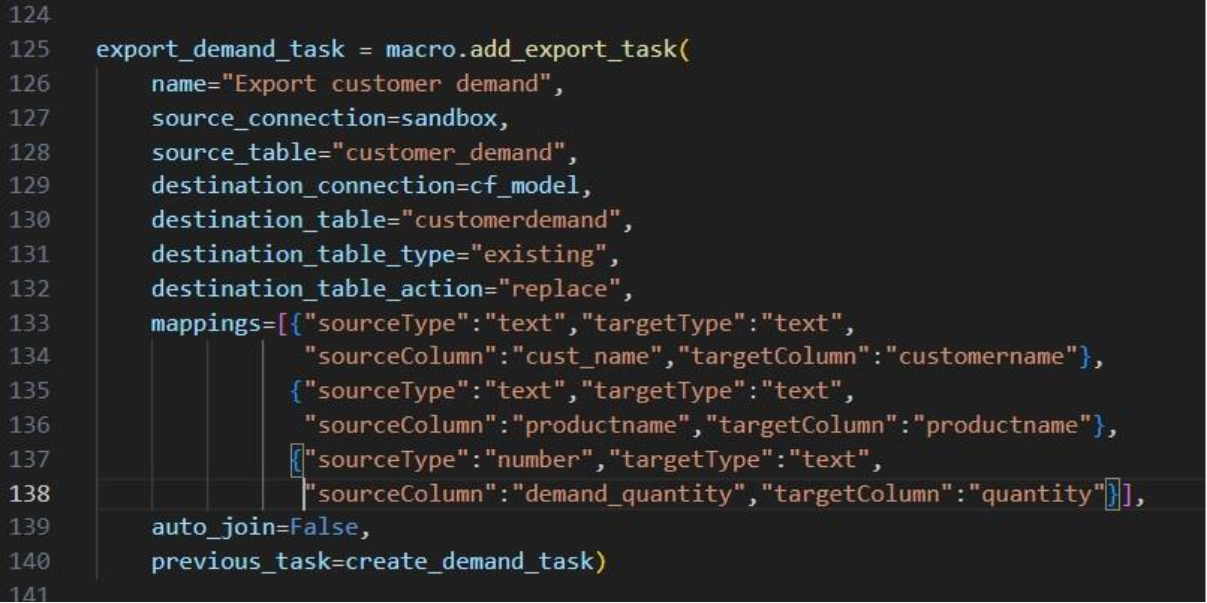
This completes the build of the macro and its tasks.
If we run it like this, the tasks will be chained in the correct way, but they will be displayed on top of each other on the Macro Canvas in DataStar. To arrange them nicely and prevent having to reposition them manually in the DataStar UI, we can use the “x” and “y” properties of tasks. Note that since we are now changing existing objects, we need to use the save method to commit the changes:
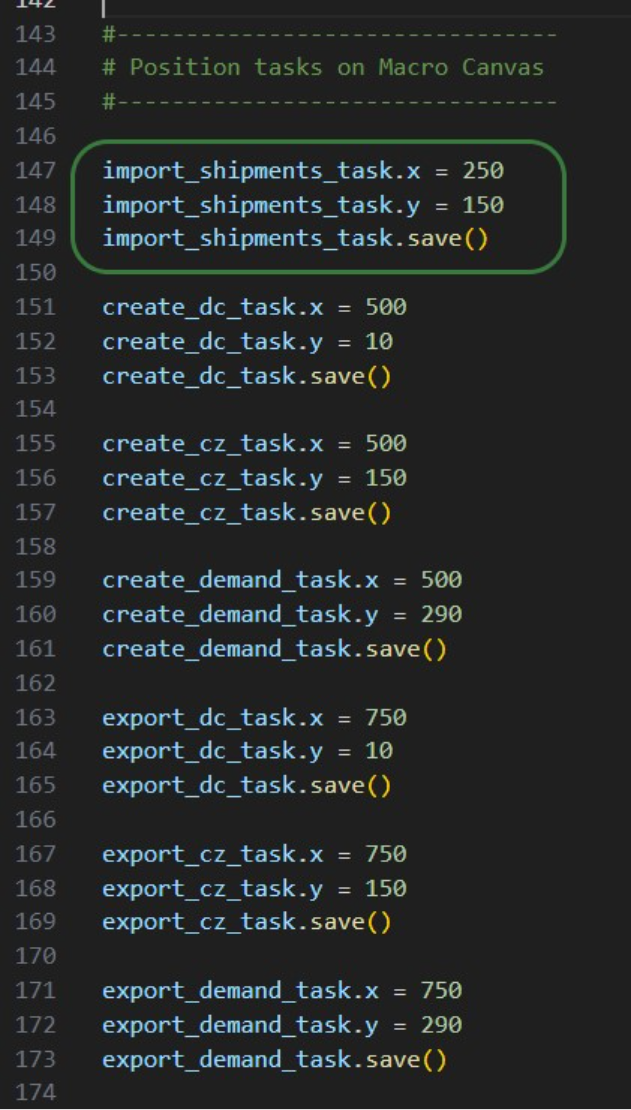
In the green outlined box, we see that the x-coordinate on the Macro Canvas for the import_shipments_task is set to 250 (line 147) and its y-coordinate to 150 (line 148). In line 149 we use the save method to persist these values.
Now we can kick off the macro run and monitor its progress:
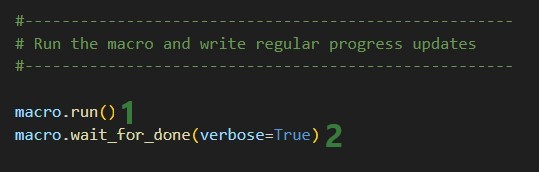
While the macro is running, messages written to the terminal by the wait_for_done method will look similar to following:
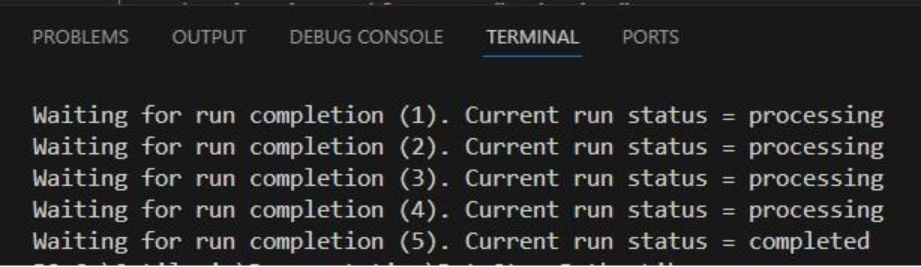
We see 4 messages where the status was “processing” and then a final fifth one stating the macro run has completed. Other statuses one might see are pending when the macro has not yet started and errored in case the macro could not finish successfully.
Opening the DataStar application, we can check the project and CSV connection were created on the DataStar startpage. They are indeed there, and we can open the “Scripting with DataStar” project to check the “Populate 3 CF Model Tables” macro and the results of its run:

The macro contains the 7 tasks we expect and checking their configurations shows they are set up the way we intended to.
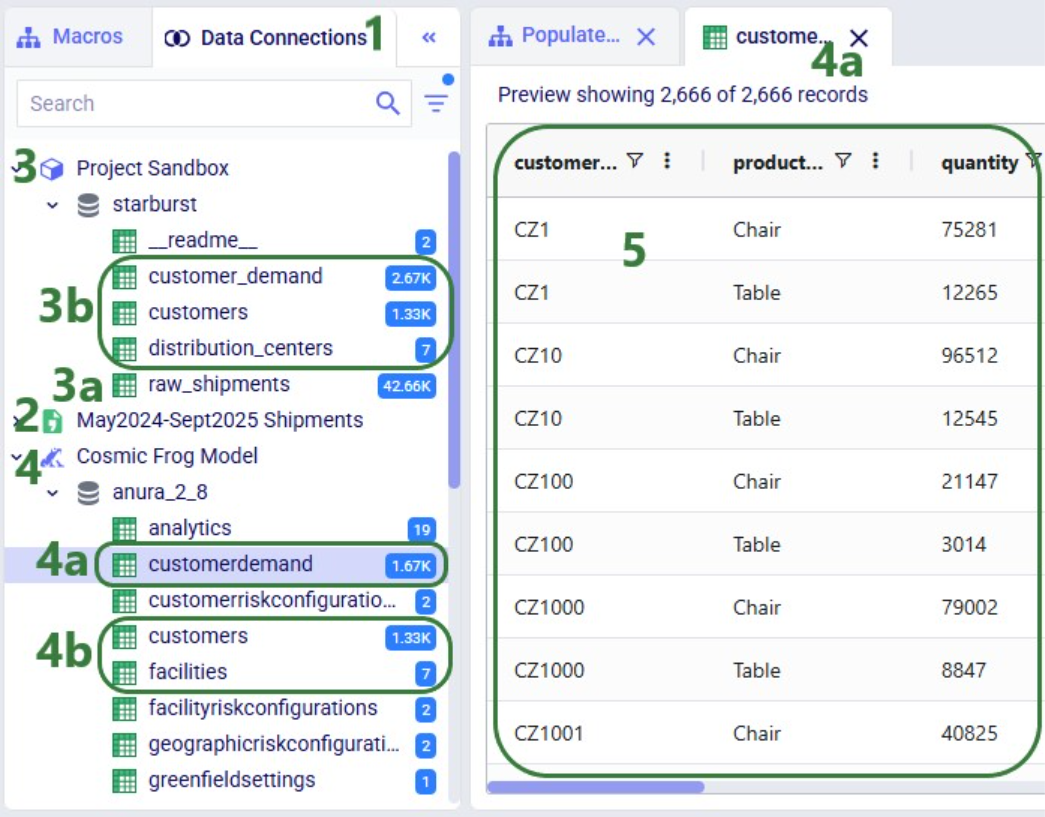
Next, we have a look at the Data Connections tab to see the results of running the macro:
Here follows the code of each of the above examples. You can copy and paste this into your own scripts and modify them to your needs. Note that whenever names and paths are used, you may need to update these to match your own environment.
Get list of DataStar projects in user's Optilogic account and print list to terminal:
from datastar import *

project_list = Project.get_projects()
print(project_list)
Connect to the project named "Import Historical Shipments" and get the list of macros within this project. Print this list to the terminal:
from datastar import *

project = Project.connect_to("Import Historical Shipments")
macro_list = project.get_macros()
print(macro_list)
In the same "Import Historical Shipments" project, get the macro named "Import Shipments", and get the list of tasks within this macro. Print the list with task names to the terminal:
from datastar import *

project = Project.connect_to("Import Historical Shipments")
macro = project.get_macro("Import Shipments")
task_list = macro.get_tasks()
print(task_list)
Copy 3 of the 7 tasks in the "Cost Data" macro in the "Data Cleansing and Aggregation NA Model" project to a new macro "Cost Data EMEA" in a new project "Data Cleansing and Aggregation EMEA". Do this by first copying the whole macro and then removing the tasks that are not required in this new macro:
from datastar import *

# connect to project and get macro to be copied into new project
project = Project.connect_to("Data Cleansing and Aggregation NA Model")
macro = project.get_macro("Cost Data")

# create new project and clone macro into it
new_project = Project.create("Data Cleansing and Aggregation EMEA")
new_macro = macro.clone(new_project,name="Cost Data EMEA",
                        description="Cloned from NA project; \
                                    keep 3 transportation tasks")

# list the transportation cost related tasks to be kept and get a list
# of tasks present in the copied macro in the new project, so that we
# can determine which tasks to delete
tasks_to_keep = ["Start",
                 "Import Transportation Cost Data",
                 "Cleanse TP Costs",
                 "Aggregate TP Costs by Month"]
tasks_present = new_macro.get_tasks()

# go through tasks present in the new macro and
# delete if the task name is not in the "to keep" list
for task in tasks_present:
    if task not in tasks_to_keep:
        new_macro.delete_task(task)
Copy specific task "Import General Ledger" from the "Cost Data" macro in the "Data Cleansing and Aggregation NA Model" project to the "Cost Data EMEA" macro in the "Data Cleansing and Aggregation EMEA" project. Chain this copied task to the Start task:
from datastar import *

project_1 = Project.connect_to("Data Cleansing and Aggregation NA Model")
macro_1 = project_1.get_macro("Cost Data")

project_2 = Project.connect_to("Data Cleansing and Aggregation EMEA")
macro_2 = project_2.get_macro("Cost Data EMEA")

task_to_copy = macro_1.get_task("Import General Ledger")
start_task = macro_2.get_task("Start")
copied_task = macro_2.add_task(task_to_copy,
                               auto_join=False,
                               previous_task=start_task)
Creating a CSV file connection and a Cosmic Frog Model connection:
from datastar import *

shipments = DelimitedConnection(
    name="Shipment Data",
    path="/My Files/DataStar/Shipments.csv",
    delimiter=","
)

cf_global_sc_strategy = FrogModelConnection(
    name="Global SC Strategy CF Model",
    model_name="Global Supply Chain Strategy"
)
Connect directly to a project's sandbox, read data into a pandas dataframe, transform it, and write the new dataframe into a new table "new_customers":
from datastar import *

# connect to project and get its sandbox
project = Project.connect_to("Import Historical Shipments")
sandbox = project.get_sandbox()

# use pandas to raed the "customers" table into a dataframe
df_customers = sandbox.read_table("customers")

# copy the dataframe into a new dataframe
df_new_customers = df_customers

# use pandas to change the customername column values format
# from CZ1, CZ20, etc to Cust_0001, Cust_0020, etc
df_new_customers['customername'] = df_new_customers['customername'].map(lambda x: x.lstrip('CZ'))
df_new_customers['customername'] = df_new_customers['customername'].str.zfill(4)
df_new_customers['customername'] = 'Cust_' + df_new_customers['customername']

# write the updates customers table with the new customername
# values to a new table "new_customers"
sandbox.write_table(df_new_customers, "new_customers")
End-to-end script - create a new project and add a new macro to it; add 7 tasks to the macro to import shipments data; create unique customers, unique distribution centers, and demand aggregated by customer and product from it. Then export these 3 tables to a Cosmic Frog model:
from datastar import *

#------------------------------------
# Create new project and add macro
#------------------------------------

project = Project.create("Scripting with DataStar",
                         description= "Show how to use a Python script to "
                         "create a DataStar project, add connections, create "
                         "a macro and its tasks, and run the macro.")
macro = project.add_macro(name="Populate 3 CF Model Tables")

#--------------------
# Get & set up connections
#--------------------

sandbox = project.get_sandbox()

cf_model = Connection.get_connection("Cosmic Frog Model")

shipments = DelimitedConnection(
    name="May2024-Sept2025 Shipments",
    path="/My Files/DataStar/shipments.csv",
    delimiter=",")


#-----------------------
# Create tasks
#-----------------------

# Import Task to import the raw shipments from the shipments CSV connection
# into a table named raw_shipments in the project sandbox

import_shipments_task = macro.add_import_task(
    name="Import historical shipments",
    source_connection=shipments,
    destination_connection=sandbox,
    destination_table="raw_shipments")

# Add 3 run SQL tasks to create unique DCs, unique Customers, and Customer
# Demand (aggregated by customer and product from July 2024-June 2025)
# from the raw shipments data.

create_dc_task = macro.add_run_sql_task(
    name="Create DCs",
    connection=sandbox,
    query="""
        CREATE TABLE IF NOT EXISTS distribution_centers AS
        SELECT DISTINCT origin_dc AS dc_name,
                        AVG(origin_latitude) AS dc_latitude,
                        AVG(origin_longitude) AS dc_longitude
        FROM raw_shipments
        GROUP BY dc_name;""")

create_cz_task = macro.add_run_sql_task(
    name="Create customers",
    connection=sandbox,
    query="""
        CREATE TABLE IF NOT EXISTS customers AS
        SELECT DISTINCT destination_store AS cust_name,
                        AVG(destination_latitude) AS cust_latitude,
                        AVG(destination_longitude) AS cust_longitude
        FROM raw_shipments
        GROUP BY cust_name;""",
    auto_join=False,
    previous_task=import_shipments_task)

create_demand_task = macro.add_run_sql_task(
    name="Create customer demand",
    connection=sandbox,
    query="""
        CREATE TABLE IF NOT EXISTS customer_demand AS
        SELECT destination_store AS cust_name,
                productname,
                SUM(units) AS demand_quantity
        FROM raw_shipments
        WHERE TO_DATE(ship_date, 'DD/MM/YYYY') BETWEEN
            '2024-07-01' AND '2025-06-30'
        GROUP BY cust_name, productname;""",
    auto_join=False,
    previous_task=import_shipments_task)

# Add 3 export tasks to populate the Facilities, Customers,
# and CustomerDemand tables in empty CF model connection

export_dc_task = macro.add_export_task(
    name="Export distribution centers",
    source_connection=sandbox,
    source_table="distribution_centers",
    destination_connection=cf_model,
    destination_table="facilities",
    destination_table_type="existing",
    destination_table_action="replace",
    mappings=[{"sourceType":"text","targetType":"text",
               "sourceColumn":"dc_name","targetColumn":"facilityname"},
              {"sourceType":"number","targetType":"text",
               "sourceColumn":"dc_latitude","targetColumn":"latitude"},
              {"sourceType":"number","targetType":"text",
               "sourceColumn":"dc_longitude","targetColumn":"longitude"}],
    auto_join=False,
    previous_task=create_dc_task)


export_cz_task = macro.add_export_task(
    name="Export customers",
    source_connection=sandbox,
    source_table="customers",
    destination_connection=cf_model,
    destination_table="customers",
    destination_table_type="existing",
    destination_table_action="replace",
    mappings=[{"sourceType":"text","targetType":"text",
               "sourceColumn":"cust_name","targetColumn":"customername"},
              {"sourceType":"number","targetType":"text",
               "sourceColumn":"cust_latitude","targetColumn":"latitude"},
              {"sourceType":"number","targetType":"text",
               "sourceColumn":"cust_longitude","targetColumn":"longitude"}],
    auto_join=False,
    previous_task=create_cz_task)


export_demand_task = macro.add_export_task(
    name="Export customer demand",
    source_connection=sandbox,
    source_table="customer_demand",
    destination_connection=cf_model,
    destination_table="customerdemand",
    destination_table_type="existing",
    destination_table_action="replace",
    mappings=[{"sourceType":"text","targetType":"text",
               "sourceColumn":"cust_name","targetColumn":"customername"},
              {"sourceType":"text","targetType":"text",
               "sourceColumn":"productname","targetColumn":"productname"},
              {"sourceType":"number","targetType":"text",
               "sourceColumn":"demand_quantity","targetColumn":"quantity"}],
    auto_join=False,
    previous_task=create_demand_task)


#--------------------------------
# Position tasks on Macro Canvas
#--------------------------------

import_shipments_task.x = 250
import_shipments_task.y = 150
import_shipments_task.save()

create_dc_task.x = 500
create_dc_task.y = 10
create_dc_task.save()

create_cz_task.x = 500
create_cz_task.y = 150
create_cz_task.save()

create_demand_task.x = 500
create_demand_task.y = 290
create_demand_task.save()

export_dc_task.x = 750
export_dc_task.y = 10
export_dc_task.save()

export_cz_task.x = 750
export_cz_task.y = 150
export_cz_task.save()

export_demand_task.x = 750
export_demand_task.y = 290
export_demand_task.save()

#-----------------------------------------------------
# Run the macro and write regular progress updates
#-----------------------------------------------------

macro.run()
macro.wait_for_done(verbose=True)
DataStar users can take advantage of the datastar Python library, which gives users access to DataStar projects, macros, tasks, and connections through Python scripts. This way users can build, access, and run their DataStar workflows programmatically. The library can be used in a user’s own Python environment (local or on the Optilogic platform), and it can also be used in Run Python tasks in a DataStar macro.
In this documentation we will cover how to use the library through multiple examples. At the end, we will step through an end-to-end script that creates a new project, adds a macro to the project, and creates multiple tasks that are added to the macro. The script then runs the macro while giving regular updates on its progress.
Before diving into the details of this article, it is recommended to read this “Setup: Python Scripts for Cosmic Frog and DataStar” article first; it explains what users need to do in terms of setup before they can run Python scripts using the datastar library. To learn more about the DataStar application itself, please see these articles on Optilogic’s Help Center.
Succinct documentation in PDF format of all datastar library functionality can be downloaded here (please note that the long character string at the beginning of the filename is expected). This includes a list of all available properties and methods for the Project, Macro, Task, and Connection classes at the end of the document.
All Python code that is shown in the screenshots throughout this documentation is available in the Appendix, so that you can copy-paste from there if you want to run the exact same code in your own Python environment and/or use these as jumping off points for your own scripts.
If you have reviewed the “Setup: Python Scripts for Cosmic Frog and DataStar” article and are set up with your local or online Python environment, we are ready to dive in! First, we will see how we can interrogate existing projects and macros using Python and the datastar library. We want to find out which DataStar projects are already present in the user’s Optilogic account.
Once the parentheses are typed, hover text comes up with information about this function. It tells us that the outcome of this method will be a list of strings, and the description of the method reads “Retrieve all project names visible to the authenticated user”. Most methods will have similar hover text describing the method, the arguments it takes and their default values, and the output format.
Now that we have a variable that contains the list of DataStar projects in the user account, we want to view the value of this variable:
Next, we want to dig one level deeper and for the “Import Historical Shipments” project find out what macros it contains:
Finally, we will retrieve the tasks this “Import Shipments” macro contains in a similar fashion:
In addition, we can have a quick look in the DataStar application to see that the information we are getting from the small scripts above matches what we have in our account in terms of projects (first screenshot below), and the “Import Shipments” macro plus its tasks in the “Import Historical Shipments” project (second screenshot below):
Besides getting information about projects and macros, other useful methods for projects and macros include:
Note that when creating new objects (projects, macros, tasks or connections) these are automatically saved. If existing objects are modified, their changes need to be committed by using the save method.
Macros can be copied, either within the same project or into a different project. Tasks can also be copied, either within the same macro, between macros in the same project, or between macros of different projects. If a task is copied within the same macro, its name will automatically be suffixed with (Copy).
As an example, we will consider a macro called “Cost Data” in a project named “Data Cleansing and Aggregation NA Model”, which is configured as follows:
The North America team shows this macro to their EMEA counterparts who realize that they could use part of this for their purposes, as their transportation cost data has the same format as that of the NA team. Instead of manually creating a new macro with new tasks that duplicate the 3 transportation cost related ones, they decide to use a script where first the whole macro is copied to a new project, and then the 4 tasks which are not relevant for the EMEA team are deleted:
After running the script, we see in DataStar that there is indeed a new project named “Data Cleansing and Aggregation EMEA” which has a “Cost Data EMEA” macro that contains the 3 transportation cost related tasks that we wanted to keep:
Note that another way we could have achieved this would have been to copy the 3 tasks from the macro in the NA project to the new macro in the EMEA project. The next example shows this for one task. Say that after the Cost Data EMEA macro was created, the team finds they also have a use for the “Import General Ledger” task that was deleted as it was not on the list of “tasks to keep”. In an extension of the previous script or a new one, we can leverage the add_task method of the Macro class to copy the “Import General Ledger” task from the NA project to the EMEA one:
After running the script, we see that the “Import General Ledger” task is now part of the “Cost Data EMEA” macro and is connected to the Start task:
Several additional helpful features on chaining tasks together in a macro are:
DataStar connections allow users to connect to different types of data sources, including CSV-files, Excel files, Cosmic Frog models, and Postgres databases. These data sources need to be present on the Optilogic platform (i.e. visible in the Explorer application). They can then be used as sources / destinations / targets for tasks within DataStar.
We can use scripts to create data connections:
After running this script, we see the connections have been created. In the following screenshot, the Explorer is on the left, and it shows the Cosmic Frog model “Global Supply Chain Strategy.frog” and the Shipments.csv file. The connections using these are listed in the Data Connections tab of DataStar. Since we did not specify any description, an auto-generated description “Created by the Optilogic Datastar library” was added to each of these 2 connections:
In addition to the connections shown above, data connections to Excel files (.xls and .xlsx) and PostgreSQL databases which are stored on the Optilogic platform can be created too. Use the ExcelConnection and OptiConnection classes to set up such these types of connections up.
Each DataStar project has its own internal data connection, the project sandbox. This is where users perform most of the data transformations after importing data into the sandbox. Using scripts, we can access and modify data in this sandbox directly instead of using tasks in macros to do so. Note that if you have a repeatable data workflow in DataStar which is used periodically to refresh a Cosmic Frog model where you update your data sources and re-run your macros, you need to be mindful of making one-off changes to the project sandbox through a script. When you change data in the sandbox through a script, macros and tasks are not updated to reflect these modifications. When running the data workflow the next time, the results may be different if that change the script made is not made again. If you want to include such changes in your macro, you can add a Run Python task to your macro within DataStar.
Our “Import Historical Shipments” project has a table named customers in its project sandbox:
To make the customers sort in numerical order of their customer number, our goal in the next script is to update the number part of the customer names with left padded 0’s so all numbers consist of 4 digits. And while we are at it, we are also going to replace the “CZ” prefix with a “Cust_” prefix.
First, we will show how to access data in the project sandbox:
Next, we will use functionality of the pandas Python library (installed as a dependency when installing the datastar library) to transform the customer names to our desired Cust_xxxx format:
As a last step, we can now write the updated customer names back into the customers table in the sandbox. Or, if we want to preserve the data in the sandbox, we can also write to a new table as is done in the next screenshot:
We use the write_table method to write the dataframe with the updated customer names into a new table called “new_customers” in the project sandbox. After running the script, opening this new table in DataStar shows us that the updates worked:
Finally, we will put everything we have covered above together in one script which will:
We will look at this script through the next set of screenshots. For those who would like to run this script themselves, and possibly use it as a starting point to modify into their own script:
Next, we will create 7 tasks to add to the “Populate 3 CF Model Tables” macro, starting with an Import task:
Similar to the “create_dc_task” Run SQL task, 2 more Run SQL tasks are created to create unique customers and aggregated customer demand from the raw_shipments table:
Now that we have generated the distribution_centers, customers, and customer_demand tables in the project sandbox using the 3 SQL Run tasks, we want to export these tables into their corresponding Cosmic Frog tables (facilities, customers, and customerdemand) in the empty Cosmic Frog model:
The following 2 Export tasks are created in a very similar way:
This completes the build of the macro and its tasks.
If we run it like this, the tasks will be chained in the correct way, but they will be displayed on top of each other on the Macro Canvas in DataStar. To arrange them nicely and prevent having to reposition them manually in the DataStar UI, we can use the “x” and “y” properties of tasks. Note that since we are now changing existing objects, we need to use the save method to commit the changes:
In the green outlined box, we see that the x-coordinate on the Macro Canvas for the import_shipments_task is set to 250 (line 147) and its y-coordinate to 150 (line 148). In line 149 we use the save method to persist these values.
Now we can kick off the macro run and monitor its progress:
While the macro is running, messages written to the terminal by the wait_for_done method will look similar to following:
We see 4 messages where the status was “processing” and then a final fifth one stating the macro run has completed. Other statuses one might see are pending when the macro has not yet started and errored in case the macro could not finish successfully.
Opening the DataStar application, we can check the project and CSV connection were created on the DataStar startpage. They are indeed there, and we can open the “Scripting with DataStar” project to check the “Populate 3 CF Model Tables” macro and the results of its run:
The macro contains the 7 tasks we expect and checking their configurations shows they are set up the way we intended to.
Next, we have a look at the Data Connections tab to see the results of running the macro:
Here follows the code of each of the above examples. You can copy and paste this into your own scripts and modify them to your needs. Note that whenever names and paths are used, you may need to update these to match your own environment.
Get list of DataStar projects in user's Optilogic account and print list to terminal:
from datastar import *

project_list = Project.get_projects()
print(project_list)
Connect to the project named "Import Historical Shipments" and get the list of macros within this project. Print this list to the terminal:
from datastar import *

project = Project.connect_to("Import Historical Shipments")
macro_list = project.get_macros()
print(macro_list)
In the same "Import Historical Shipments" project, get the macro named "Import Shipments", and get the list of tasks within this macro. Print the list with task names to the terminal:
from datastar import *

project = Project.connect_to("Import Historical Shipments")
macro = project.get_macro("Import Shipments")
task_list = macro.get_tasks()
print(task_list)
Copy 3 of the 7 tasks in the "Cost Data" macro in the "Data Cleansing and Aggregation NA Model" project to a new macro "Cost Data EMEA" in a new project "Data Cleansing and Aggregation EMEA". Do this by first copying the whole macro and then removing the tasks that are not required in this new macro:
from datastar import *

# connect to project and get macro to be copied into new project
project = Project.connect_to("Data Cleansing and Aggregation NA Model")
macro = project.get_macro("Cost Data")

# create new project and clone macro into it
new_project = Project.create("Data Cleansing and Aggregation EMEA")
new_macro = macro.clone(new_project,name="Cost Data EMEA",
                        description="Cloned from NA project; \
                                    keep 3 transportation tasks")

# list the transportation cost related tasks to be kept and get a list
# of tasks present in the copied macro in the new project, so that we
# can determine which tasks to delete
tasks_to_keep = ["Start",
                 "Import Transportation Cost Data",
                 "Cleanse TP Costs",
                 "Aggregate TP Costs by Month"]
tasks_present = new_macro.get_tasks()

# go through tasks present in the new macro and
# delete if the task name is not in the "to keep" list
for task in tasks_present:
    if task not in tasks_to_keep:
        new_macro.delete_task(task)
Copy specific task "Import General Ledger" from the "Cost Data" macro in the "Data Cleansing and Aggregation NA Model" project to the "Cost Data EMEA" macro in the "Data Cleansing and Aggregation EMEA" project. Chain this copied task to the Start task:
from datastar import *

project_1 = Project.connect_to("Data Cleansing and Aggregation NA Model")
macro_1 = project_1.get_macro("Cost Data")

project_2 = Project.connect_to("Data Cleansing and Aggregation EMEA")
macro_2 = project_2.get_macro("Cost Data EMEA")

task_to_copy = macro_1.get_task("Import General Ledger")
start_task = macro_2.get_task("Start")
copied_task = macro_2.add_task(task_to_copy,
                               auto_join=False,
                               previous_task=start_task)
Creating a CSV file connection and a Cosmic Frog Model connection:
from datastar import *

shipments = DelimitedConnection(
    name="Shipment Data",
    path="/My Files/DataStar/Shipments.csv",
    delimiter=","
)

cf_global_sc_strategy = FrogModelConnection(
    name="Global SC Strategy CF Model",
    model_name="Global Supply Chain Strategy"
)
Connect directly to a project's sandbox, read data into a pandas dataframe, transform it, and write the new dataframe into a new table "new_customers":
from datastar import *

# connect to project and get its sandbox
project = Project.connect_to("Import Historical Shipments")
sandbox = project.get_sandbox()

# use pandas to raed the "customers" table into a dataframe
df_customers = sandbox.read_table("customers")

# copy the dataframe into a new dataframe
df_new_customers = df_customers

# use pandas to change the customername column values format
# from CZ1, CZ20, etc to Cust_0001, Cust_0020, etc
df_new_customers['customername'] = df_new_customers['customername'].map(lambda x: x.lstrip('CZ'))
df_new_customers['customername'] = df_new_customers['customername'].str.zfill(4)
df_new_customers['customername'] = 'Cust_' + df_new_customers['customername']

# write the updates customers table with the new customername
# values to a new table "new_customers"
sandbox.write_table(df_new_customers, "new_customers")
End-to-end script - create a new project and add a new macro to it; add 7 tasks to the macro to import shipments data; create unique customers, unique distribution centers, and demand aggregated by customer and product from it. Then export these 3 tables to a Cosmic Frog model:
from datastar import *

#------------------------------------
# Create new project and add macro
#------------------------------------

project = Project.create("Scripting with DataStar",
                         description= "Show how to use a Python script to "
                         "create a DataStar project, add connections, create "
                         "a macro and its tasks, and run the macro.")
macro = project.add_macro(name="Populate 3 CF Model Tables")

#--------------------
# Get & set up connections
#--------------------

sandbox = project.get_sandbox()

cf_model = Connection.get_connection("Cosmic Frog Model")

shipments = DelimitedConnection(
    name="May2024-Sept2025 Shipments",
    path="/My Files/DataStar/shipments.csv",
    delimiter=",")


#-----------------------
# Create tasks
#-----------------------

# Import Task to import the raw shipments from the shipments CSV connection
# into a table named raw_shipments in the project sandbox

import_shipments_task = macro.add_import_task(
    name="Import historical shipments",
    source_connection=shipments,
    destination_connection=sandbox,
    destination_table="raw_shipments")

# Add 3 run SQL tasks to create unique DCs, unique Customers, and Customer
# Demand (aggregated by customer and product from July 2024-June 2025)
# from the raw shipments data.

create_dc_task = macro.add_run_sql_task(
    name="Create DCs",
    connection=sandbox,
    query="""
        CREATE TABLE IF NOT EXISTS distribution_centers AS
        SELECT DISTINCT origin_dc AS dc_name,
                        AVG(origin_latitude) AS dc_latitude,
                        AVG(origin_longitude) AS dc_longitude
        FROM raw_shipments
        GROUP BY dc_name;""")

create_cz_task = macro.add_run_sql_task(
    name="Create customers",
    connection=sandbox,
    query="""
        CREATE TABLE IF NOT EXISTS customers AS
        SELECT DISTINCT destination_store AS cust_name,
                        AVG(destination_latitude) AS cust_latitude,
                        AVG(destination_longitude) AS cust_longitude
        FROM raw_shipments
        GROUP BY cust_name;""",
    auto_join=False,
    previous_task=import_shipments_task)

create_demand_task = macro.add_run_sql_task(
    name="Create customer demand",
    connection=sandbox,
    query="""
        CREATE TABLE IF NOT EXISTS customer_demand AS
        SELECT destination_store AS cust_name,
                productname,
                SUM(units) AS demand_quantity
        FROM raw_shipments
        WHERE TO_DATE(ship_date, 'DD/MM/YYYY') BETWEEN
            '2024-07-01' AND '2025-06-30'
        GROUP BY cust_name, productname;""",
    auto_join=False,
    previous_task=import_shipments_task)

# Add 3 export tasks to populate the Facilities, Customers,
# and CustomerDemand tables in empty CF model connection

export_dc_task = macro.add_export_task(
    name="Export distribution centers",
    source_connection=sandbox,
    source_table="distribution_centers",
    destination_connection=cf_model,
    destination_table="facilities",
    destination_table_type="existing",
    destination_table_action="replace",
    mappings=[{"sourceType":"text","targetType":"text",
               "sourceColumn":"dc_name","targetColumn":"facilityname"},
              {"sourceType":"number","targetType":"text",
               "sourceColumn":"dc_latitude","targetColumn":"latitude"},
              {"sourceType":"number","targetType":"text",
               "sourceColumn":"dc_longitude","targetColumn":"longitude"}],
    auto_join=False,
    previous_task=create_dc_task)


export_cz_task = macro.add_export_task(
    name="Export customers",
    source_connection=sandbox,
    source_table="customers",
    destination_connection=cf_model,
    destination_table="customers",
    destination_table_type="existing",
    destination_table_action="replace",
    mappings=[{"sourceType":"text","targetType":"text",
               "sourceColumn":"cust_name","targetColumn":"customername"},
              {"sourceType":"number","targetType":"text",
               "sourceColumn":"cust_latitude","targetColumn":"latitude"},
              {"sourceType":"number","targetType":"text",
               "sourceColumn":"cust_longitude","targetColumn":"longitude"}],
    auto_join=False,
    previous_task=create_cz_task)


export_demand_task = macro.add_export_task(
    name="Export customer demand",
    source_connection=sandbox,
    source_table="customer_demand",
    destination_connection=cf_model,
    destination_table="customerdemand",
    destination_table_type="existing",
    destination_table_action="replace",
    mappings=[{"sourceType":"text","targetType":"text",
               "sourceColumn":"cust_name","targetColumn":"customername"},
              {"sourceType":"text","targetType":"text",
               "sourceColumn":"productname","targetColumn":"productname"},
              {"sourceType":"number","targetType":"text",
               "sourceColumn":"demand_quantity","targetColumn":"quantity"}],
    auto_join=False,
    previous_task=create_demand_task)


#--------------------------------
# Position tasks on Macro Canvas
#--------------------------------

import_shipments_task.x = 250
import_shipments_task.y = 150
import_shipments_task.save()

create_dc_task.x = 500
create_dc_task.y = 10
create_dc_task.save()

create_cz_task.x = 500
create_cz_task.y = 150
create_cz_task.save()

create_demand_task.x = 500
create_demand_task.y = 290
create_demand_task.save()

export_dc_task.x = 750
export_dc_task.y = 10
export_dc_task.save()

export_cz_task.x = 750
export_cz_task.y = 150
export_cz_task.save()

export_demand_task.x = 750
export_demand_task.y = 290
export_demand_task.save()

#-----------------------------------------------------
# Run the macro and write regular progress updates
#-----------------------------------------------------

macro.run()
macro.wait_for_done(verbose=True)


