Setup: Scripting with Python for Cosmic Frog and DataStar

Optilogic has developed Python libraries to facilitate scripting for 2 of its flagship applications: Cosmic Frog, the most powerful supply chain design tool on the market, and DataStar, its just released AI-powered data product where users can create flexible, accessible and repeatable workflows with zero learning curve.

Instead of going into the applications themselves to build and run supply chain models and data workflows, these libraries enable users to programmatically access their functionality and underlying data. Example use cases for such scripts are:

  • Cosmic Frog – read, write, and modify Cosmic Frog model tables.
  • DataStar – connecting to data sources, building macros from tasks chained together and running these macros.

In this documentation we cover the basics of getting yourself set up so you can take advantage of these Python scripting libraries, both on a local computer and on the Optilogic platform leveraging the Lightning Editor application. More specific details for the cosmicfrog and datastar libraries, including examples and end-to-end scripts, are detailed in the following Help Center articles and library specifications:

  • Cosmic Frog:  
    • Using the Cosmic Frog Python Library Help Center article, which includes a great, succinct video overview with examples of using the cosmicfrog Python library.
    • Documentation in PDF format of all cosmicfrog library functionality can be downloaded here (please note that the long character string at the beginning of the filename is expected).
  • DataStar:  
    • Using the DataStar Python Library Help Center article, which covers the main features of the datastar Python library using multiple examples.
    • Documentation in PDF format of all datastar library functionality can be downloaded here (please note that the long character string at the beginning of the filename is expected).

Working with Python Locally

Working locally with Python scripts has the advantage that you can make use of code completion features which may include text auto-completion, showing what arguments functions need, catching incorrect syntax/names, etc. An example set up to achieve this is for example one where Python, Visual Studio Code, and an IntelliSense extension package for Python for Visual Studio Code are installed locally:

  • Visual Studio Code can be downloaded and installed from the “Download for Windows Stable Build” button on the https://code.visualstudio.com/ website or from the Microsoft store
  • Python itself can be downloaded and installed from https://www.python.org/downloads/ or the Microsoft store
    • If asked to add Python to the PATH variable, say yes or check the box to do so
    • If you are unsure Python is already installed on your computer, press the Windows key or click on the Start button to open the Start menu. Type “python” and if it is installed, it will show up as the best match, from which you can also tell the version number.
  • Get IntelliSense (code completion) for Python in Visual Studio Code working with an extension package like this one https://marketplace.visualstudio.com/items?itemName=ms-python.python
    • Again, if asked to add to the PATH variable, say yes or check the box to do so

Installing the Required Python Libraries

Once you are set up locally and are starting to work with Python scripts in Visual Studio Code, you will need to install the Python libraries you want to use to have access to their functionality. You do this by typing following in a terminal in Visual Studio Code (if no terminal is open yet: click on the View menu at the top and select Terminal, or the keyboard shortcut Ctrl + ` can be used):
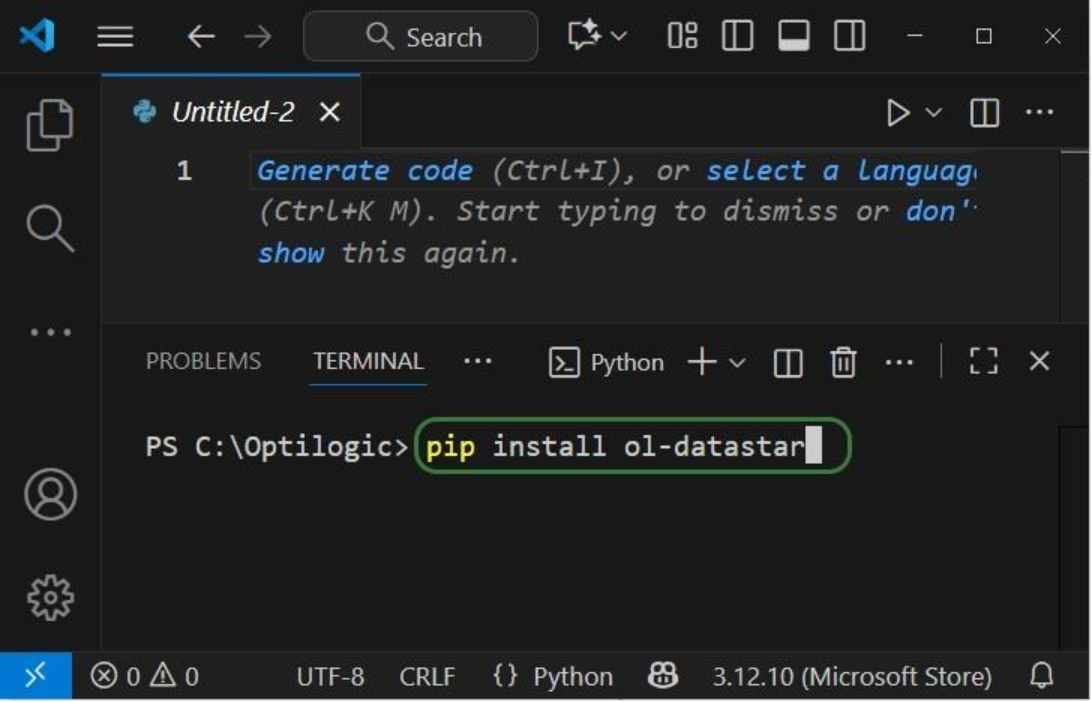
  1. To install the cosmicfrog library facilitating scripting for the Cosmic Frog application, type “pip install cosmicfrog”, then hit Enter.
  2. To install the datastar library facilitating scripting for the DataStar application, type “pip install ol-datastar”, then hit enter:

When installing these libraries, multiple external libraries (dependencies) are installed too. These are required to run the packages successfully and/or make working with them easier. These include the optilogic, pandas, and SQLAlchemy packages (among others) for both libraries. You can find out which packages are installed with the cosmicfrog / ol-datastar libraries by typing “pip show cosmicfrog” or “pip show ol-datastar" in a terminal.

To use other Python libraries in addition, you will usually need to install them using “pip install” too before you can leverage them.

Whitelisting your IP Address

If you want to access certain items on the Optilogic platform (like Cosmic Frog models, DataStar project sandboxes) while working locally, you will need to whitelist your IP address on the platform, so the connections are not blocked by a firewall. You can do this yourself on the Optilogic platform:

  1. After logging into the Optilogic platform on optilogic.app, go to Cloud Storage.
  2. If you do not see the Cloud Storage icon, click on the icon with the 3 dots to see more apps, and then click on the Cloud Storage icon which should be visible now.
  3. Click on the Firewall tab, the 4th tab across the top.
  4. Your current IP address will be shown and you can copy this into the “Enter IP / CIDR” field to create a new rule.
  5. Configure the Rule: give it a Name if you so desire (can leave blank) and enter the Start and End IP addresses if you are whitelisting a range of IP addresses. You will only need to enter a Start IP if there is one static address you are connecting from. Click on the calendar to pick your own end date for the rule. Once done configuring the rule, you can click on the Add Rule button.
  6. The rule that was added is listed at the bottom: it shows when the rule was created, the IP address(es) the rule applies to, and when the rule expires. Once the rule expires, you will need to create a new one to be able to keep connecting to the Optilogic platform with your local Python scripts.

Please note that for working with DataStar, the whitelisting of your IP address is only necessary if you want to access the Project Sandbox of projects directly through scripts. You do not need to whitelist your IP address to leverage other functions while scripting, like creating projects, adding macros and their tasks, and running macros.

Creating an app.key File

App Keys are used to authenticate the user from the local environment on the Optilogic platform. To create an App Key, see this Help Center Article on Generating App and API Keys. Copy the generated App Key and paste it into an empty Notepad window. Save this file as app.key and place it in the same folder as your local Python script.

It is important to emphasize that App Keys and app.key files should not be shared with others, e.g. remove them from folders / zip-files before sharing. Individual users need to authenticate with their own App Key.

Getting Started with the Local Setup

The next set of screenshots will show an example Python script named testing123.py on our local set-up. Here it uses the cosmicfrog library, using the ol-datastar library works similarly. The first screenshot shows a list of functions available from the cosmicfrog Python library:
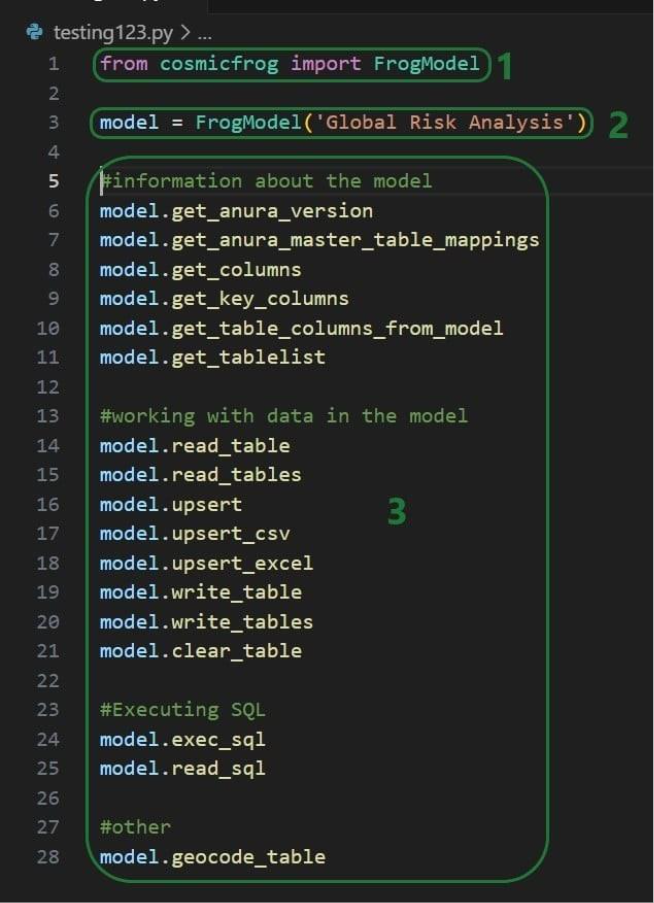
  1. The FrogModel classfrom the cosmicfrog Python library is imported on the first line (“from cosmicfrog import FrogModel”), this is needed to be able to use the specific functions in the cosmicfrog library that work with Cosmic Frog models (line 1).
  2. A variable named “model” is created and the FrogModel function is used to point it to a model named “Global Risk Analysis” that is in my Optilogic account (line 3). Now whenever the Python code does something with “model” it applies to this Global Risk Analysis model.
  3. This lists the functions available in the FrogModel class of the cosmicfrog Python library (lines 5-28).

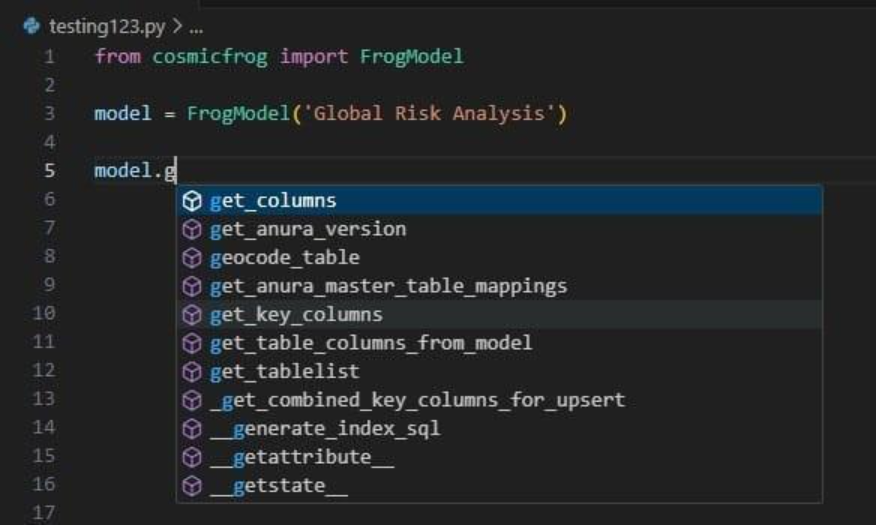
When you continue typing after you have typed “model.” the code completion feature will auto-generate a list of functions you may be getting at. In the next screenshot ones that start with or contain a “g” as I have only typed a “g” so far. This list will auto-update the more you type. You can select from the list with your cursor or arrow up/down keys and hitting the Tab key to select and auto-complete:
When you have completed typing the function name and next type a parenthesis ‘(‘ to start entering arguments, a pop-up will come up which contains information about the function and its arguments:
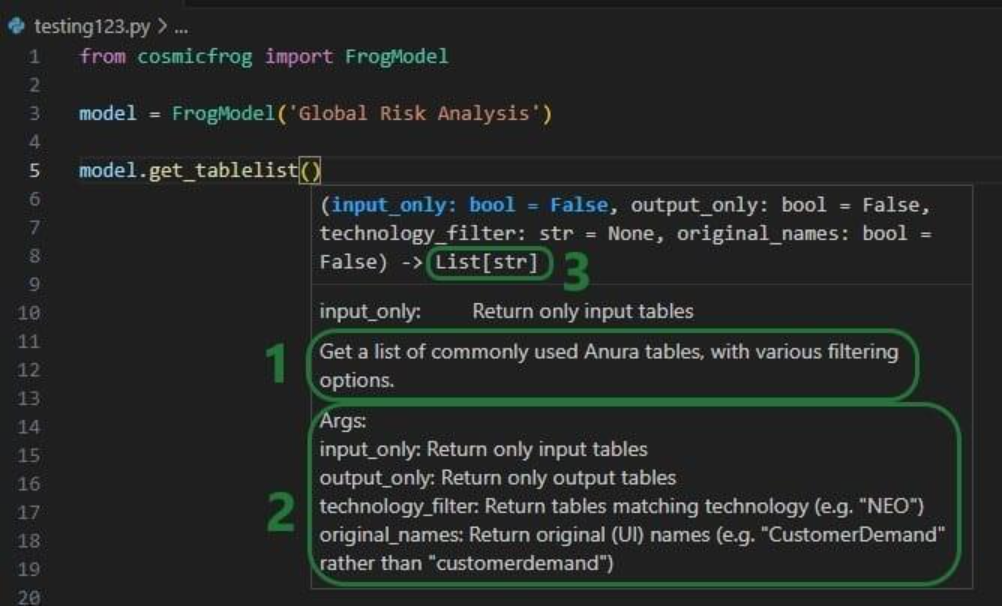
  1. A short description of what the function does.
  2. A description of each argument of the function.
  3. The information given after the -> arrow tells us what type of output this function generates, a list of strings in this case.

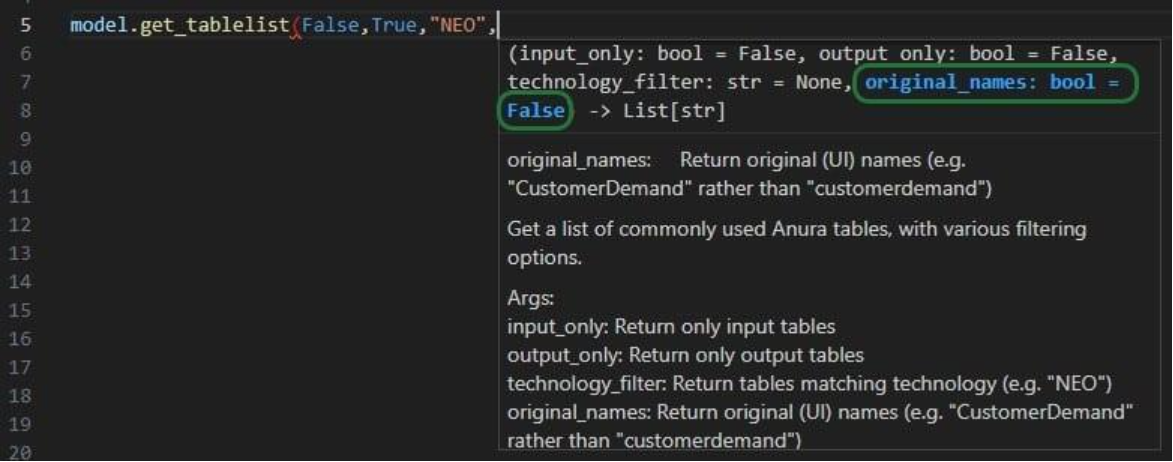
As you type the arguments for the function, the argument that you are on and the expected format (e.g. bool for a Boolean, str for string, etc.) will be in blue font and a description of this specific argument appears above the function description (e.g. above box 1 in the above screenshot). In the screenshot above we are on the first argument input_only which requires a Boolean as input and will be set to False by default if the argument is not specified. In the screenshot below we are on the fourth argument (original_names) which is now in blue font; its default is also False, and the argument description above the function description has changed now to reflect the fourth argument:
Once you are ready to run a script, you can click on the play button at the top right of the screen:
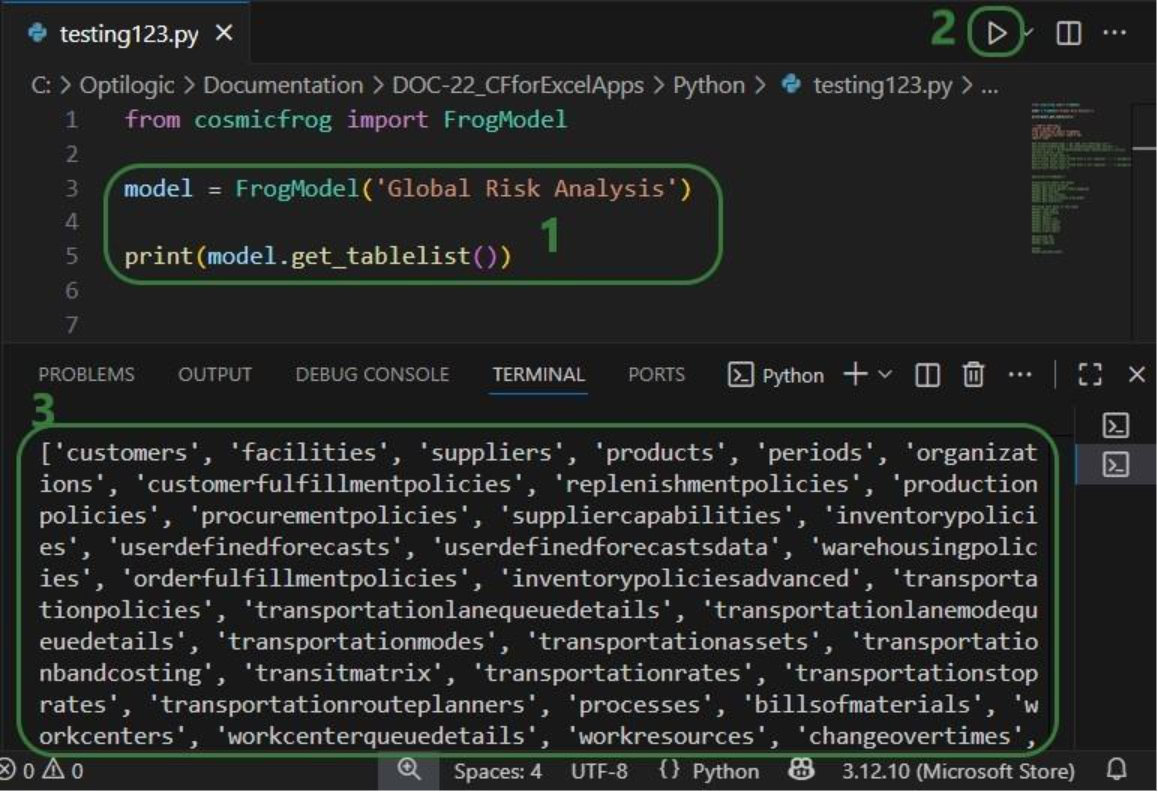
  1. This simple script connects to a Cosmic Frog model named “Global Risk Analysis” (line 3) and then prints a list of all the tables contained in this model (line 5).
  2. To run the script, click on the play button at the right top of the script.
  3. The results of print statements are printed to the Terminal at the bottom of the screen. If not yet open, click on the View menu at the top and select Terminal, or use the keyboard shortcut: Ctrl + `. Here the names of all tables present in the Global Risk Analysis model are printed to the terminal (not all are shown in the screenshot).

Working with Python in Lightning Editor

As mentioned above, you can also use the Lightning Editor application on the Optilogic platform to create and run Python scripts. Lightning Editor is an Integrated Development Environment (IDE) which has some code completion features, but these are not as extensive and complete as those in Visual Studio Code when used with an IntelliSense extension package.

When working on the Optilogic platform, you are already authenticated as a user, and you do not need to generate / provide an App Key or app.key file nor whitelist your IP address.

When using the datastar library in scripts, users need to place a requirements.txt file in the same folder on the Optilogic platform as the script. This file should only contain the text “ol-datastar” (without the quotes). No requirements.txt files is required when using the cosmicfrog library.

The following simple test.py Python script on Lightning Editor will print the first Hopper output table name and its column names:
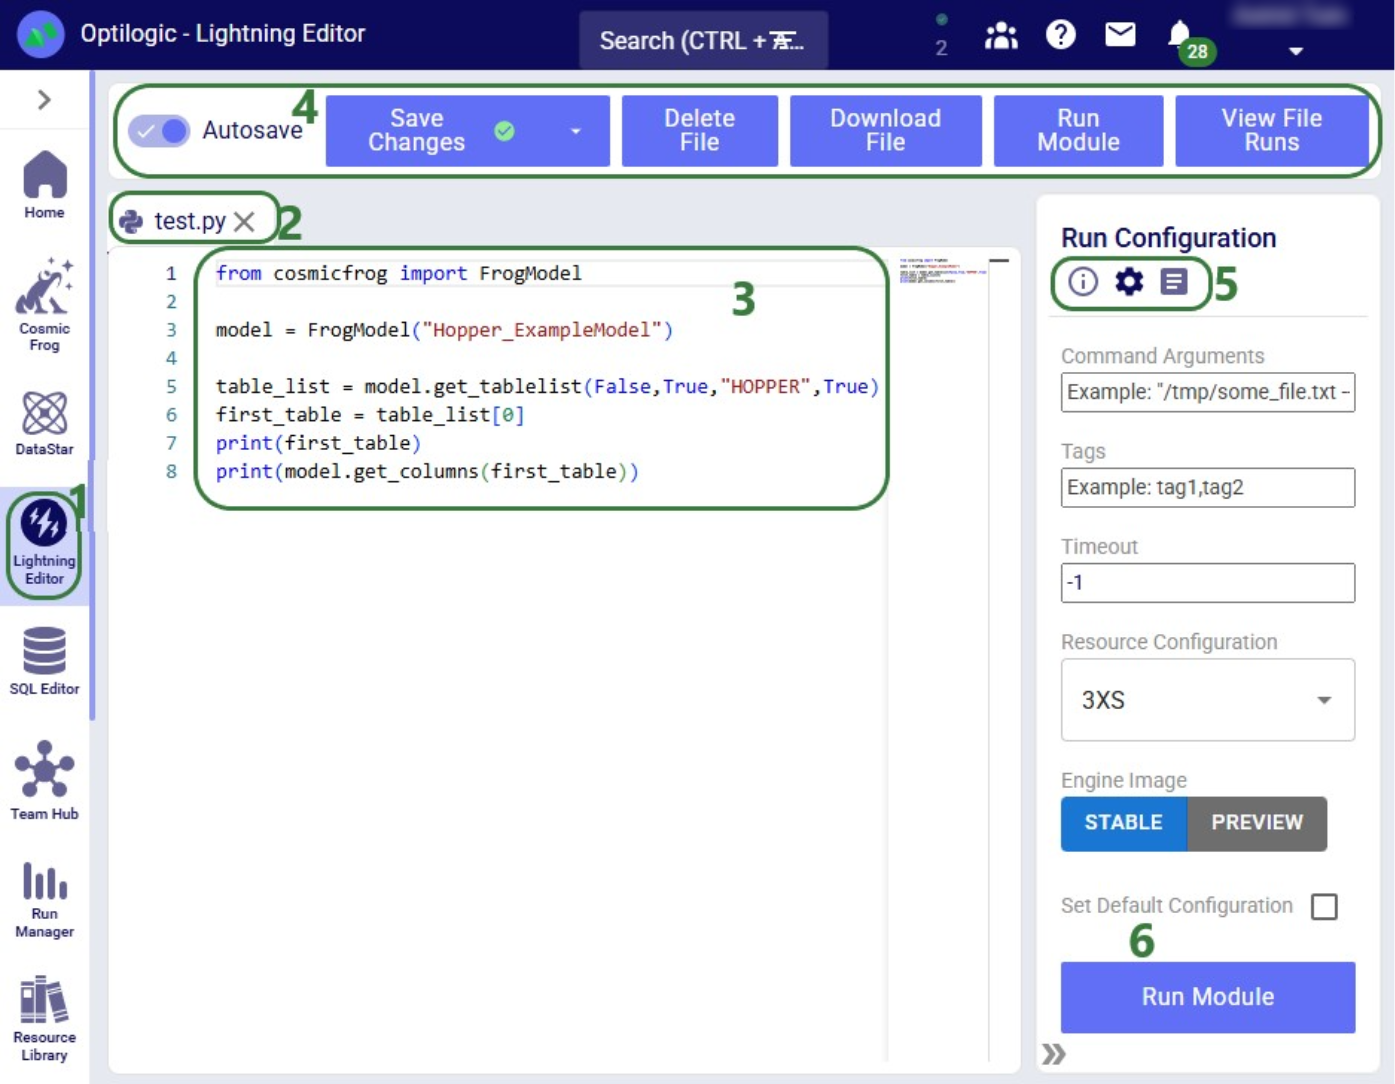
  1. On the Optilogic platform (optilogic.app), open the Lightning Editor application. Note that the order of the applications available on the left-hand side on the Optilogic platform may be different for you as compared to what is shown here. If you do not see Lightning Editor, then click on the icon with 3 horizontal dots to show all applications, and then click on Atlas.
  2. The test.py script is the one file that is open in Lightning Editor.
  3. This is the body of the script, which users can edit directly in here. The script:
    1. Assigns a Cosmic Frog model named “Hopper_ExampleModel” to the “model” variable (line 3).
    2. Uses the get_tablelist method with arguments False (input_only), True (output_only), “HOPPER” (technology_filter) and True (original_names), so that the output of this function will be the list of Hopper ( = transportation optimization engine) output tables where the names will be as they are in the Cosmic Frog UI. This is assigned to a variable named “my_list” (line 5).
    3. Assigns the first table name from the list created under bullet b. to a variable named “first_table” (line 6).
    4. Prints the name of this first table (line 7).
    5. Prints the names of the columns in this table, by using the cosmicfrog get_columns method (line 8). Note that not all column names are shown in the screenshot.
  4. Across the top, several options and actions are available for the currently open file. Clicking on the Run Module button will open the Run Configuration pane on the right hand-side.
  5. This pane has 3 tabs which can be opened using these 3 icons. From left to right: File Details, Run Configuration (currently open), and Run History.
  6. After configuring the script (in our case we do not need to use any of the options), we can click on the Run Module button to start running the script. After starting the run, the pane switches to showing the Run History tab:

  1. The Run History tab is now showing; it can also be opened by clicking on the third icon.
  2. This is the run we just kicked off, and the status shows that it has not yet completed.
  3. Clicking on this “View Run Details” icon will open the Run Manager application in which any jobs run on the Optilogic platform can be monitored and managed:
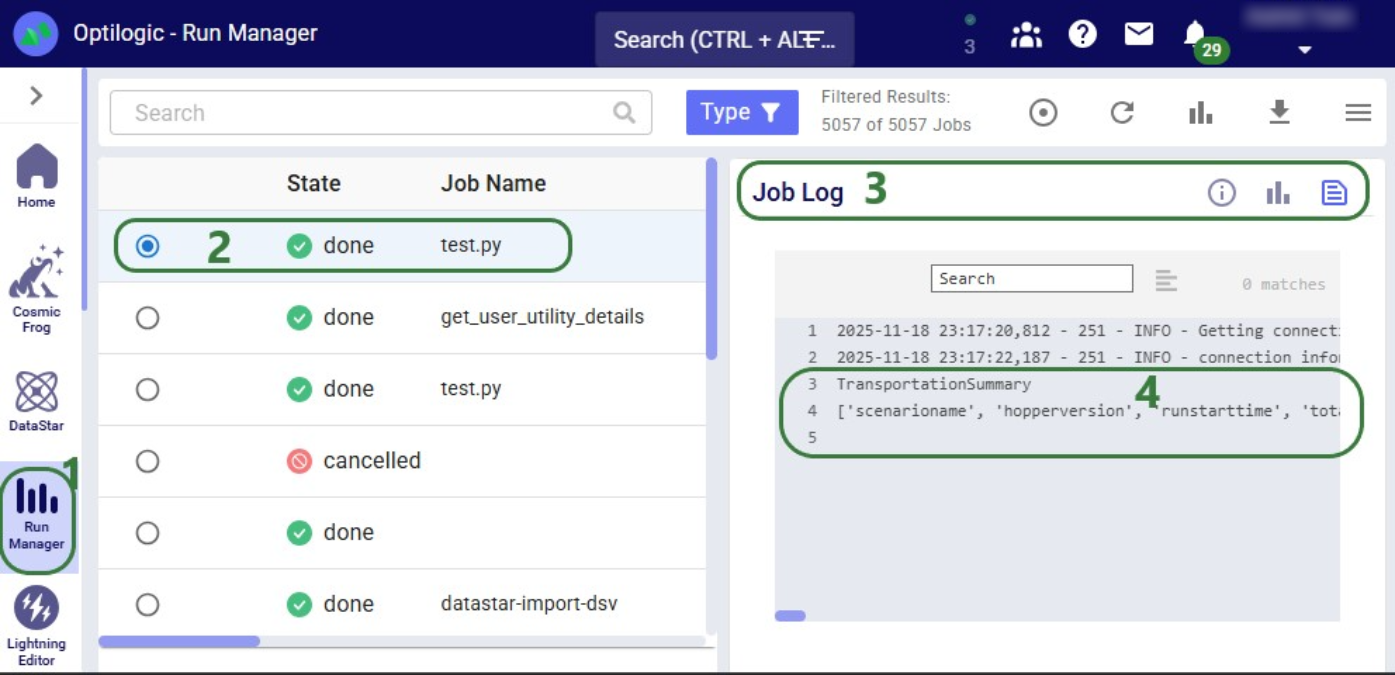
  1. We are now in the Run Manager application.
  2. At the top of the list the most recent job that was run is listed, in this case our test.py Python script. Its state is done, so it completed successfully.
  3. On the right hand-side information about the run can be viewed, currently the right most of the 3 icons has been clicked on which brings up the Job Log.
  4. Results of print statements in Python scripts will be written into this log. We do see here that the first Hopper output table is the Transportation Summary (line 3) and on line 4 all columns in this table are listed. These are not all visible in the screenshot, the user needs to scroll right to see all.

Other Helpful Resources

  • AI Chatbots and Assistants: these can help draft and edit scripts. Note that a human is still needed to make sure a script does what it intends to. Multiple iterations, including possibly human edits, may be needed to create a complete, working script.
  • Python: there are many helpful resources and communities online regarding using & writing Python code. A great place to start is on the Python for Beginners page on python.org. This page also mentions how more experienced coders can get started with Python.
  • Cosmic Frog: learn more about Cosmic Frog and its capabilities from these articles on Optilogic’s Help Center.
  • DataStar: learn more about DataStar and its capabilities from these articles on Optilogic’s Help Center.

Optilogic has developed Python libraries to facilitate scripting for 2 of its flagship applications: Cosmic Frog, the most powerful supply chain design tool on the market, and DataStar, its just released AI-powered data product where users can create flexible, accessible and repeatable workflows with zero learning curve.

Instead of going into the applications themselves to build and run supply chain models and data workflows, these libraries enable users to programmatically access their functionality and underlying data. Example use cases for such scripts are:

  • Cosmic Frog – read, write, and modify Cosmic Frog model tables.
  • DataStar – connecting to data sources, building macros from tasks chained together and running these macros.

In this documentation we cover the basics of getting yourself set up so you can take advantage of these Python scripting libraries, both on a local computer and on the Optilogic platform leveraging the Lightning Editor application. More specific details for the cosmicfrog and datastar libraries, including examples and end-to-end scripts, are detailed in the following Help Center articles and library specifications:

  • Cosmic Frog:  
    • Using the Cosmic Frog Python Library Help Center article, which includes a great, succinct video overview with examples of using the cosmicfrog Python library.
    • Documentation in PDF format of all cosmicfrog library functionality can be downloaded here (please note that the long character string at the beginning of the filename is expected).
  • DataStar:  
    • Using the DataStar Python Library Help Center article, which covers the main features of the datastar Python library using multiple examples.
    • Documentation in PDF format of all datastar library functionality can be downloaded here (please note that the long character string at the beginning of the filename is expected).

Working with Python Locally

Working locally with Python scripts has the advantage that you can make use of code completion features which may include text auto-completion, showing what arguments functions need, catching incorrect syntax/names, etc. An example set up to achieve this is for example one where Python, Visual Studio Code, and an IntelliSense extension package for Python for Visual Studio Code are installed locally:

  • Visual Studio Code can be downloaded and installed from the “Download for Windows Stable Build” button on the https://code.visualstudio.com/ website or from the Microsoft store
  • Python itself can be downloaded and installed from https://www.python.org/downloads/ or the Microsoft store
    • If asked to add Python to the PATH variable, say yes or check the box to do so
    • If you are unsure Python is already installed on your computer, press the Windows key or click on the Start button to open the Start menu. Type “python” and if it is installed, it will show up as the best match, from which you can also tell the version number.
  • Get IntelliSense (code completion) for Python in Visual Studio Code working with an extension package like this one https://marketplace.visualstudio.com/items?itemName=ms-python.python
    • Again, if asked to add to the PATH variable, say yes or check the box to do so

Installing the Required Python Libraries

Once you are set up locally and are starting to work with Python scripts in Visual Studio Code, you will need to install the Python libraries you want to use to have access to their functionality. You do this by typing following in a terminal in Visual Studio Code (if no terminal is open yet: click on the View menu at the top and select Terminal, or the keyboard shortcut Ctrl + ` can be used):

  1. To install the cosmicfrog library facilitating scripting for the Cosmic Frog application, type “pip install cosmicfrog”, then hit Enter.
  2. To install the datastar library facilitating scripting for the DataStar application, type “pip install ol-datastar”, then hit enter:

When installing these libraries, multiple external libraries (dependencies) are installed too. These are required to run the packages successfully and/or make working with them easier. These include the optilogic, pandas, and SQLAlchemy packages (among others) for both libraries. You can find out which packages are installed with the cosmicfrog / ol-datastar libraries by typing “pip show cosmicfrog” or “pip show ol-datastar" in a terminal.

To use other Python libraries in addition, you will usually need to install them using “pip install” too before you can leverage them.

Whitelisting your IP Address

If you want to access certain items on the Optilogic platform (like Cosmic Frog models, DataStar project sandboxes) while working locally, you will need to whitelist your IP address on the platform, so the connections are not blocked by a firewall. You can do this yourself on the Optilogic platform:

  1. After logging into the Optilogic platform on optilogic.app, go to Cloud Storage.
  2. If you do not see the Cloud Storage icon, click on the icon with the 3 dots to see more apps, and then click on the Cloud Storage icon which should be visible now.
  3. Click on the Firewall tab, the 4th tab across the top.
  4. Your current IP address will be shown and you can copy this into the “Enter IP / CIDR” field to create a new rule.
  5. Configure the Rule: give it a Name if you so desire (can leave blank) and enter the Start and End IP addresses if you are whitelisting a range of IP addresses. You will only need to enter a Start IP if there is one static address you are connecting from. Click on the calendar to pick your own end date for the rule. Once done configuring the rule, you can click on the Add Rule button.
  6. The rule that was added is listed at the bottom: it shows when the rule was created, the IP address(es) the rule applies to, and when the rule expires. Once the rule expires, you will need to create a new one to be able to keep connecting to the Optilogic platform with your local Python scripts.

Please note that for working with DataStar, the whitelisting of your IP address is only necessary if you want to access the Project Sandbox of projects directly through scripts. You do not need to whitelist your IP address to leverage other functions while scripting, like creating projects, adding macros and their tasks, and running macros.

Creating an app.key File

App Keys are used to authenticate the user from the local environment on the Optilogic platform. To create an App Key, see this Help Center Article on Generating App and API Keys. Copy the generated App Key and paste it into an empty Notepad window. Save this file as app.key and place it in the same folder as your local Python script.

It is important to emphasize that App Keys and app.key files should not be shared with others, e.g. remove them from folders / zip-files before sharing. Individual users need to authenticate with their own App Key.

Getting Started with the Local Setup

The next set of screenshots will show an example Python script named testing123.py on our local set-up. Here it uses the cosmicfrog library, using the ol-datastar library works similarly. The first screenshot shows a list of functions available from the cosmicfrog Python library:

  1. The FrogModel classfrom the cosmicfrog Python library is imported on the first line (“from cosmicfrog import FrogModel”), this is needed to be able to use the specific functions in the cosmicfrog library that work with Cosmic Frog models (line 1).
  2. A variable named “model” is created and the FrogModel function is used to point it to a model named “Global Risk Analysis” that is in my Optilogic account (line 3). Now whenever the Python code does something with “model” it applies to this Global Risk Analysis model.
  3. This lists the functions available in the FrogModel class of the cosmicfrog Python library (lines 5-28).

When you continue typing after you have typed “model.” the code completion feature will auto-generate a list of functions you may be getting at. In the next screenshot ones that start with or contain a “g” as I have only typed a “g” so far. This list will auto-update the more you type. You can select from the list with your cursor or arrow up/down keys and hitting the Tab key to select and auto-complete:

When you have completed typing the function name and next type a parenthesis ‘(‘ to start entering arguments, a pop-up will come up which contains information about the function and its arguments:

  1. A short description of what the function does.
  2. A description of each argument of the function.
  3. The information given after the -> arrow tells us what type of output this function generates, a list of strings in this case.

As you type the arguments for the function, the argument that you are on and the expected format (e.g. bool for a Boolean, str for string, etc.) will be in blue font and a description of this specific argument appears above the function description (e.g. above box 1 in the above screenshot). In the screenshot above we are on the first argument input_only which requires a Boolean as input and will be set to False by default if the argument is not specified. In the screenshot below we are on the fourth argument (original_names) which is now in blue font; its default is also False, and the argument description above the function description has changed now to reflect the fourth argument:

Once you are ready to run a script, you can click on the play button at the top right of the screen:

  1. This simple script connects to a Cosmic Frog model named “Global Risk Analysis” (line 3) and then prints a list of all the tables contained in this model (line 5).
  2. To run the script, click on the play button at the right top of the script.
  3. The results of print statements are printed to the Terminal at the bottom of the screen. If not yet open, click on the View menu at the top and select Terminal, or use the keyboard shortcut: Ctrl + `. Here the names of all tables present in the Global Risk Analysis model are printed to the terminal (not all are shown in the screenshot).

Working with Python in Lightning Editor

As mentioned above, you can also use the Lightning Editor application on the Optilogic platform to create and run Python scripts. Lightning Editor is an Integrated Development Environment (IDE) which has some code completion features, but these are not as extensive and complete as those in Visual Studio Code when used with an IntelliSense extension package.

When working on the Optilogic platform, you are already authenticated as a user, and you do not need to generate / provide an App Key or app.key file nor whitelist your IP address.

When using the datastar library in scripts, users need to place a requirements.txt file in the same folder on the Optilogic platform as the script. This file should only contain the text “ol-datastar” (without the quotes). No requirements.txt files is required when using the cosmicfrog library.

The following simple test.py Python script on Lightning Editor will print the first Hopper output table name and its column names:
  1. On the Optilogic platform (optilogic.app), open the Lightning Editor application. Note that the order of the applications available on the left-hand side on the Optilogic platform may be different for you as compared to what is shown here. If you do not see Lightning Editor, then click on the icon with 3 horizontal dots to show all applications, and then click on Atlas.
  2. The test.py script is the one file that is open in Lightning Editor.
  3. This is the body of the script, which users can edit directly in here. The script:
    1. Assigns a Cosmic Frog model named “Hopper_ExampleModel” to the “model” variable (line 3).
    2. Uses the get_tablelist method with arguments False (input_only), True (output_only), “HOPPER” (technology_filter) and True (original_names), so that the output of this function will be the list of Hopper ( = transportation optimization engine) output tables where the names will be as they are in the Cosmic Frog UI. This is assigned to a variable named “my_list” (line 5).
    3. Assigns the first table name from the list created under bullet b. to a variable named “first_table” (line 6).
    4. Prints the name of this first table (line 7).
    5. Prints the names of the columns in this table, by using the cosmicfrog get_columns method (line 8). Note that not all column names are shown in the screenshot.
  4. Across the top, several options and actions are available for the currently open file. Clicking on the Run Module button will open the Run Configuration pane on the right hand-side.
  5. This pane has 3 tabs which can be opened using these 3 icons. From left to right: File Details, Run Configuration (currently open), and Run History.
  6. After configuring the script (in our case we do not need to use any of the options), we can click on the Run Module button to start running the script. After starting the run, the pane switches to showing the Run History tab:

  1. The Run History tab is now showing; it can also be opened by clicking on the third icon.
  2. This is the run we just kicked off, and the status shows that it has not yet completed.
  3. Clicking on this “View Run Details” icon will open the Run Manager application in which any jobs run on the Optilogic platform can be monitored and managed:
  1. We are now in the Run Manager application.
  2. At the top of the list the most recent job that was run is listed, in this case our test.py Python script. Its state is done, so it completed successfully.
  3. On the right hand-side information about the run can be viewed, currently the right most of the 3 icons has been clicked on which brings up the Job Log.
  4. Results of print statements in Python scripts will be written into this log. We do see here that the first Hopper output table is the Transportation Summary (line 3) and on line 4 all columns in this table are listed. These are not all visible in the screenshot, the user needs to scroll right to see all.

Other Helpful Resources

  • AI Chatbots and Assistants: these can help draft and edit scripts. Note that a human is still needed to make sure a script does what it intends to. Multiple iterations, including possibly human edits, may be needed to create a complete, working script.
  • Python: there are many helpful resources and communities online regarding using & writing Python code. A great place to start is on the Python for Beginners page on python.org. This page also mentions how more experienced coders can get started with Python.
  • Cosmic Frog: learn more about Cosmic Frog and its capabilities from these articles on Optilogic’s Help Center.
  • DataStar: learn more about DataStar and its capabilities from these articles on Optilogic’s Help Center.

Have More Questions?

Contact Support

Get in touch

Contact Sales

Get in touch

Visit Frogger Pond Community

Visit our Community