

In this quick start guide we will walk through the steps of modifying data in a table in the Project Sandbox using Update tasks. These changes can either be made to all records in a table or a subset based on a filtering condition. Any PostgreSQL function can be used when configuring the update statements and conditions of Update tasks.
This quick start guide builds upon a previous one where unique customers were created from historical shipments using a Leapfrog-generated Run SQL task. Please follow the steps in that quick start guide first if you want to follow along with the steps in this one. The starting point for this quick start is therefore a project named “Import Historical Shipments”, which contains a macro called Import Shipments. This macro has an Import task and a Run SQL task. The project has a Historical Shipments data connection of type = CSV, and the Project Sandbox contains 2 tables named rawshipments (42,656 records) and customers (1,333 records). Note that if you also followed one of the other quick start guides on exporting data to a Cosmic Frog model (see here), your project will also contain an Export task, and a Cosmic Frog data connection; you can still follow along with this quick start guide too.
The steps we will walk through in this quick start guide are:
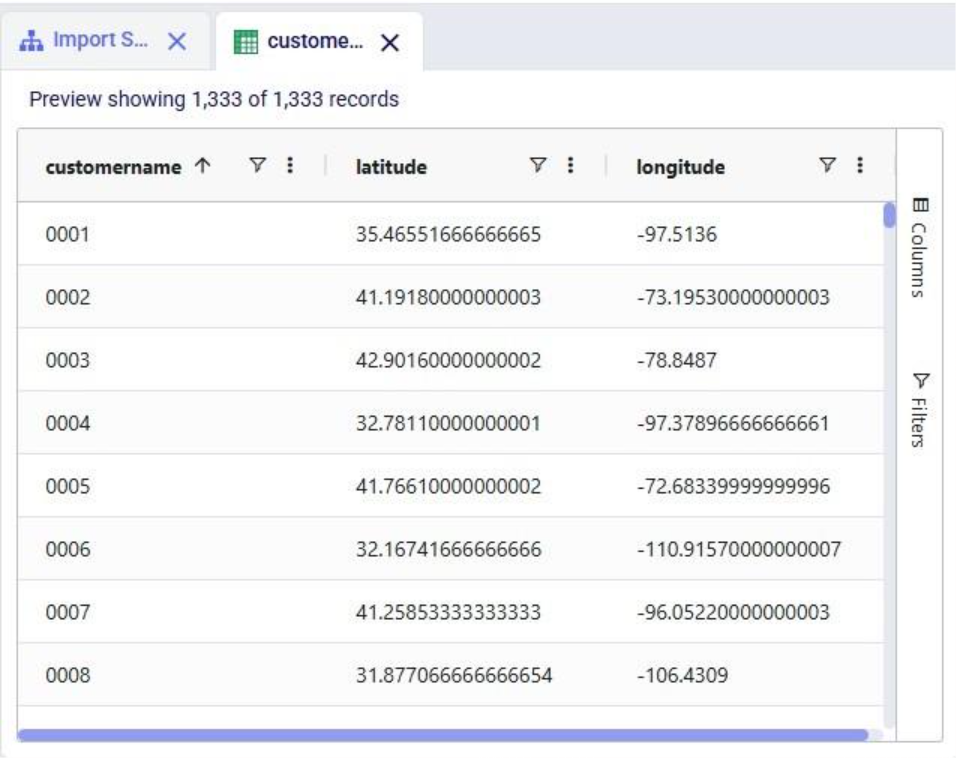
We have a look at the customers table which was created from the historical shipment data in the previous 2 quick start guides, see the screenshot below. Sorting on the customername column, we see that they are ordered in alphabetical order. This is because the customer name column is of type text as it starts with the string “CZ”. This leads to them not being ordered based on the number part that follows the “CZ” prefix.

If we want ordering customer names alphabetically to result in an order that is the same as sorting the number part of the customer name, we need to make sure each customer name has the same number of digits. We will use Update tasks to change the format of the number part of the customer names so that they are all 4 digits by adding leading 0’s to those that have less than 4 digits. While we are at it, we will also replace the “CZ” prefix with “Cust_” to make the data consistent with other data sources that contain customer names. We will break the updates to the customer name column up into 3 steps using 3 Update tasks initially. At the end, we will see how they can be combined into a single Update task. The 3 steps are:
Let us add the first Update task to our Import Shipments macro:
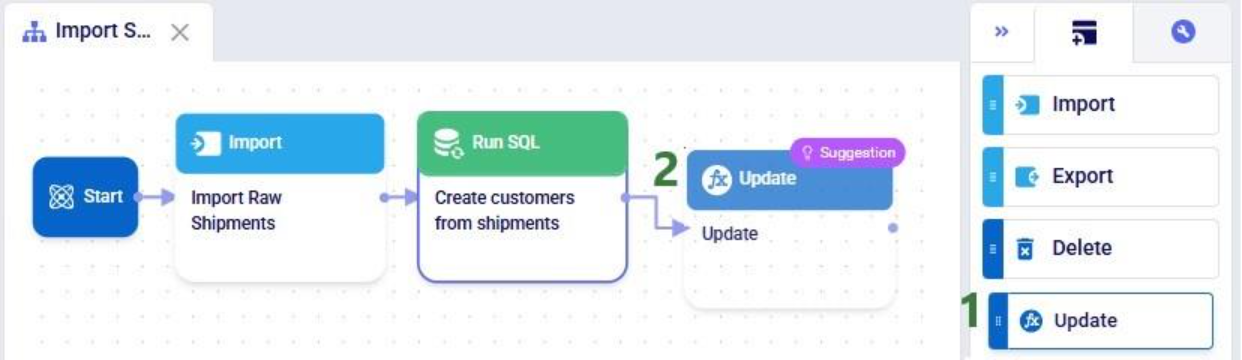
After dropping the Update task onto the macro canvas, its configuration tab will be opened automatically on the right-hand side:

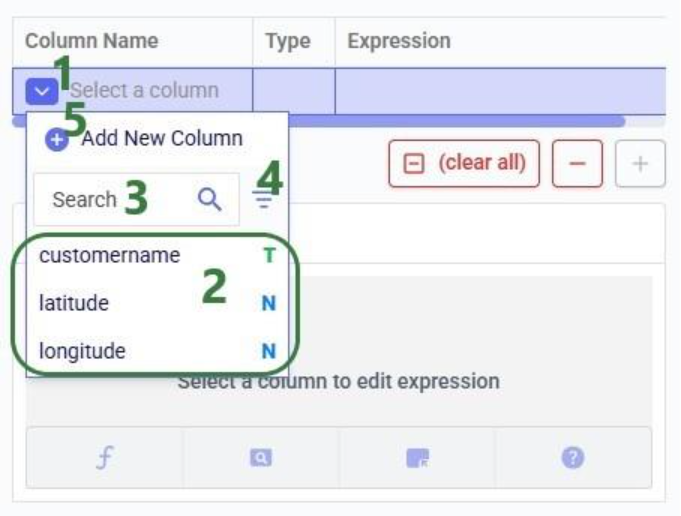
If you have not already, click on the plus button to add your first update statement:
Next, we will write the expression for which we can use the Expression Builder area just below the update statements table. What we type there will also be added to the Expression column of the selected Update Statement. These expressions can use any PostgreSQL function, also those which may not be pre-populated in the helper lists. Please see the PostgreSQL documentation for all available functions.
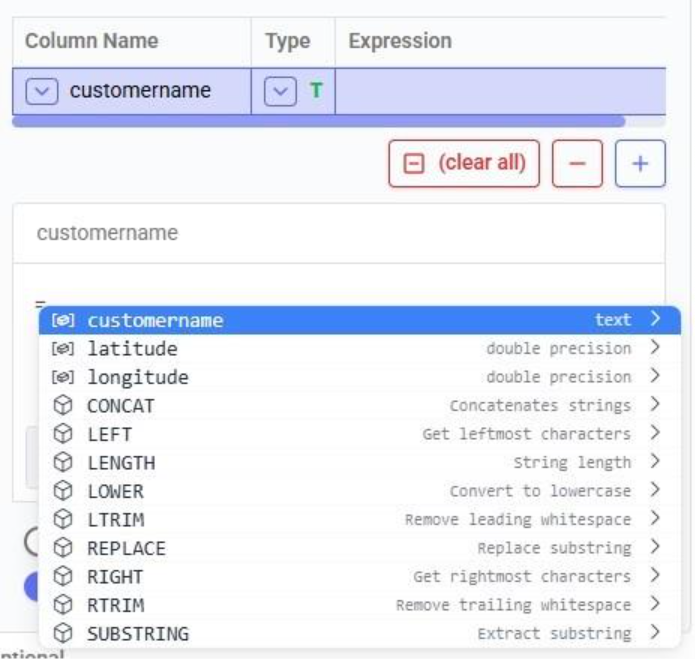
When clicking in the Expression Builder, an equal sign is already there, and a list of items comes up. At the top are the columns that are present in the target table and below those is a list of string functions which we can select to use. Here, the functions shown are string functions, since we are working on a text type column, when working on column with a different data type, other functions, those relevant to the data type, will be shown. We will select the last option shown in the screenshot, the substring function, since we want to first remove the “CZ” from the start of the customer names:
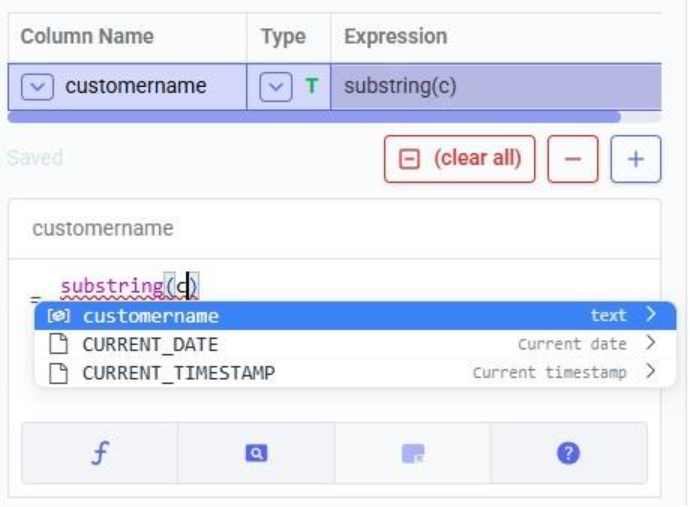
The substring function needs at least 2 arguments, which will be specified in the parentheses. The first argument needs to be the customername column in our case, since that is the column containing the string values we want manipulate. After typing a “c”, the customername column and 2 functions starting with “c” are suggested in the pop-up list. We choose the customername column. The second argument specifies the start location from where we want to start the substring. Since we want to remove the “CZ”, we specify 3 as the start location, leaving characters number 1 and 2 off. The third argument is optional; it indicates the end location of the substring. We do not specify it, meaning we want to keep all characters starting from character number 3:

We can run this task now without specifying a Condition (see section further below) in which case the expression will be applied to all records in the customers table. After running the task, we open the customers table to see the result:

We see that our intended change was made. The “CZ” is removed from the customer names. Sorted alphabetically, they still are not in increasing order of the number part of their name. Next, we use the lpad (left pad) function to add leading zeroes so all customer names consist of 4 digits. This function has 3 arguments: the string to apply the left padding to (the customername column), the number of characters the final string needs to have (4), and the padding character (‘0’).

After running this task, the customername column values are as follows:
Now with the leading zeroes and all customer names being 4 characters long, sorting alphabetically results in the same order as sorting by the number part of the customer name.
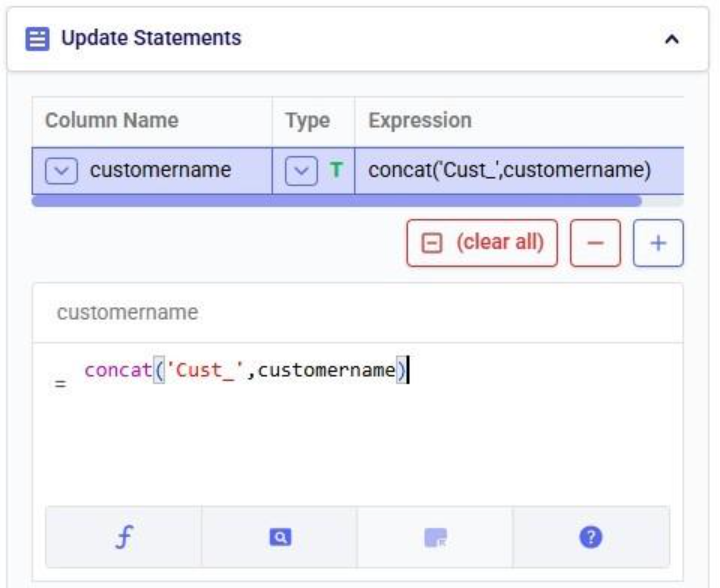
Finally, we want to add the prefix “Cust_”. We use the concat (concatenation) function for this. At first, we type Cust_ with double quotes around it, but the squiggly red line below the expression in the expression builder indicates this is not the right syntax. Hovering over the expression in the expression builder explains the problem:

The correct syntax for using strings in these functions is to use single quotes:
Instead of concat we can also use “= ‘Cust_’ || customername” as the expression. The double pipe symbol is used in PostgreSQL as the concatenation operator.
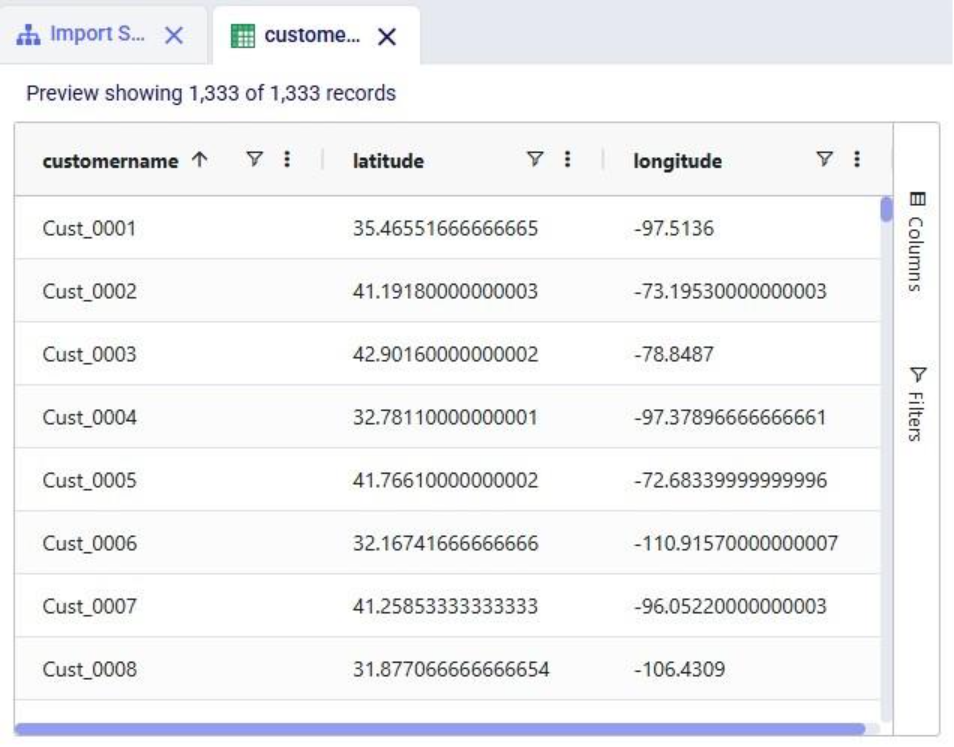
Running this third update task results in the following customer names in the customers table:
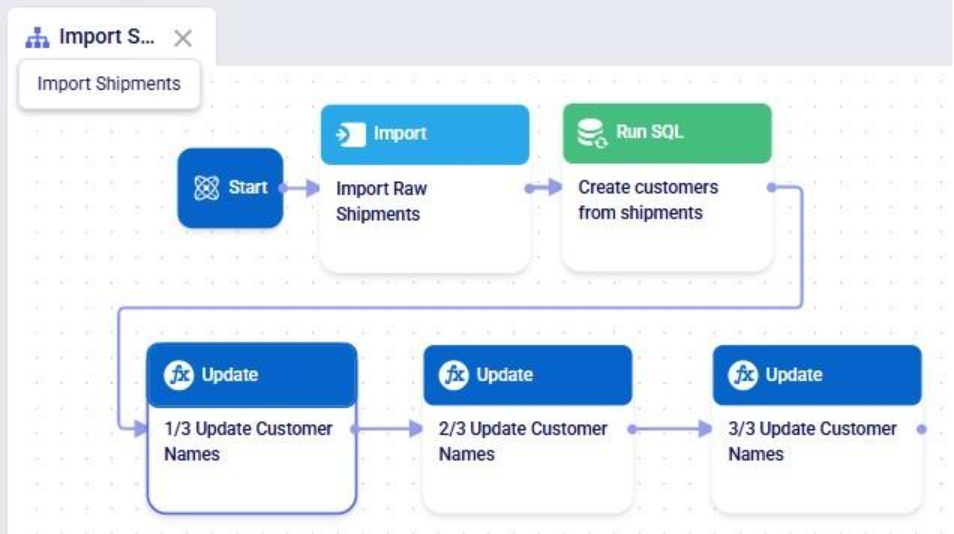
Our goal of how we wanted to update the customername column has been achieved. Our macro now looks as follows with the 3 Update tasks added:
The 3 tasks described above can be combined into 1 Update task by nesting the expressions as follows:

Running this task instead of the 3 above will result in the same changes to the customername column in the customers table.
Please note that in the above we only specified one update statement in each Update task. You can add more than one update statement per update task, in which case:
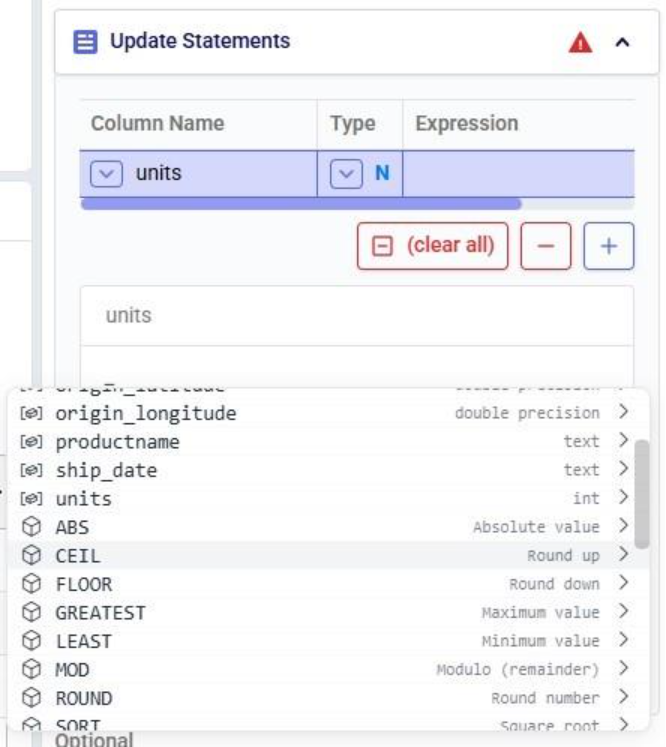
As mentioned above, the list of suggested functions is different depending on the data type of the column being updated. This screenshot shows part of the suggested functions for a number column:
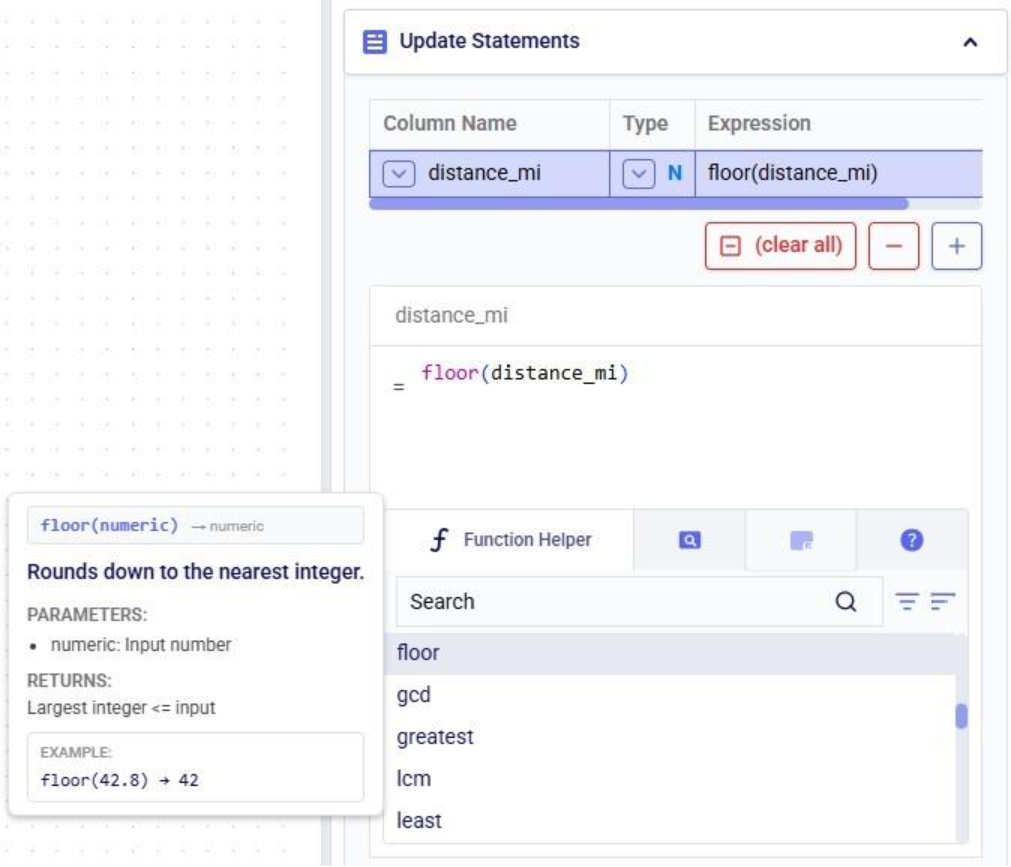
At the bottom of Expression Builder are multiple helper tabs to facilitate quickly building your desired expressions. The first one is the Function Helper which lists the available functions. The functions are listed by category: string, numeric, date, aggregate, and conditional. At the top of the list user has search, filter and sort options available to quickly find a function of interest. Hovering over a function in the list will bring up details of the function, from top to bottom: a summary of the format and input and output data types of the function, a description of what the function does, its input parameter(s), what it returns, and an example:
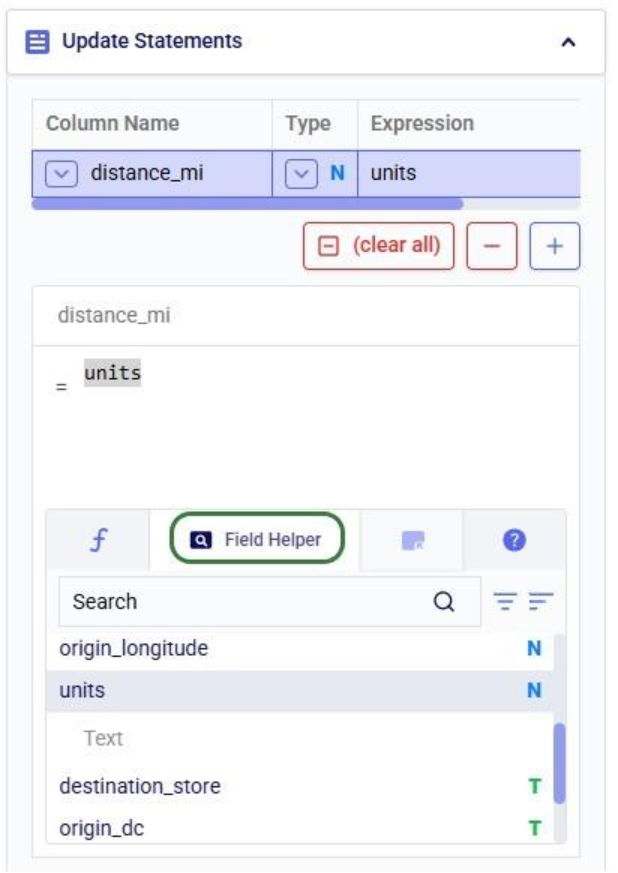
The next helper tab contains the Field Helper. This lists all the columns of the target table, sorted by their data type. Again, to quickly find the desired field, users can search, filter, and sort the list using the options at the top of the list:
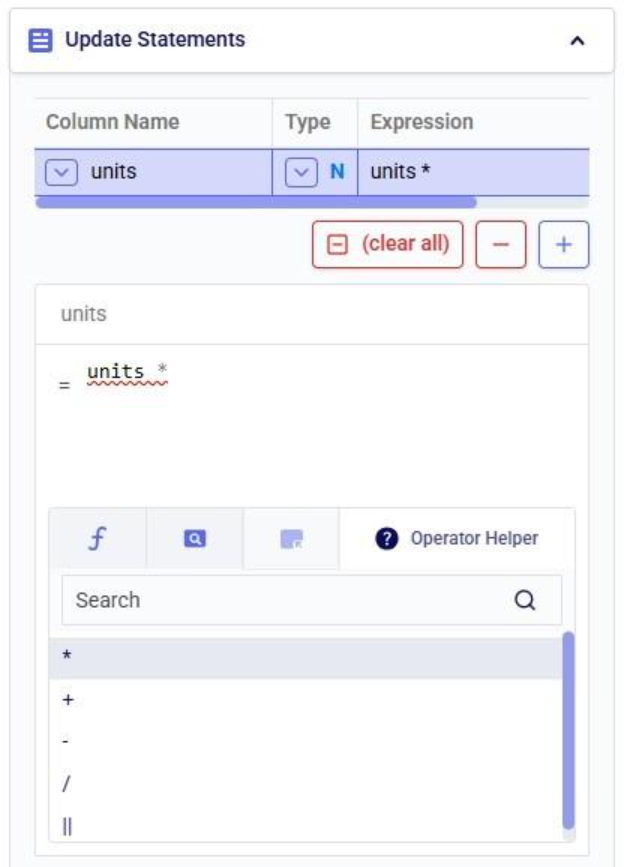
The fourth tab is the Operator Helper, which lists several helpful numerical and string operators. This list can be searched too using the Search box at the top of the list:
There is another optional configuration section for Update tasks, the Condition section. In here, users can specify an expression to filter the target table on before applying the update(s) specified in the Update Statements section. This way, the updates are only applied to the subset of records that match the condition.
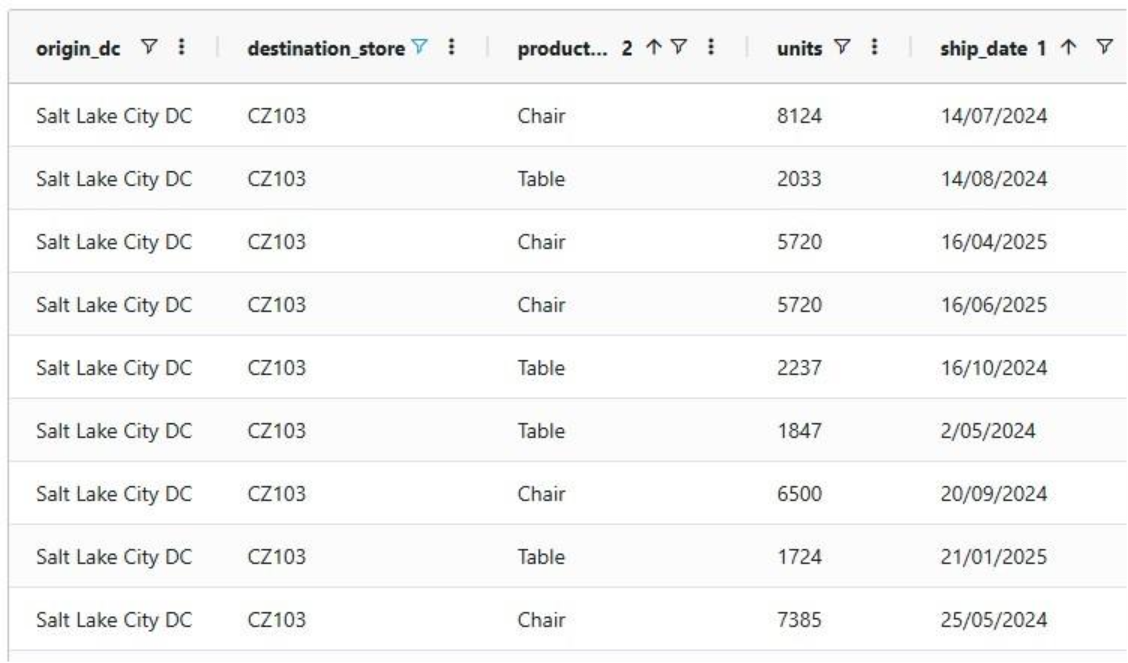
In this example, we will look at some records of the rawshipments table in the project sandbox of the same project (“Import Historical Shipments). We have opened this table in a grid and filtered for origin_dc Salt Lake City DC and destination_store CZ103.

What we want to do is update the “units” column and increase the values by 50% for the Table product. The Update Statements section shows that we set the units field to its current value multiplied by 1.5, which will achieve the 50% increase:

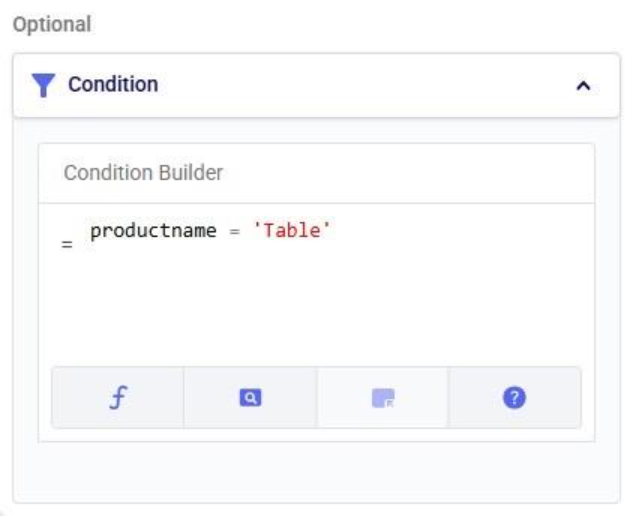
However, if we run the Update task as is, all values in the units field will be increased by 50%, for both the Table and the Chair product. To make sure we only apply this increase to the Table product, we configure the Condition section as follows:
The condition builder has the same function, field, and operator helper tabs at the bottom as the expression builder in the update statements section to enable users to quickly build their conditions. Building conditions works in the same way as building expressions.
Running the task and checking the updated rawshipments table for the same subset of records as we saw above, we can check that it worked as intended. The values in the units column for the Table records are indeed 1.5 times their original value, while the Chair units are unchanged.
It is important to note that opening tables in DataStar currently shows a preview of 10,000 records. When filtering a table by clicking on the filter icons to the right of a column name, only the resulting subset of records from those first 10,000 records will be included. While an Update task will be applied to all records in a table, due to this limit on the number of records in the preview you may not always be able to see (all) results of your Update task in the grid. In addition, an Update task can also change the order of the records in the table. This can lead to a filter showing a different set of records after running an update task as compared to the filtered subset that was shown prior to running it. Users can use the SQL Editor application on the Optilogic platform to see the full set of records for any tables.
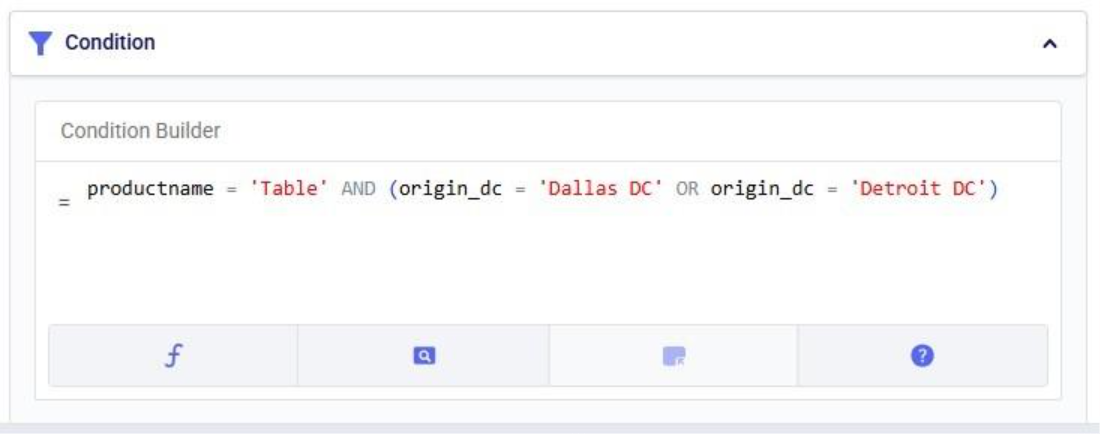
Finally, if you want to apply multiple conditions you can use logical AND and OR statements to combine them in the Expression Builder. You would for example specify the condition as follows if you want to increase the units for the Table product by 50% only for the records where the origin_dc value is either “Dallas DC” or “Detroit DC”:

In this quick start guide we will walk through the steps of modifying data in a table in the Project Sandbox using Update tasks. These changes can either be made to all records in a table or a subset based on a filtering condition. Any PostgreSQL function can be used when configuring the update statements and conditions of Update tasks.
This quick start guide builds upon a previous one where unique customers were created from historical shipments using a Leapfrog-generated Run SQL task. Please follow the steps in that quick start guide first if you want to follow along with the steps in this one. The starting point for this quick start is therefore a project named “Import Historical Shipments”, which contains a macro called Import Shipments. This macro has an Import task and a Run SQL task. The project has a Historical Shipments data connection of type = CSV, and the Project Sandbox contains 2 tables named rawshipments (42,656 records) and customers (1,333 records). Note that if you also followed one of the other quick start guides on exporting data to a Cosmic Frog model (see here), your project will also contain an Export task, and a Cosmic Frog data connection; you can still follow along with this quick start guide too.
The steps we will walk through in this quick start guide are:
We have a look at the customers table which was created from the historical shipment data in the previous 2 quick start guides, see the screenshot below. Sorting on the customername column, we see that they are ordered in alphabetical order. This is because the customer name column is of type text as it starts with the string “CZ”. This leads to them not being ordered based on the number part that follows the “CZ” prefix.
If we want ordering customer names alphabetically to result in an order that is the same as sorting the number part of the customer name, we need to make sure each customer name has the same number of digits. We will use Update tasks to change the format of the number part of the customer names so that they are all 4 digits by adding leading 0’s to those that have less than 4 digits. While we are at it, we will also replace the “CZ” prefix with “Cust_” to make the data consistent with other data sources that contain customer names. We will break the updates to the customer name column up into 3 steps using 3 Update tasks initially. At the end, we will see how they can be combined into a single Update task. The 3 steps are:
Let us add the first Update task to our Import Shipments macro:
After dropping the Update task onto the macro canvas, its configuration tab will be opened automatically on the right-hand side:
If you have not already, click on the plus button to add your first update statement:
Next, we will write the expression for which we can use the Expression Builder area just below the update statements table. What we type there will also be added to the Expression column of the selected Update Statement. These expressions can use any PostgreSQL function, also those which may not be pre-populated in the helper lists. Please see the PostgreSQL documentation for all available functions.
When clicking in the Expression Builder, an equal sign is already there, and a list of items comes up. At the top are the columns that are present in the target table and below those is a list of string functions which we can select to use. Here, the functions shown are string functions, since we are working on a text type column, when working on column with a different data type, other functions, those relevant to the data type, will be shown. We will select the last option shown in the screenshot, the substring function, since we want to first remove the “CZ” from the start of the customer names:
The substring function needs at least 2 arguments, which will be specified in the parentheses. The first argument needs to be the customername column in our case, since that is the column containing the string values we want manipulate. After typing a “c”, the customername column and 2 functions starting with “c” are suggested in the pop-up list. We choose the customername column. The second argument specifies the start location from where we want to start the substring. Since we want to remove the “CZ”, we specify 3 as the start location, leaving characters number 1 and 2 off. The third argument is optional; it indicates the end location of the substring. We do not specify it, meaning we want to keep all characters starting from character number 3:
We can run this task now without specifying a Condition (see section further below) in which case the expression will be applied to all records in the customers table. After running the task, we open the customers table to see the result:
We see that our intended change was made. The “CZ” is removed from the customer names. Sorted alphabetically, they still are not in increasing order of the number part of their name. Next, we use the lpad (left pad) function to add leading zeroes so all customer names consist of 4 digits. This function has 3 arguments: the string to apply the left padding to (the customername column), the number of characters the final string needs to have (4), and the padding character (‘0’).
After running this task, the customername column values are as follows:
Now with the leading zeroes and all customer names being 4 characters long, sorting alphabetically results in the same order as sorting by the number part of the customer name.
Finally, we want to add the prefix “Cust_”. We use the concat (concatenation) function for this. At first, we type Cust_ with double quotes around it, but the squiggly red line below the expression in the expression builder indicates this is not the right syntax. Hovering over the expression in the expression builder explains the problem:
The correct syntax for using strings in these functions is to use single quotes:
Instead of concat we can also use “= ‘Cust_’ || customername” as the expression. The double pipe symbol is used in PostgreSQL as the concatenation operator.
Running this third update task results in the following customer names in the customers table:
Our goal of how we wanted to update the customername column has been achieved. Our macro now looks as follows with the 3 Update tasks added:
The 3 tasks described above can be combined into 1 Update task by nesting the expressions as follows:
Running this task instead of the 3 above will result in the same changes to the customername column in the customers table.
Please note that in the above we only specified one update statement in each Update task. You can add more than one update statement per update task, in which case:
As mentioned above, the list of suggested functions is different depending on the data type of the column being updated. This screenshot shows part of the suggested functions for a number column:
At the bottom of Expression Builder are multiple helper tabs to facilitate quickly building your desired expressions. The first one is the Function Helper which lists the available functions. The functions are listed by category: string, numeric, date, aggregate, and conditional. At the top of the list user has search, filter and sort options available to quickly find a function of interest. Hovering over a function in the list will bring up details of the function, from top to bottom: a summary of the format and input and output data types of the function, a description of what the function does, its input parameter(s), what it returns, and an example:
The next helper tab contains the Field Helper. This lists all the columns of the target table, sorted by their data type. Again, to quickly find the desired field, users can search, filter, and sort the list using the options at the top of the list:
The fourth tab is the Operator Helper, which lists several helpful numerical and string operators. This list can be searched too using the Search box at the top of the list:
There is another optional configuration section for Update tasks, the Condition section. In here, users can specify an expression to filter the target table on before applying the update(s) specified in the Update Statements section. This way, the updates are only applied to the subset of records that match the condition.
In this example, we will look at some records of the rawshipments table in the project sandbox of the same project (“Import Historical Shipments). We have opened this table in a grid and filtered for origin_dc Salt Lake City DC and destination_store CZ103.
What we want to do is update the “units” column and increase the values by 50% for the Table product. The Update Statements section shows that we set the units field to its current value multiplied by 1.5, which will achieve the 50% increase:
However, if we run the Update task as is, all values in the units field will be increased by 50%, for both the Table and the Chair product. To make sure we only apply this increase to the Table product, we configure the Condition section as follows:
The condition builder has the same function, field, and operator helper tabs at the bottom as the expression builder in the update statements section to enable users to quickly build their conditions. Building conditions works in the same way as building expressions.
Running the task and checking the updated rawshipments table for the same subset of records as we saw above, we can check that it worked as intended. The values in the units column for the Table records are indeed 1.5 times their original value, while the Chair units are unchanged.
It is important to note that opening tables in DataStar currently shows a preview of 10,000 records. When filtering a table by clicking on the filter icons to the right of a column name, only the resulting subset of records from those first 10,000 records will be included. While an Update task will be applied to all records in a table, due to this limit on the number of records in the preview you may not always be able to see (all) results of your Update task in the grid. In addition, an Update task can also change the order of the records in the table. This can lead to a filter showing a different set of records after running an update task as compared to the filtered subset that was shown prior to running it. Users can use the SQL Editor application on the Optilogic platform to see the full set of records for any tables.
Finally, if you want to apply multiple conditions you can use logical AND and OR statements to combine them in the Expression Builder. You would for example specify the condition as follows if you want to increase the units for the Table product by 50% only for the records where the origin_dc value is either “Dallas DC” or “Detroit DC”:


