

In this quick start guide we will walk through the steps of exporting data from a table in the Project Sandbox to a table in a Cosmic Frog model.
This quick start guide builds upon a previous one where unique customers were created from historical shipments using a Leapfrog-generated Run SQL task. Please follow the steps in that quick start guide first if you want to follow along with the steps in this one. The starting point for this quick start is therefore a project named Import Historical Shipments, which contains a macro called Import Shipments. This macro has an Import task and a Run SQL task. The project has a Historical Shipments data connection of type = CSV, and the Project Sandbox contains 2 tables named rawshipments (42,656 records) and customers (1,333 records).
The steps we will walk through in this quick start guide are:
First, we will create a new Cosmic Frog model which does not have any data in it. We want to use this model to receive the data we export from the Project Sandbox.
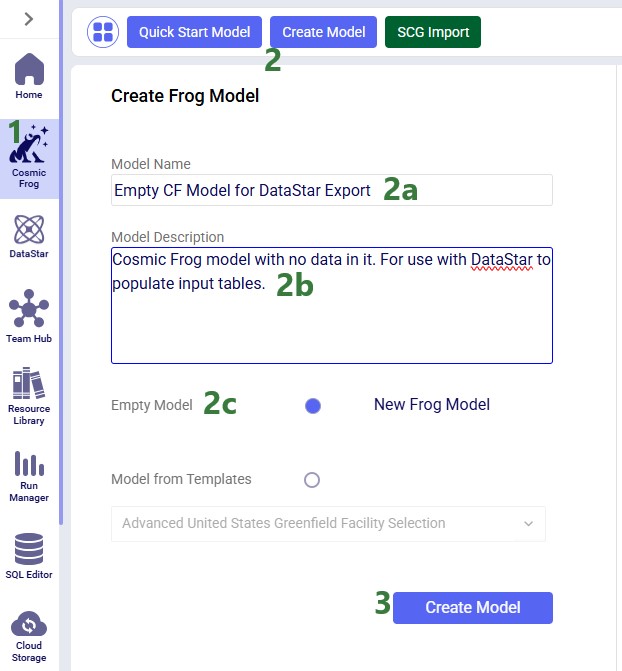
As shown with the numbered steps in the screenshot below: while on the start page of Cosmic Frog, click on the Create Model button at the top of the screen. In the Create Frog Model form that comes up, type the model name, optionally add a description, and select the Empty Model option. Click on the Create Model button to complete the creation of the new model:
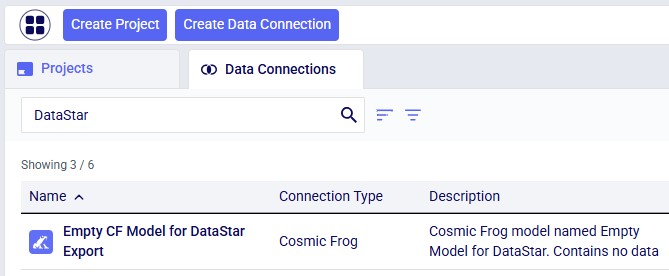
Next, we want to create a connection to the just created empty Cosmic Frog model in DataStar. To do so: open your DataStar application, then click on the Create Data Connection button at the top of the screen. In the Create Data Connection form that comes up, type the name of the connection (we are using the same name as the model, i.e. “Empty CF Model for DataStar Export”),optionally add a description, select Cosmic Frog Models in the Connection Type drop-down list, click on the name of the newly created empty model in the list of models, and click on Add Connection. The new data connection will now be shown in the list of connections on the Data Connections tab (shown in list format here):
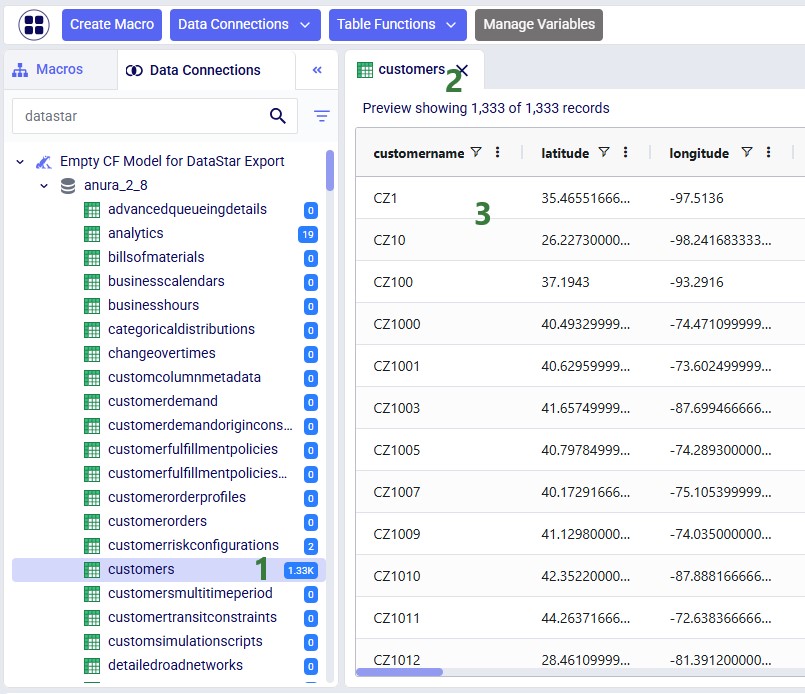
Now, go to the Projects tab, and click on the “Import Historical Shipments” project to open it. We will first have a look at the Project Sandbox and the empty Cosmic Frog model connections, so click on the Data Connections tab:

The next step is to add and configure an Export Task to the Import Shipments macro. Click on the Macros tab in the panel on the left-hand side, and then on the Import Shipments macro to open it. Click on the Export task in the Tasks panel on the right-hand side and drag it onto the Macro Canvas. If you drag it close to the Run SQL task, it will automatically connect to it once you drop the Export task:

The Configuration panel on the right has now become the active panel:

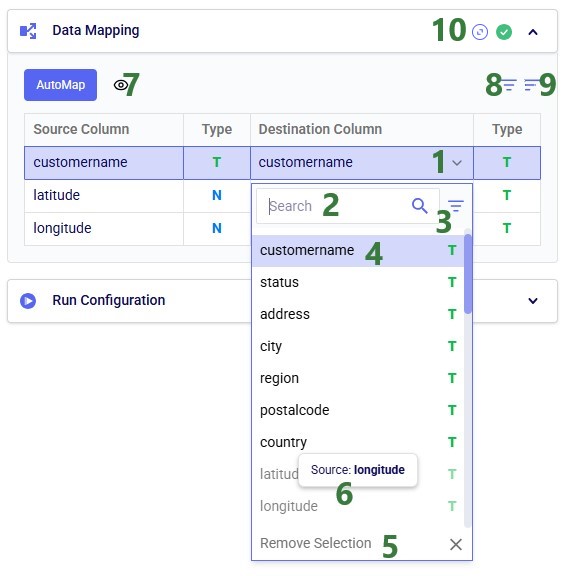
Click on the AutoMap button, and in the message that comes up, select either Replace Mappings or Add New Mappings. Since we have not mapped anything yet, the result will be the same in this case. After using the AutoMap option, the mapping looks as follows:

We see that each source column is now mapped to a destination column of the same name. This is what we expect, since in the previous quick start guide, we made sure to tell Leapfrog when generating the Run SQL task for creating unique customers to match the schema of the customers table in Cosmic Frog models (“the Anura schema”).
If the Import Shipments macro has been run previously, we can just run the new Export Customers task by itself (hover over the task in the Macro Canvas and click on the play button that comes up), otherwise we can choose to run the full macro by clicking on the green Run button at the right top. Once completed, click on the Data Connections tab to check the results:
Above, the AutoMap functionality was used to map all 3 source columns to the correct destination columns. Here, we will go into some more detail on manually mapping and additional options users have to quickly sort and filter the list of mappings.

In this quick start guide we will walk through the steps of exporting data from a table in the Project Sandbox to a table in a Cosmic Frog model.
This quick start guide builds upon a previous one where unique customers were created from historical shipments using a Leapfrog-generated Run SQL task. Please follow the steps in that quick start guide first if you want to follow along with the steps in this one. The starting point for this quick start is therefore a project named Import Historical Shipments, which contains a macro called Import Shipments. This macro has an Import task and a Run SQL task. The project has a Historical Shipments data connection of type = CSV, and the Project Sandbox contains 2 tables named rawshipments (42,656 records) and customers (1,333 records).
The steps we will walk through in this quick start guide are:
First, we will create a new Cosmic Frog model which does not have any data in it. We want to use this model to receive the data we export from the Project Sandbox.
As shown with the numbered steps in the screenshot below: while on the start page of Cosmic Frog, click on the Create Model button at the top of the screen. In the Create Frog Model form that comes up, type the model name, optionally add a description, and select the Empty Model option. Click on the Create Model button to complete the creation of the new model:
Next, we want to create a connection to the just created empty Cosmic Frog model in DataStar. To do so: open your DataStar application, then click on the Create Data Connection button at the top of the screen. In the Create Data Connection form that comes up, type the name of the connection (we are using the same name as the model, i.e. “Empty CF Model for DataStar Export”),optionally add a description, select Cosmic Frog Models in the Connection Type drop-down list, click on the name of the newly created empty model in the list of models, and click on Add Connection. The new data connection will now be shown in the list of connections on the Data Connections tab (shown in list format here):
Now, go to the Projects tab, and click on the “Import Historical Shipments” project to open it. We will first have a look at the Project Sandbox and the empty Cosmic Frog model connections, so click on the Data Connections tab:
The next step is to add and configure an Export Task to the Import Shipments macro. Click on the Macros tab in the panel on the left-hand side, and then on the Import Shipments macro to open it. Click on the Export task in the Tasks panel on the right-hand side and drag it onto the Macro Canvas. If you drag it close to the Run SQL task, it will automatically connect to it once you drop the Export task:
The Configuration panel on the right has now become the active panel:
Click on the AutoMap button, and in the message that comes up, select either Replace Mappings or Add New Mappings. Since we have not mapped anything yet, the result will be the same in this case. After using the AutoMap option, the mapping looks as follows:
We see that each source column is now mapped to a destination column of the same name. This is what we expect, since in the previous quick start guide, we made sure to tell Leapfrog when generating the Run SQL task for creating unique customers to match the schema of the customers table in Cosmic Frog models (“the Anura schema”).
If the Import Shipments macro has been run previously, we can just run the new Export Customers task by itself (hover over the task in the Macro Canvas and click on the play button that comes up), otherwise we can choose to run the full macro by clicking on the green Run button at the right top. Once completed, click on the Data Connections tab to check the results:
Above, the AutoMap functionality was used to map all 3 source columns to the correct destination columns. Here, we will go into some more detail on manually mapping and additional options users have to quickly sort and filter the list of mappings.


