

DataStar users typically will want to use data from a variety of sources in their projects. This data can be in different locations and systems and there are multiple methods available to get the required data into the DataStar application. In this documentation we will describe the main categories of data sources users may want to use and the possible ways of making these available in DataStar for usage.
If you would first like to learn more about DataStar before diving into data integration specifics, please see the Navigation DataStar articles on the Optilogic Help Center.
The following diagram shows different data sources and the data transfer pathways to make them available for use in DataStar:

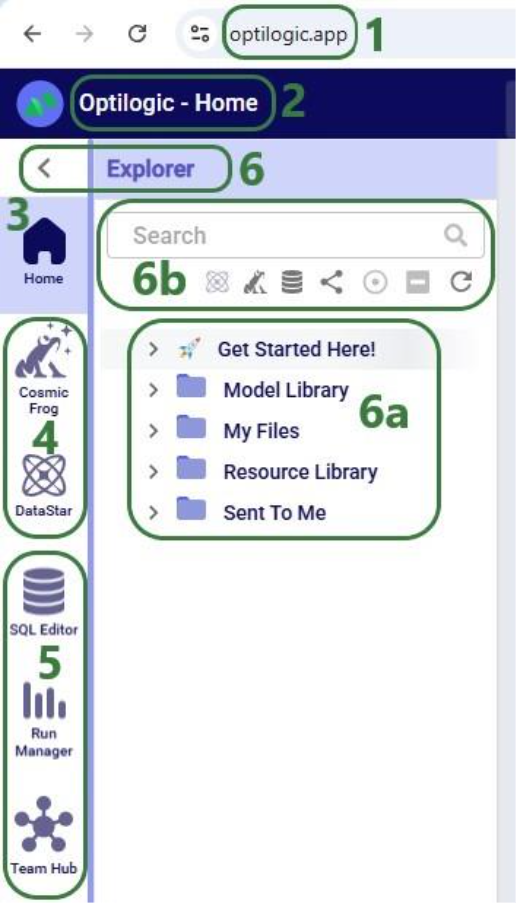
We will dive a bit deeper into making local data available for use in DataStar building upon what was covered under bullets 5a-5c in the previous screenshot. First, we will familiarize ourselves with the layout of the Optilogic platform:
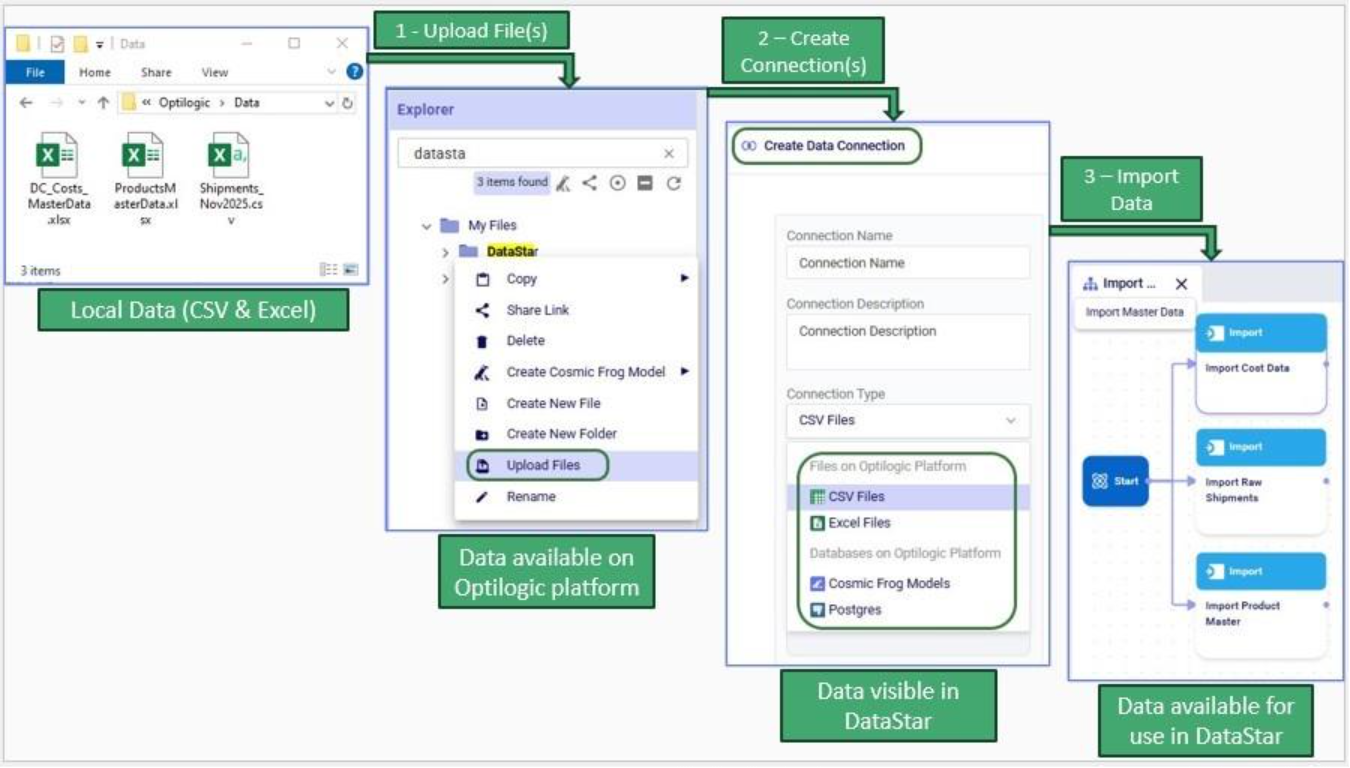
Next, we will cover the 3 steps to go from data sitting on a user’s computer locally to being able to use it in DataStar in detail through the next set of screenshots. At a high-level the steps are:
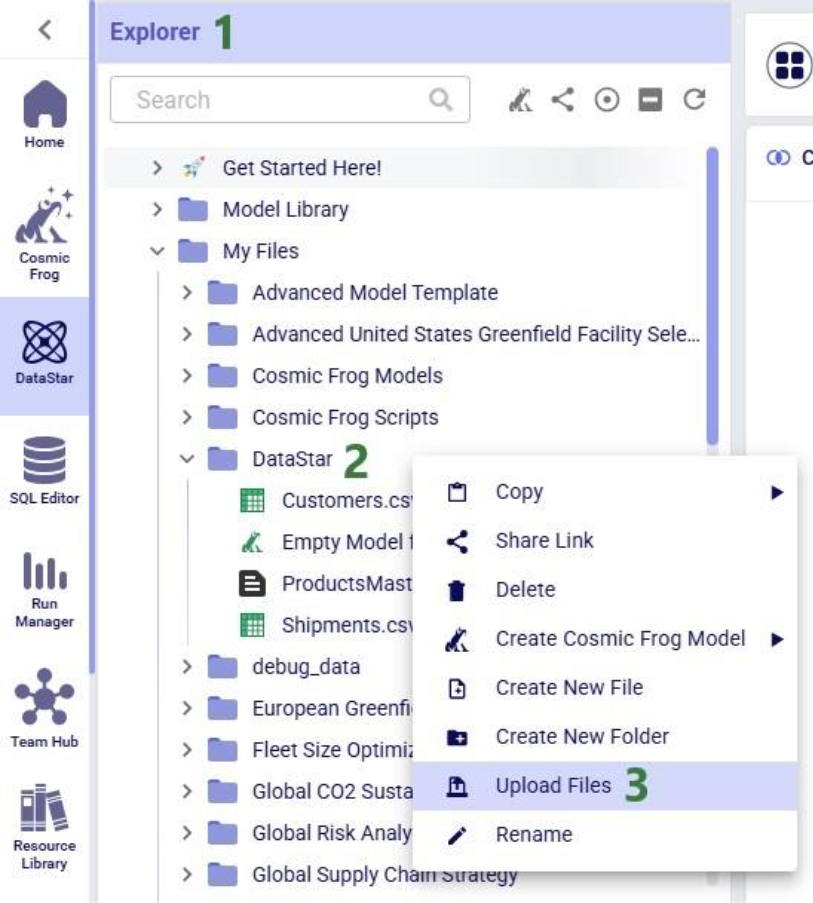
To get local data onto the Opitlogic platform, we can use the file / folder upload option:

Select either the file(s) or folder you want to upload by browsing to it/them. After clicking on Open, the File Upload form will be shown again:
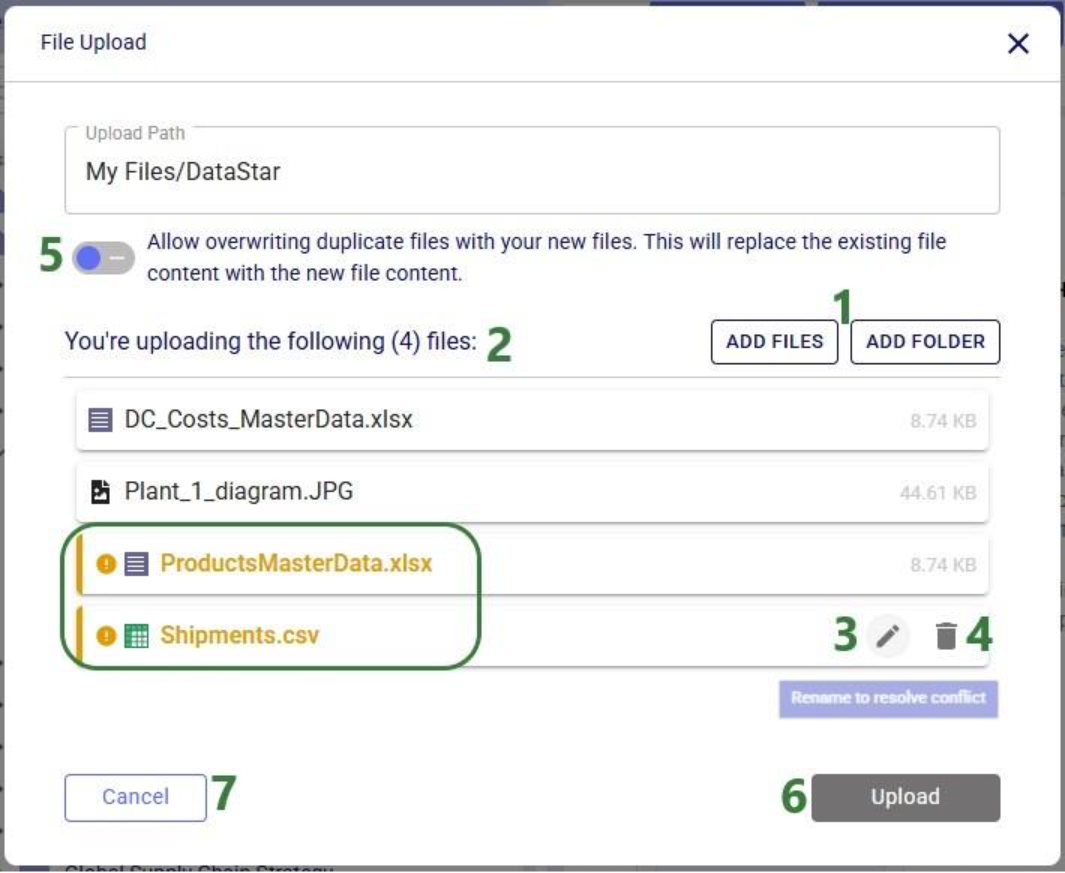
Note that files in the upload list that will not cause name conflicts can also be renamed or removed from the list if so desired. This can for example be convenient when wanting to upload most files in a folder, except for a select few. In that case use the Add Folder option and in the list that will be shown, remove the few that should not be uploaded rather than using Add Files and then manually selecting almost all files in a folder.
Once the files are uploaded, you will be able to see them in the Explorer by expanding the folder they were uploaded to or searching for (part of) their name using the Search box.
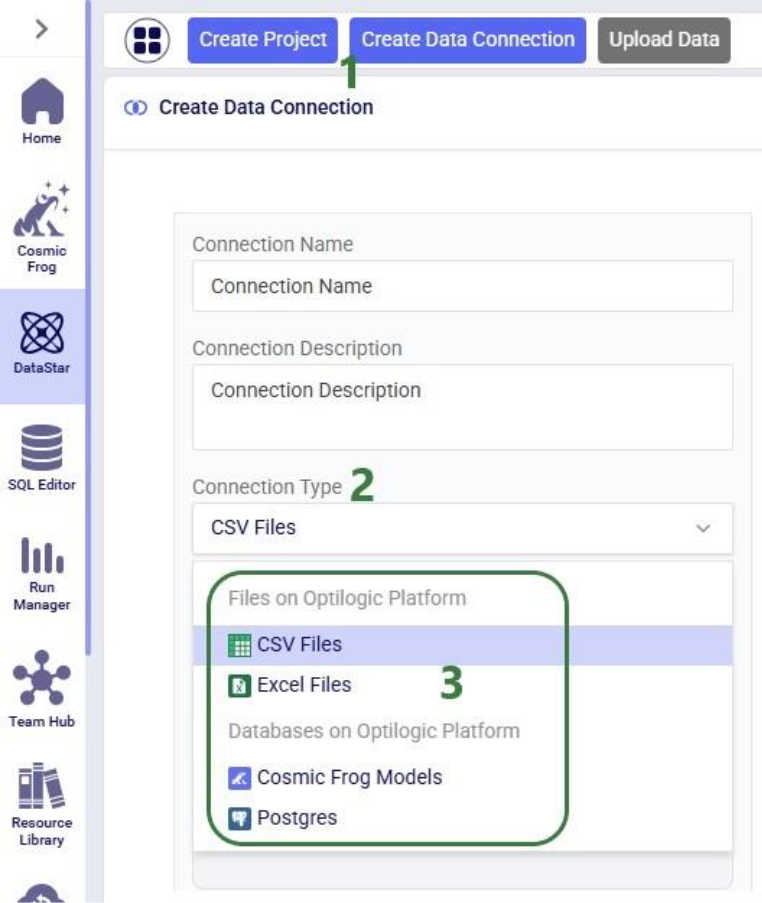
The second step is to then make these files visible to DataStar by setting up Data Connections to them:
After setting up a Data Connection to a Cosmic Frog model and to a CSV file, we can see the source files in the Explorer, and the Data Connections pointing to these in DataStar side-by-side:
To start using the data in DataStar, we need to take the third step of importing the data from the data connections into a project. Typically, the data will be imported into the Project Sandbox, but this could also be into another Postgres database, including a Cosmic Frog model. Importing data is done using Import tasks; the Configuration tab of one is shown in this next screenshot:

The 3 steps described above are summarized in the following sequence of screenshots:
For a data workflow that is used repeatedly and needs to be re-run using the latest data regularly, users do not need to go through all 3 steps above of uploading data, creating/re-configuring data connections, and creating/re-configuring Import tasks to refresh local data. If the new files to be used have the same name and same data structure as the current ones, replacing the files on the Optilogic platform with the newer ones will suffice (so only step 1 is needed); the data connections and Import tasks do not need to be updated or re-configured. Users can do this manually or programmatically:
This section describes how to bring external data into DataStar using supported integration patterns where the data transfer is started from an external system, e.g. the data is “pushed” onto the Optilogic platform.
External systems such as ETL tools, automation platforms, or custom scripts can load data into DataStar through the Optilogic Pioneer API (please see the Optilogic REST API documentation for details). This approach is ideal when you want to programmatically upload files, refresh datasets, or orchestrate transformations without connecting directly to the underlying database.
Key points:
Please note that Optilogic has developed a Python library to facilitate scripting for DataStar. If your external system is Python based, you can leverage this library as a wrapper for the API. For more details on working with the library and a code example of accessing a DataStar project’s sandbox, see this “Using the DataStar Python Library” help center article.
Every DataStar project is backed by a PostgreSQL database. You can connect directly to this database using any PostgreSQL-compatible driver, including:
This enables you to write or update data using SQL, query the sandbox tables, or automate recurring loads. The same approach applies to both DataStar projects and Cosmic Frog models since both use PostgreSQL under the hood. Please see this help center article on how to retrieve connection strings for Cosmic Frog model and DataStar project databases; these will need to be passed into the database connection to gain access to the model / project database.
Several scripts and utilities to connect to common external data sources, including Databricks, Google Big Query, Google Drive, and Snowflake, are available on Optilogic’s Resource Library:

These utilities and scripts can function as a starting point to modify into your own desired script for connecting to and retrieving data from a certain data source. You will need to update authentication and connection information in the scripts and configure the user settings to your needs. For example, this is the User Input section of the “Databricks Data Import Script”:
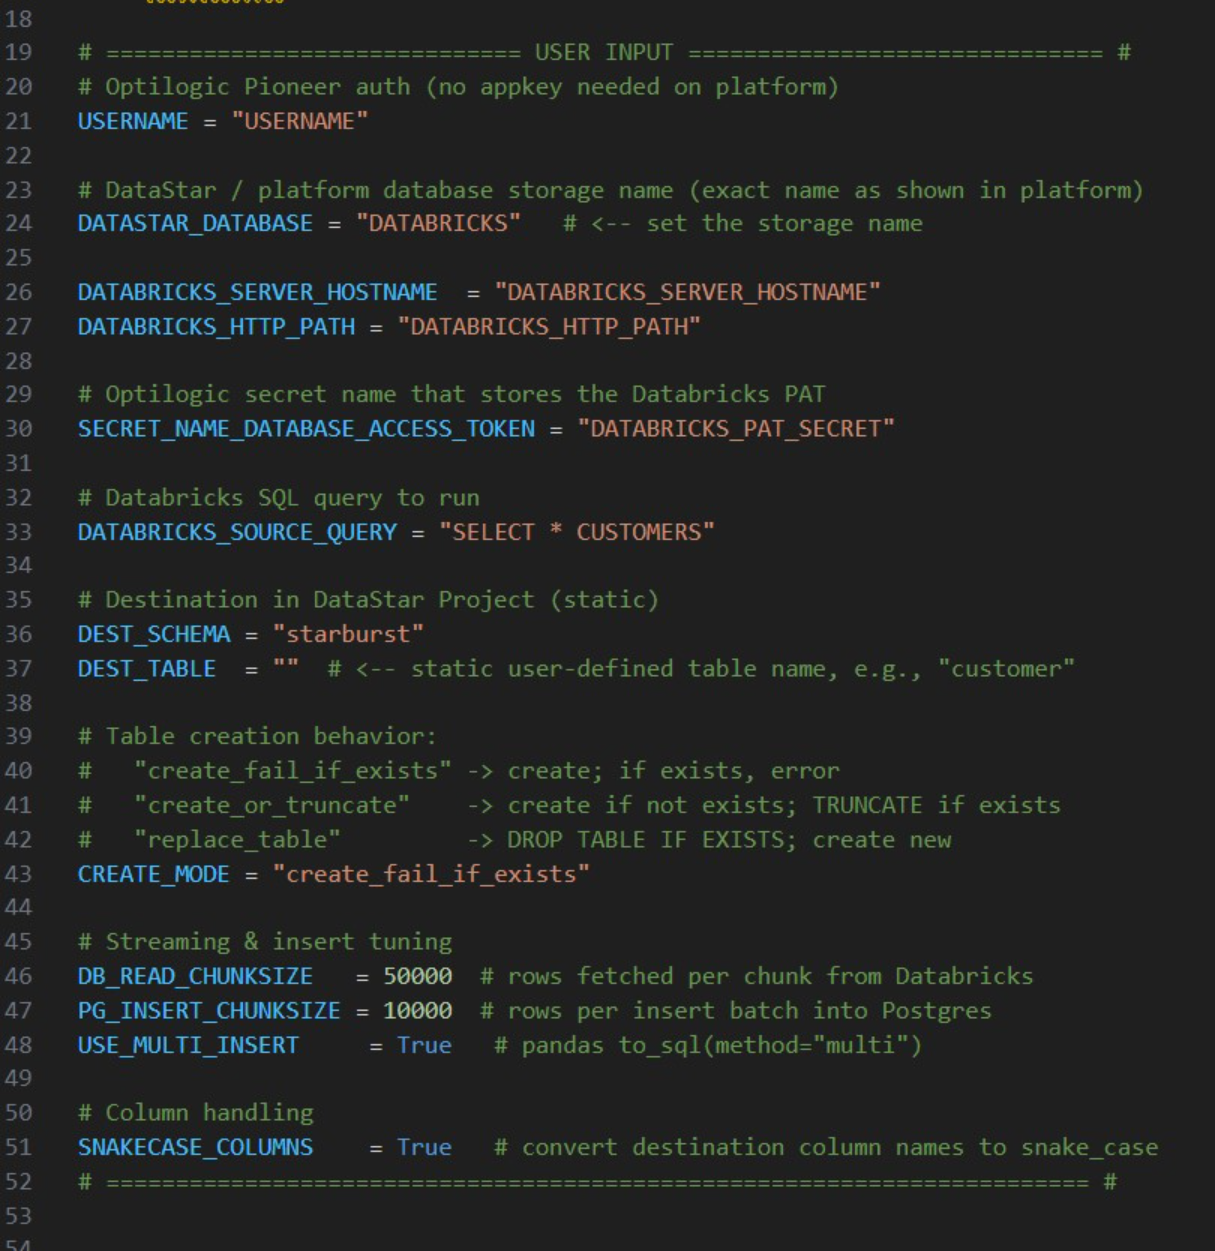
The user needs to update following lines; others can be left at defaults and only updated if desired/required:
For any questions or feedback, please feel free to reach out to the Optilogic support team on support@optilogic.com.

DataStar users typically will want to use data from a variety of sources in their projects. This data can be in different locations and systems and there are multiple methods available to get the required data into the DataStar application. In this documentation we will describe the main categories of data sources users may want to use and the possible ways of making these available in DataStar for usage.
If you would first like to learn more about DataStar before diving into data integration specifics, please see the Navigation DataStar articles on the Optilogic Help Center.
The following diagram shows different data sources and the data transfer pathways to make them available for use in DataStar:
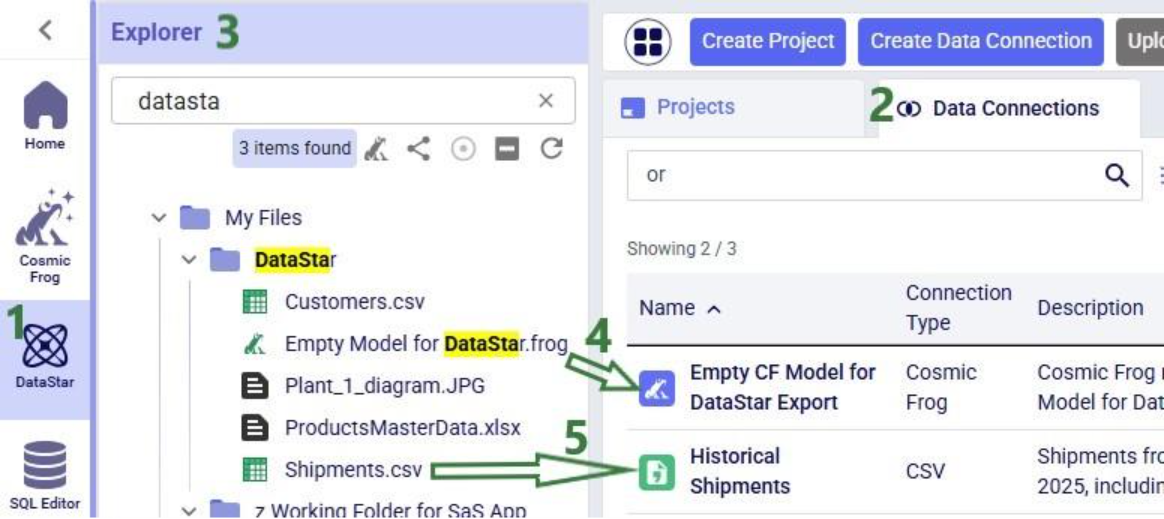
We will dive a bit deeper into making local data available for use in DataStar building upon what was covered under bullets 5a-5c in the previous screenshot. First, we will familiarize ourselves with the layout of the Optilogic platform:
Next, we will cover the 3 steps to go from data sitting on a user’s computer locally to being able to use it in DataStar in detail through the next set of screenshots. At a high-level the steps are:
To get local data onto the Opitlogic platform, we can use the file / folder upload option:
Select either the file(s) or folder you want to upload by browsing to it/them. After clicking on Open, the File Upload form will be shown again:
Note that files in the upload list that will not cause name conflicts can also be renamed or removed from the list if so desired. This can for example be convenient when wanting to upload most files in a folder, except for a select few. In that case use the Add Folder option and in the list that will be shown, remove the few that should not be uploaded rather than using Add Files and then manually selecting almost all files in a folder.
Once the files are uploaded, you will be able to see them in the Explorer by expanding the folder they were uploaded to or searching for (part of) their name using the Search box.
The second step is to then make these files visible to DataStar by setting up Data Connections to them:
After setting up a Data Connection to a Cosmic Frog model and to a CSV file, we can see the source files in the Explorer, and the Data Connections pointing to these in DataStar side-by-side:
To start using the data in DataStar, we need to take the third step of importing the data from the data connections into a project. Typically, the data will be imported into the Project Sandbox, but this could also be into another Postgres database, including a Cosmic Frog model. Importing data is done using Import tasks; the Configuration tab of one is shown in this next screenshot:
The 3 steps described above are summarized in the following sequence of screenshots:
For a data workflow that is used repeatedly and needs to be re-run using the latest data regularly, users do not need to go through all 3 steps above of uploading data, creating/re-configuring data connections, and creating/re-configuring Import tasks to refresh local data. If the new files to be used have the same name and same data structure as the current ones, replacing the files on the Optilogic platform with the newer ones will suffice (so only step 1 is needed); the data connections and Import tasks do not need to be updated or re-configured. Users can do this manually or programmatically:
This section describes how to bring external data into DataStar using supported integration patterns where the data transfer is started from an external system, e.g. the data is “pushed” onto the Optilogic platform.
External systems such as ETL tools, automation platforms, or custom scripts can load data into DataStar through the Optilogic Pioneer API (please see the Optilogic REST API documentation for details). This approach is ideal when you want to programmatically upload files, refresh datasets, or orchestrate transformations without connecting directly to the underlying database.
Key points:
Please note that Optilogic has developed a Python library to facilitate scripting for DataStar. If your external system is Python based, you can leverage this library as a wrapper for the API. For more details on working with the library and a code example of accessing a DataStar project’s sandbox, see this “Using the DataStar Python Library” help center article.
Every DataStar project is backed by a PostgreSQL database. You can connect directly to this database using any PostgreSQL-compatible driver, including:
This enables you to write or update data using SQL, query the sandbox tables, or automate recurring loads. The same approach applies to both DataStar projects and Cosmic Frog models since both use PostgreSQL under the hood. Please see this help center article on how to retrieve connection strings for Cosmic Frog model and DataStar project databases; these will need to be passed into the database connection to gain access to the model / project database.
Several scripts and utilities to connect to common external data sources, including Databricks, Google Big Query, Google Drive, and Snowflake, are available on Optilogic’s Resource Library:
These utilities and scripts can function as a starting point to modify into your own desired script for connecting to and retrieving data from a certain data source. You will need to update authentication and connection information in the scripts and configure the user settings to your needs. For example, this is the User Input section of the “Databricks Data Import Script”:
The user needs to update following lines; others can be left at defaults and only updated if desired/required:
For any questions or feedback, please feel free to reach out to the Optilogic support team on support@optilogic.com.


