

Cosmic Frog supports importing and exporting both CSV and Excel files directly through the application. This enables users to for example:
In this documentation we will cover how users can import and export data into and out of Cosmic Frog, and illustrate this with multiple examples.
There are 2 methods of importing Excel/CSV data into Cosmic Frog’s input tables available to users:
Pointers on how data to be imported needs to be formatted will be covered first, including some tips and call outs of specifics to keep in mind when using the upsert import method. Next, the steps to import a CSV/Excel file will be walked through step by step.
Data is mapped from CSV/Excel files based on matching column names and table names matching to the file name (CSV) or worksheet name (Excel):
Data preparation tips:
CSV vs Excel: CSV files only have 1 “worksheet”, so it can only contain data to be imported into 1 table, whereas Excel files can have multiple worksheets with data to be imported to different tables in Cosmic Frog.
Please take note of how existing records are treated when using the upsert import method to import to a table which already has some data in it:
We will illustrate these behaviors through several examples too.
Users can import 1 or multiple CSV or Excel files simultaneously, please take note of how the import will work for following situations:
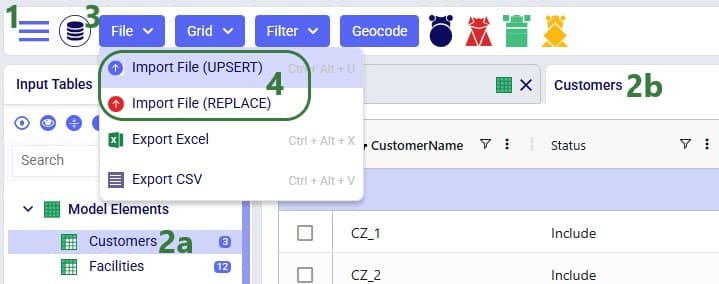
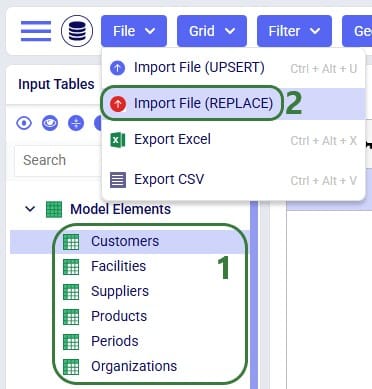
Once ready to import the prepared CSV/Excel file(s), user has 2 ways of accessing the import and export methods: from the File menu in the toolbar and from the right-click context menu of an input table. It looks like this from the File menu to import a file:
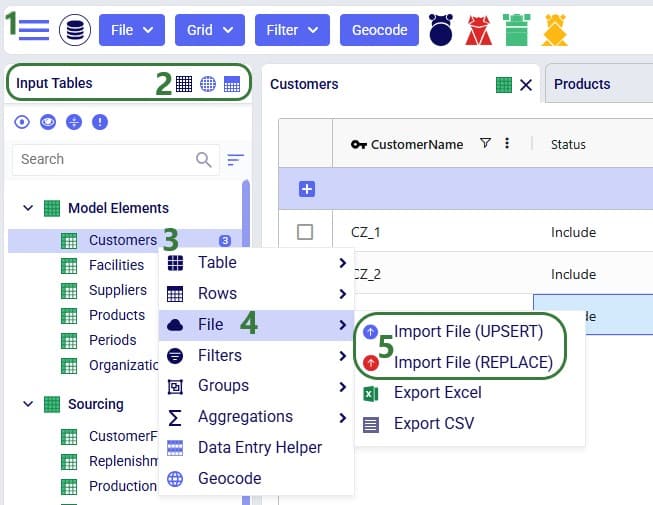
And when using the right-click context menu the steps to import a file are as follows:
When using the replace import method, a confirmation message will now be shown on which user can click Import to continue the import or Cancel to abort.
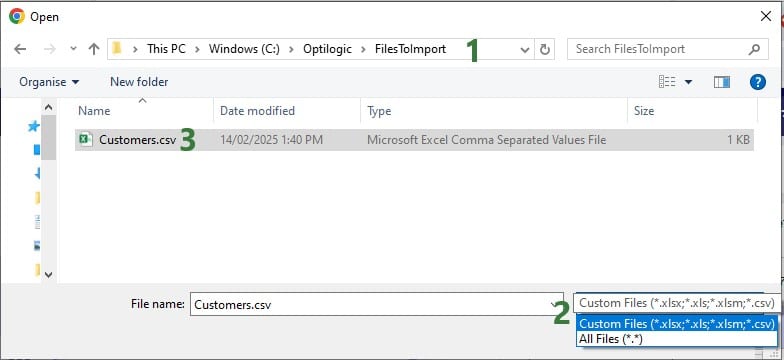
Next, a file explorer window opens in which user can browse to and select the CSV/Excel file(s) to import:
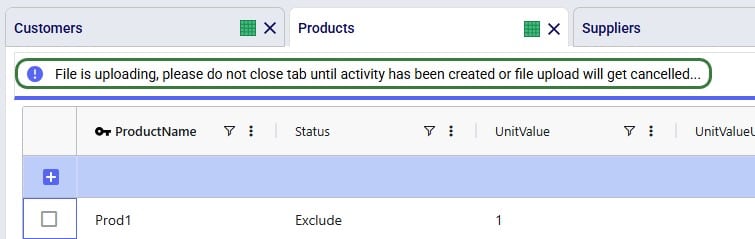
Once the import starts, a status message shows at the top of the active table:
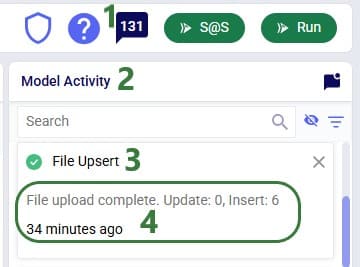
The Model Activity log will also have an entry for each import action:
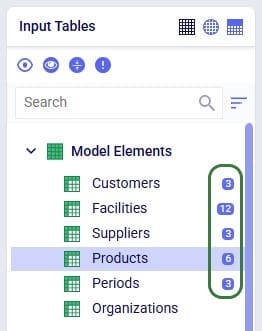
User can see the results of the import by opening and inspecting the affected input table(s), and by looking at the row counts for the tables in the input tables list, outlined in green in this screenshot:
A common way to start building a new model in Cosmic Frog is to make use of the replace import method to populate multiple tables simultaneously with data from Excel or CSV files. These files have typically been prepared from ERP extracts which have been manipulated to match the Cosmic Frog table and column names. This way, users do not need to enter data manually into the Cosmic Frog input tables, which would be very laborious. Note that it can be helpful to first export empty tables from a new, empty Cosmic Frog model to have a template to start filling out (see the “Exporting to CSV/Excel Files” section further below on how to do this).
Starting with an empty new model in Cosmic Frog:
User has prepared the following Excel .xlsx file:
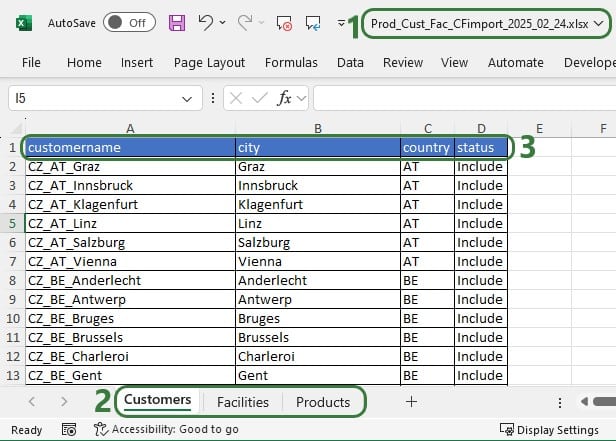
After importing this file into Cosmic Frog, we notice that the Customers, Facilities and Products tables now have row counts that match the number of records we had in the Excel file that was used for the import, and we can open the individual tables to see the imported records:

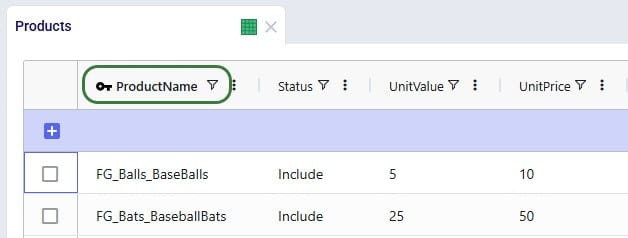
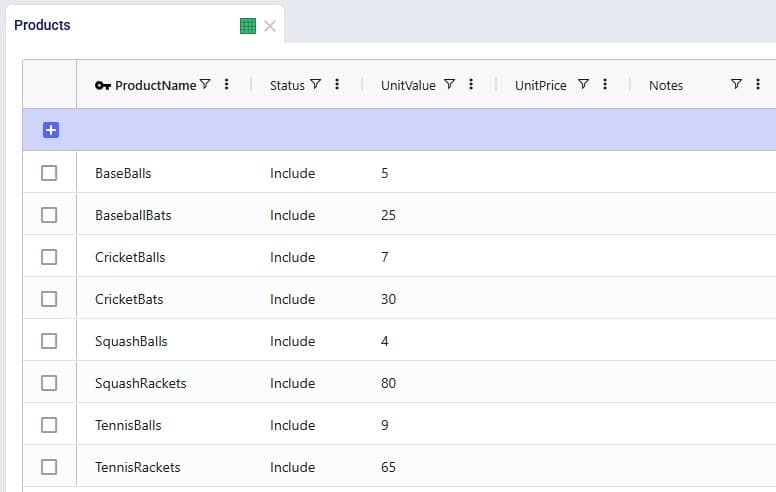
Consider user is modelling a sports equipment company and has populated the Products table of a Cosmic Frog model with 8 products as follows:
After working with the model for a while, the user realizes a few things:
As item number 1 will change the product names, a column that is part of the primary key of the Products table, user will need to use the replace import method to make these changes as the upsert method does not change the values of columns that are part of the primary key. Following is the .xlsx file user prepares to replace the data in the Products table with:

After importing the file using the replace method, the Products table looks like this:

We see the records are the exact same as what was contained in the Products.xlsx file that was imported, and the row count for the Products table has correctly gone up to 10 with the 2 new products added.
Continuing from the Products table in the last screenshot above, user now wants to make a few additional changes as follows:
To make these changes to the Products table, the user prepares the following Products file to be upserted to the Products table, where the green numbers in the screenshot below match the items described in the bullet point list directly above:

After using the upsert import method for this file into the Products table, it contains following records. The ones changed / added are listed at the bottom:

In the boxes outlined in green we see that all the expected changes and the insertion of the 1 new record have been made.
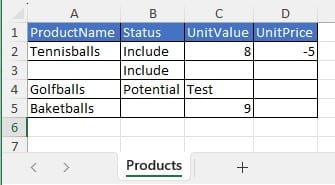
Let us also illustrate what will happen when files with invalid /missing data are imported. We will use the replace import method for the example here, but similar results will be seen when using the upsert method. Following screenshot shows a Products table that has been prepared in Excel, where we can see several issues already: a blank Product Name, a negative value for Unit Price, etc.
After this file is imported to the Products table using the replace method, the Products table will look as follows:
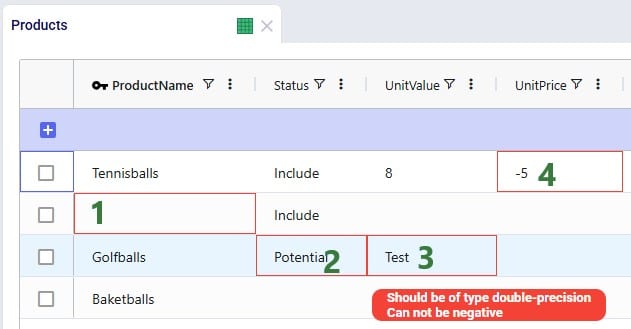
The cells that are outlined in red contain invalid values. Hovering over each cell will show a tooltip message describing the problem.
For tables with many records, it may be hard to find the fields in red outline manually. To help with this, there is a standard filter user can apply that will show all records that have 1 or multiple input data errors:

In conclusion, Cosmic Frog will let a user import invalid data, and then helps user identify the data issues with the red outlines, hover over tooltips, and the Show Input Data Errors filter.
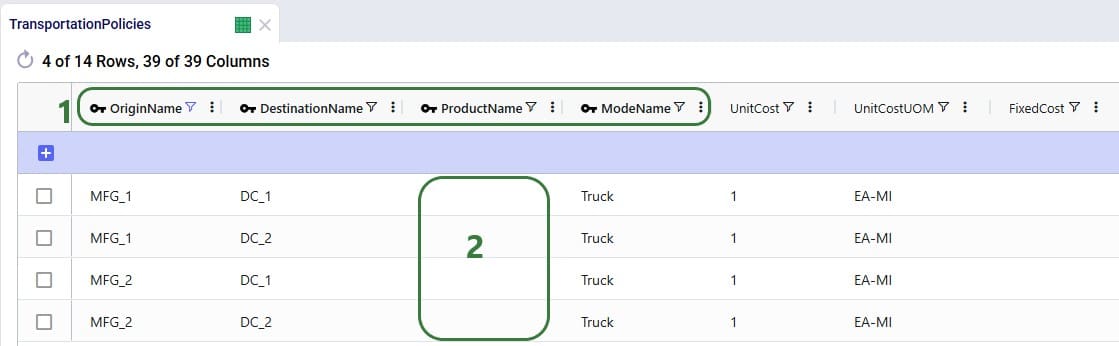
Consider following Transportation Policies table:
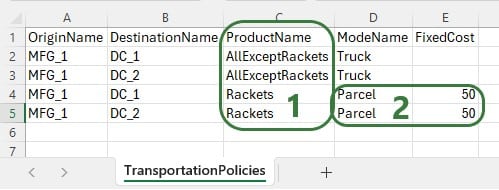
There is now a change where from MFG_1 all Racket products need to be shipped by Parcel for a fixed cost of $50. User creates 2 Named Filters (see the Named Filters in Cosmic Frog help center article) in the Products table: 1 that filters out all racket products (those products that have a product name that start with FG_Racket) which is named Rackets and 1 that filters out all non-racket products (those products that do not contain racket in the product name) which is named AllExceptRackets. Next, user prepares following TransportationPolicies.csv file to upsert into the Transportation policies table with the intention to update the first 2 records in the existing table to be specific for the AllExceptRackets products and add 2 new ones for the Rackets products:
The result of using this file to upsert to the Transportation Policies table is as follows:
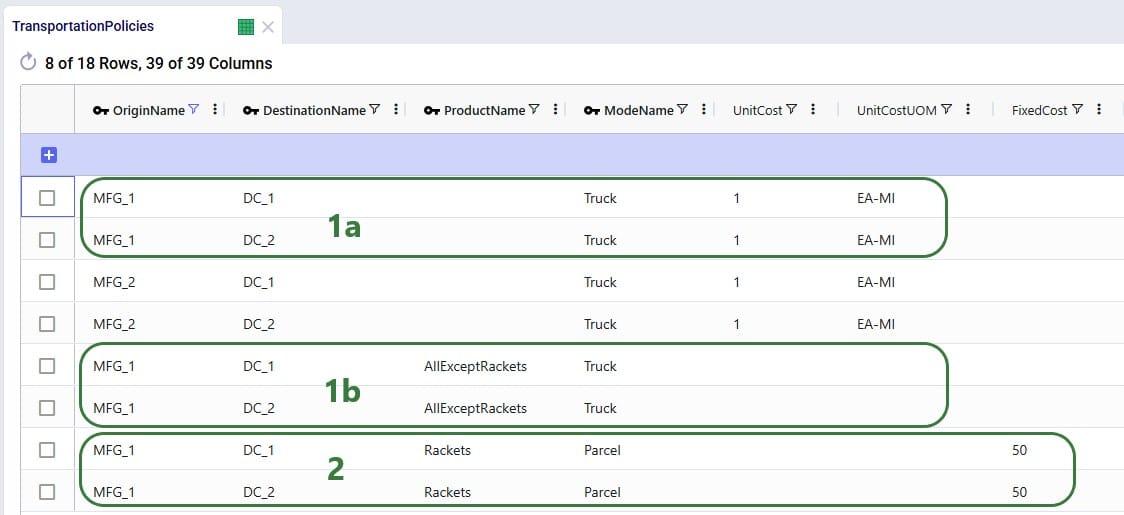
This example shows that users need to be mindful of which fields are part of the table’s primary key and remember that values of primary key fields cannot be changed by the upsert import method. An example workflow that will achieve the desired changes to the Transportation Policies table is as follows:
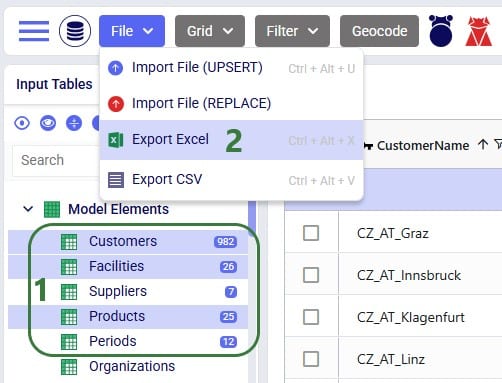
It is possible to export a single table or multiple tables (input and output tables) to CSV or Excel from Cosmic Frog. Similar to importing data from CSV/Excel, user can access the export options in 2 ways: from the File menu in the toolbar and from the context menus that come up when right-clicking on tables in the input/output/custom tables lists.
Please note:
The steps to export multiple tables to an Excel file are as follows:
Once the export starts, following message appears at the top of the active table:

Once the export is complete, the exported file can be found in the folder where user’s downloaded files are saved:
When exporting multiple tables to Excel or CSV, the downloaded file will be a .zip file with an automatically generated name based on the model’s Cosmic Frog ID. Extracting the zip-file will show an .xlsx file of the same name, which can be opened in Excel:
These are the steps to export multiple tables to CSV:

When the export starts, the same “File is exporting…” message as shown in the previous section will be showing at the top of the active table. Once the export process is finished, the exported file can again be found in the folder where user’s downloaded files are saved:
The file is again a zip-file, and it has the same name based on the model’s Cosmic Frog ID, just appended with (1), as there is already a zip-file of the same name in the Downloads folder from the previous export to Excel. Unzipping the file creates a new sub-folder of the same name in the Downloads folder:

Exporting a single table to Excel can also be done from the File menu, in the same way as multiple tables are exported to Excel, which was shown above in the “Export Multiple Tables to Excel” section. Now, we will show the second way of doing this by using the context menu that comes up when right-clicking on a table:
When the export starts, the same “File is exporting…” message as shown above will be showing at the top of the active table. Once the export process is finished, the exported file can again be found in the folder where user’s downloaded files are saved:

The name of the exported CSV file matches that of the table that was exported.
Exporting a single table to CSV can also be done from the File menu, in the same way as multiple tables are exported to CSV, which was shown above in the “Export Multiple Tables to CSV” section. Now, we will show the second way of doing this by using the context menu that comes up when right-clicking on a table:
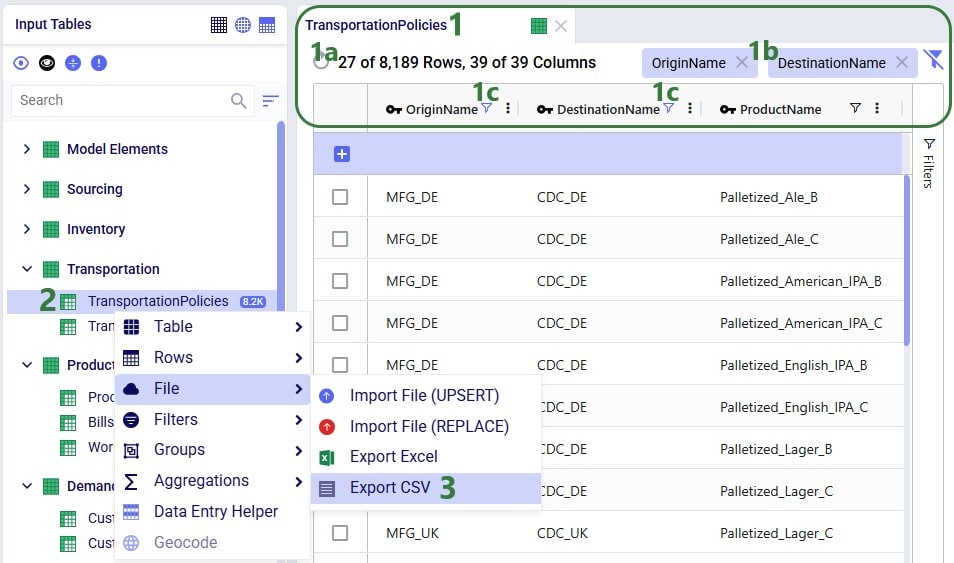
When the export starts, the same “File is exporting…” message as shown above will be showing at the top of the active table. Once the export process is finished, the exported file can again be found in the folder where user’s downloaded files are saved:
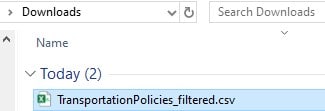
For single tables exported to CSV, the name of the file is the same as the name of the exported table. If the Cosmic Frog table was filtered, the file name is appended with “_filtered” like it is here to remind user that only the filtered rows are contained in this exported file.
Cosmic Frog supports importing and exporting both CSV and Excel files directly through the application. This enables users to for example:
In this documentation we will cover how users can import and export data into and out of Cosmic Frog, and illustrate this with multiple examples.
There are 2 methods of importing Excel/CSV data into Cosmic Frog’s input tables available to users:
Pointers on how data to be imported needs to be formatted will be covered first, including some tips and call outs of specifics to keep in mind when using the upsert import method. Next, the steps to import a CSV/Excel file will be walked through step by step.
Data is mapped from CSV/Excel files based on matching column names and table names matching to the file name (CSV) or worksheet name (Excel):
Data preparation tips:
CSV vs Excel: CSV files only have 1 “worksheet”, so it can only contain data to be imported into 1 table, whereas Excel files can have multiple worksheets with data to be imported to different tables in Cosmic Frog.
Please take note of how existing records are treated when using the upsert import method to import to a table which already has some data in it:
We will illustrate these behaviors through several examples too.
Users can import 1 or multiple CSV or Excel files simultaneously, please take note of how the import will work for following situations:
Once ready to import the prepared CSV/Excel file(s), user has 2 ways of accessing the import and export methods: from the File menu in the toolbar and from the right-click context menu of an input table. It looks like this from the File menu to import a file:
And when using the right-click context menu the steps to import a file are as follows:
When using the replace import method, a confirmation message will now be shown on which user can click Import to continue the import or Cancel to abort.
Next, a file explorer window opens in which user can browse to and select the CSV/Excel file(s) to import:
Once the import starts, a status message shows at the top of the active table:
The Model Activity log will also have an entry for each import action:
User can see the results of the import by opening and inspecting the affected input table(s), and by looking at the row counts for the tables in the input tables list, outlined in green in this screenshot:
A common way to start building a new model in Cosmic Frog is to make use of the replace import method to populate multiple tables simultaneously with data from Excel or CSV files. These files have typically been prepared from ERP extracts which have been manipulated to match the Cosmic Frog table and column names. This way, users do not need to enter data manually into the Cosmic Frog input tables, which would be very laborious. Note that it can be helpful to first export empty tables from a new, empty Cosmic Frog model to have a template to start filling out (see the “Exporting to CSV/Excel Files” section further below on how to do this).
Starting with an empty new model in Cosmic Frog:
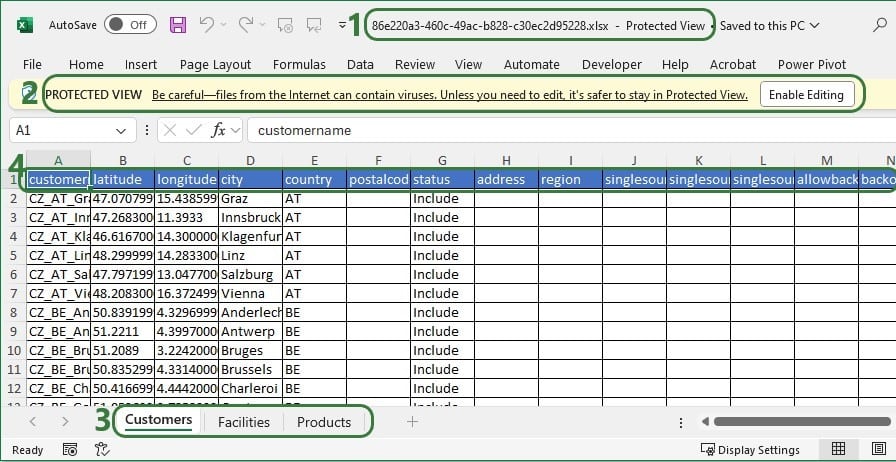
User has prepared the following Excel .xlsx file:
After importing this file into Cosmic Frog, we notice that the Customers, Facilities and Products tables now have row counts that match the number of records we had in the Excel file that was used for the import, and we can open the individual tables to see the imported records:
Consider user is modelling a sports equipment company and has populated the Products table of a Cosmic Frog model with 8 products as follows:
After working with the model for a while, the user realizes a few things:
As item number 1 will change the product names, a column that is part of the primary key of the Products table, user will need to use the replace import method to make these changes as the upsert method does not change the values of columns that are part of the primary key. Following is the .xlsx file user prepares to replace the data in the Products table with:
After importing the file using the replace method, the Products table looks like this:
We see the records are the exact same as what was contained in the Products.xlsx file that was imported, and the row count for the Products table has correctly gone up to 10 with the 2 new products added.
Continuing from the Products table in the last screenshot above, user now wants to make a few additional changes as follows:
To make these changes to the Products table, the user prepares the following Products file to be upserted to the Products table, where the green numbers in the screenshot below match the items described in the bullet point list directly above:
After using the upsert import method for this file into the Products table, it contains following records. The ones changed / added are listed at the bottom:
In the boxes outlined in green we see that all the expected changes and the insertion of the 1 new record have been made.
Let us also illustrate what will happen when files with invalid /missing data are imported. We will use the replace import method for the example here, but similar results will be seen when using the upsert method. Following screenshot shows a Products table that has been prepared in Excel, where we can see several issues already: a blank Product Name, a negative value for Unit Price, etc.
After this file is imported to the Products table using the replace method, the Products table will look as follows:
The cells that are outlined in red contain invalid values. Hovering over each cell will show a tooltip message describing the problem.
For tables with many records, it may be hard to find the fields in red outline manually. To help with this, there is a standard filter user can apply that will show all records that have 1 or multiple input data errors:
In conclusion, Cosmic Frog will let a user import invalid data, and then helps user identify the data issues with the red outlines, hover over tooltips, and the Show Input Data Errors filter.
Consider following Transportation Policies table:
There is now a change where from MFG_1 all Racket products need to be shipped by Parcel for a fixed cost of $50. User creates 2 Named Filters (see the Named Filters in Cosmic Frog help center article) in the Products table: 1 that filters out all racket products (those products that have a product name that start with FG_Racket) which is named Rackets and 1 that filters out all non-racket products (those products that do not contain racket in the product name) which is named AllExceptRackets. Next, user prepares following TransportationPolicies.csv file to upsert into the Transportation policies table with the intention to update the first 2 records in the existing table to be specific for the AllExceptRackets products and add 2 new ones for the Rackets products:
The result of using this file to upsert to the Transportation Policies table is as follows:
This example shows that users need to be mindful of which fields are part of the table’s primary key and remember that values of primary key fields cannot be changed by the upsert import method. An example workflow that will achieve the desired changes to the Transportation Policies table is as follows:
It is possible to export a single table or multiple tables (input and output tables) to CSV or Excel from Cosmic Frog. Similar to importing data from CSV/Excel, user can access the export options in 2 ways: from the File menu in the toolbar and from the context menus that come up when right-clicking on tables in the input/output/custom tables lists.
Please note:
The steps to export multiple tables to an Excel file are as follows:
Once the export starts, following message appears at the top of the active table:
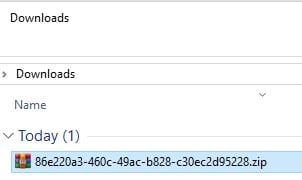
Once the export is complete, the exported file can be found in the folder where user’s downloaded files are saved:
When exporting multiple tables to Excel or CSV, the downloaded file will be a .zip file with an automatically generated name based on the model’s Cosmic Frog ID. Extracting the zip-file will show an .xlsx file of the same name, which can be opened in Excel:
These are the steps to export multiple tables to CSV:
When the export starts, the same “File is exporting…” message as shown in the previous section will be showing at the top of the active table. Once the export process is finished, the exported file can again be found in the folder where user’s downloaded files are saved:
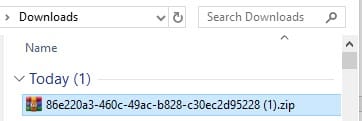
The file is again a zip-file, and it has the same name based on the model’s Cosmic Frog ID, just appended with (1), as there is already a zip-file of the same name in the Downloads folder from the previous export to Excel. Unzipping the file creates a new sub-folder of the same name in the Downloads folder:
Exporting a single table to Excel can also be done from the File menu, in the same way as multiple tables are exported to Excel, which was shown above in the “Export Multiple Tables to Excel” section. Now, we will show the second way of doing this by using the context menu that comes up when right-clicking on a table:
When the export starts, the same “File is exporting…” message as shown above will be showing at the top of the active table. Once the export process is finished, the exported file can again be found in the folder where user’s downloaded files are saved:
The name of the exported CSV file matches that of the table that was exported.
Exporting a single table to CSV can also be done from the File menu, in the same way as multiple tables are exported to CSV, which was shown above in the “Export Multiple Tables to CSV” section. Now, we will show the second way of doing this by using the context menu that comes up when right-clicking on a table:
When the export starts, the same “File is exporting…” message as shown above will be showing at the top of the active table. Once the export process is finished, the exported file can again be found in the folder where user’s downloaded files are saved:
For single tables exported to CSV, the name of the file is the same as the name of the exported table. If the Cosmic Frog table was filtered, the file name is appended with “_filtered” like it is here to remind user that only the filtered rows are contained in this exported file.


