

The following instructions show how to establish a local connection, using Alteryx, to an Optilogic model that resides within our platform. These instructions will show you how to:
Watch the video for an overview of the connection process:
A step by step set of instructions can also be downloaded in the slide deck here: CosmicFrog-Alteryx-Connection-Instructions
To make a local connection you must first open a Firewall connection between your current IP address and the Optilogic platform. Navigate to the Cloud Storage app – note that the app selection found on the left-hand side of the screen might need to be expanded. Check to see if your current IP address is authorized and if not, add a rule to authorize this IP address. You can optionally set an expiration date for this authorization.

If you are working from a new IP Address, a banner notification should be displayed to let you know that the new IP Address will need to be authorized.
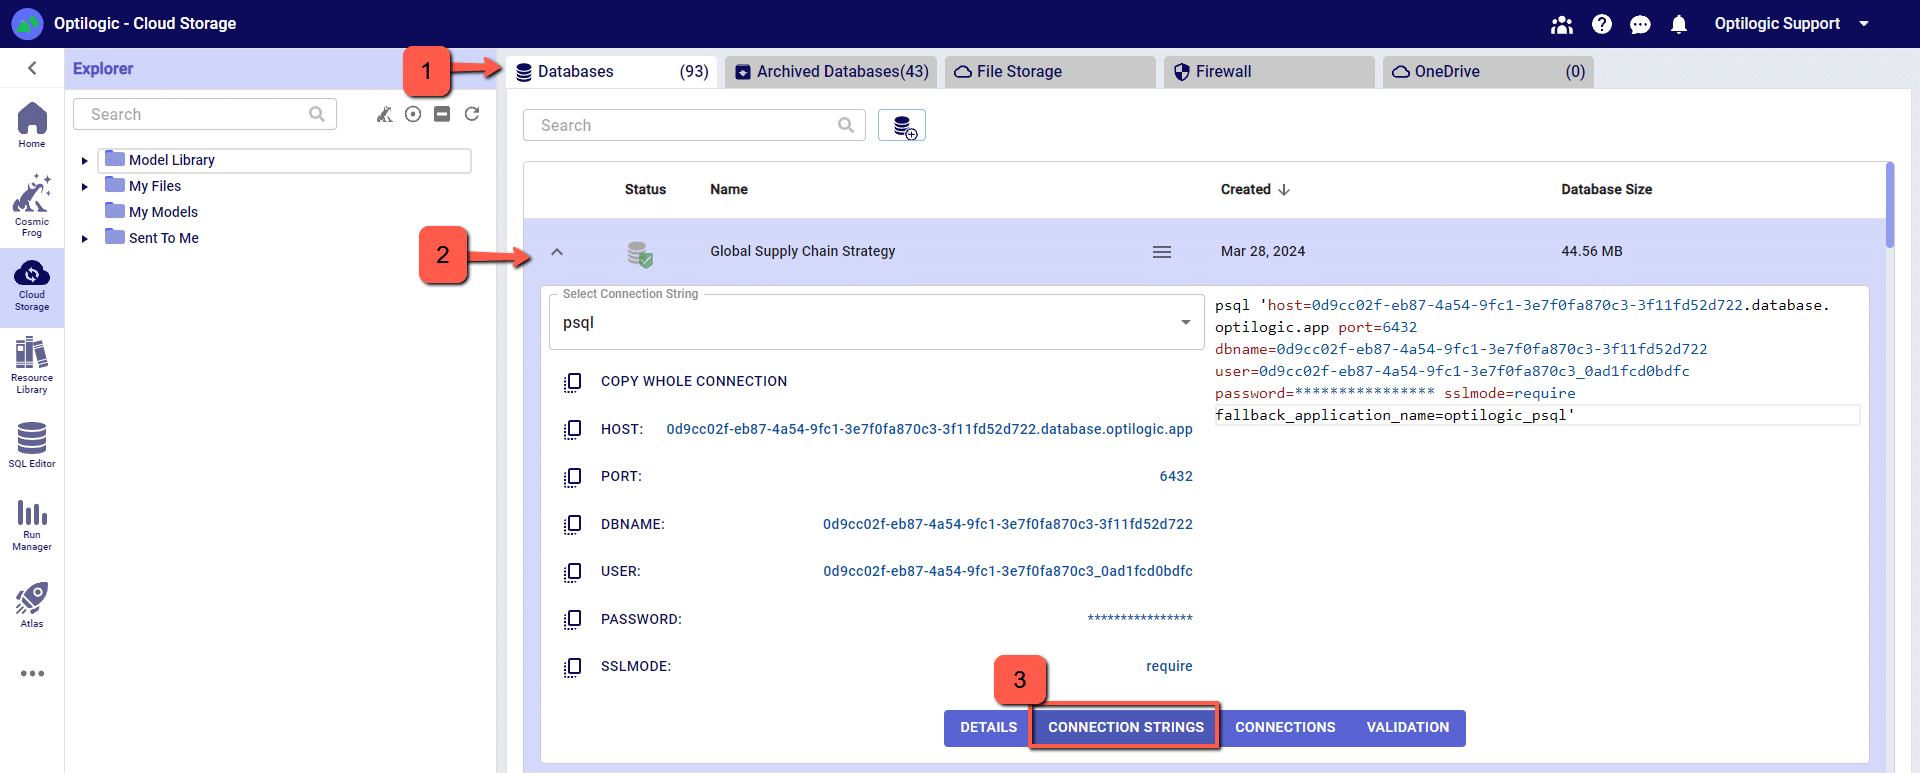
From the Databases section of the Cloud Storage page, click on the database that you want to connect to. Then, click on the Connection Strings button to display all of the required connection information.
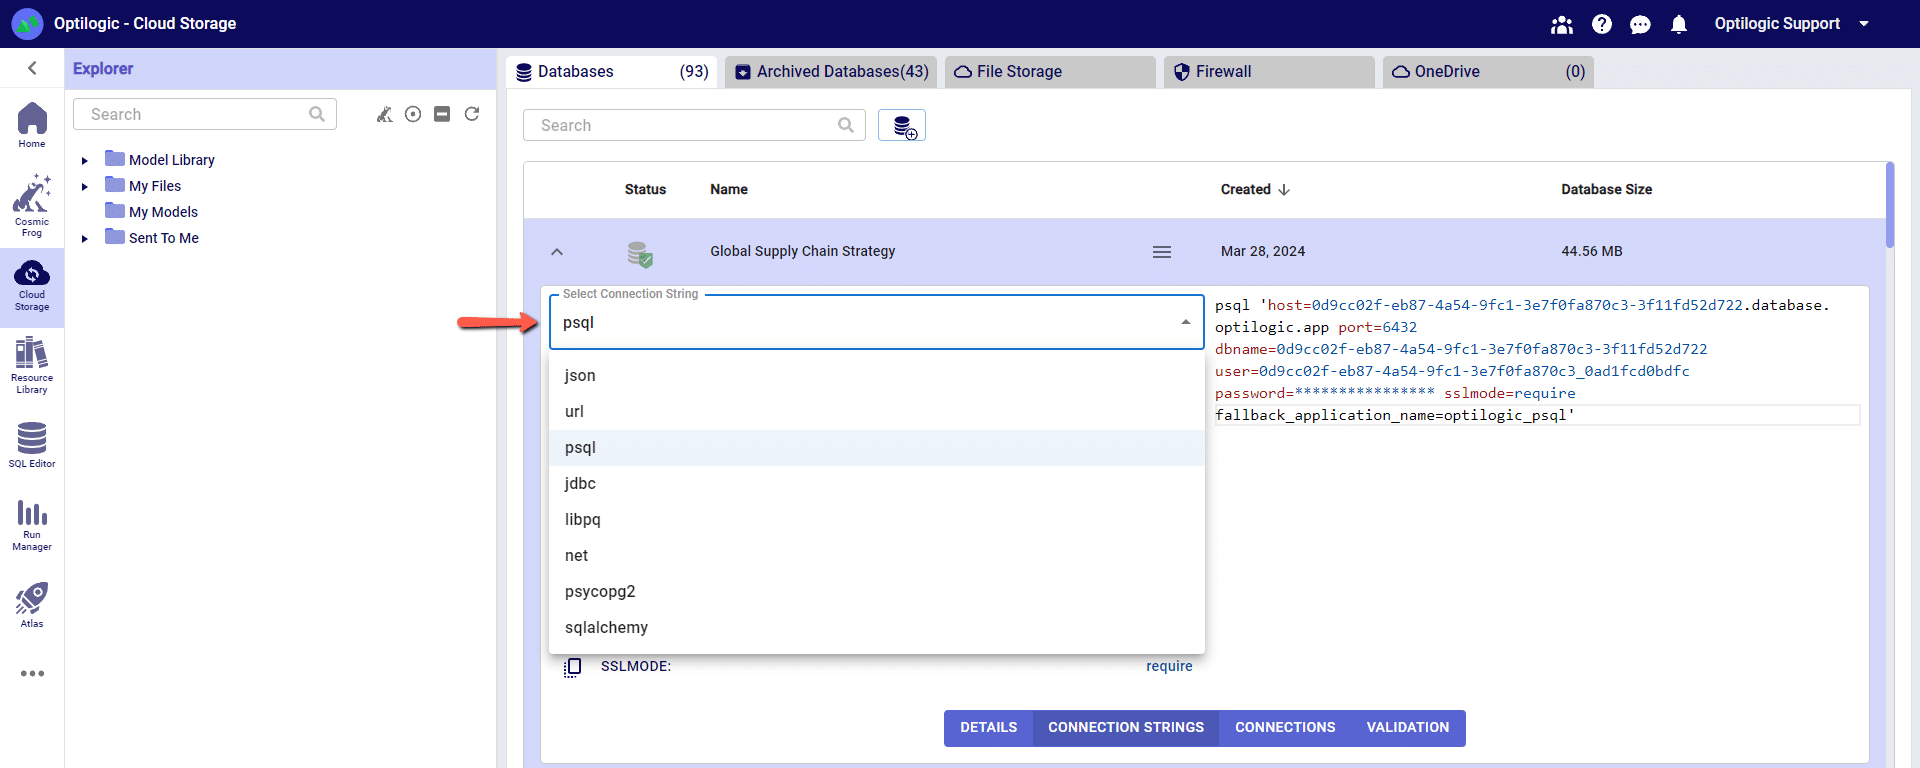
We have connection information for the following formats:
To select the format of your connection information, use the drop-down menu labeled Select Connection String:
For this example, we will copy and paste the strings for the ‘PSQL’ connection. The screen should look something like the following:
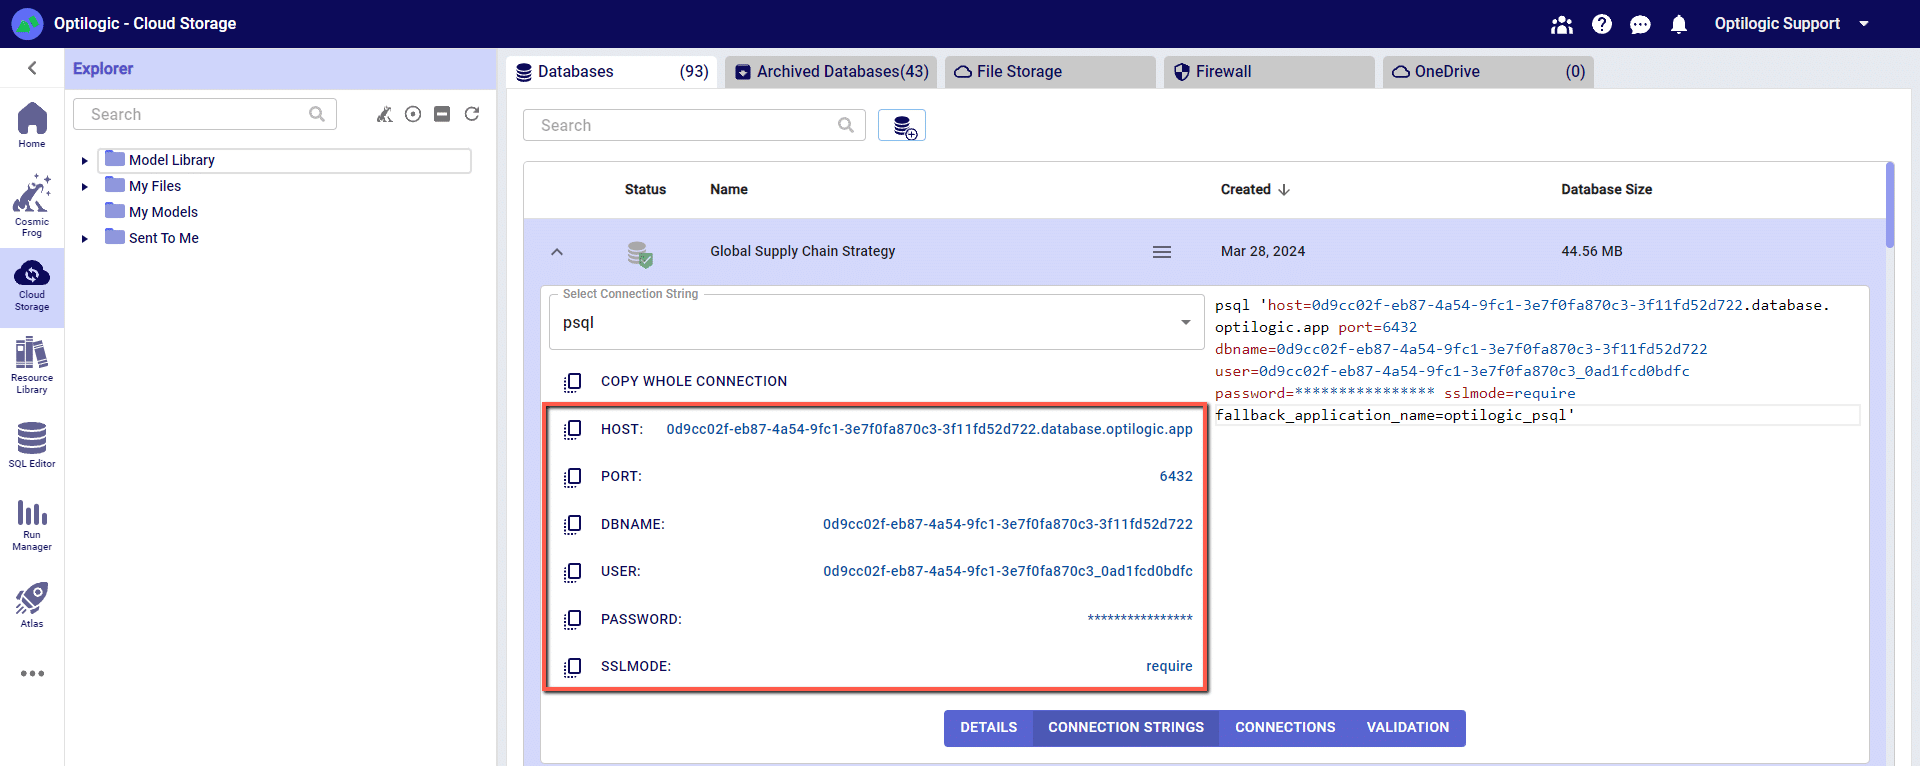
You can click on any of the parameters to copy them to your clipboard, and then paste them into the relevant field when establishing the PSQL ODBC connection.
Many tools, including Alteryx, use Open Database Connectivity (ODBC) to enable a connection to the Cosmic Frog model database. To access the Cosmic Frog model, you will need to download and install the relevant ODBC drivers. Latest versions of the drivers are located here: https://www.postgresql.org/ftp/odbc/releases/
From here, click on the latest parent folder, which as of June 20, 2024 will be REL-16_00_0005. Select and download the psqlodbc_x64.msi file.
When installing, use the default settings from the installation wizard.
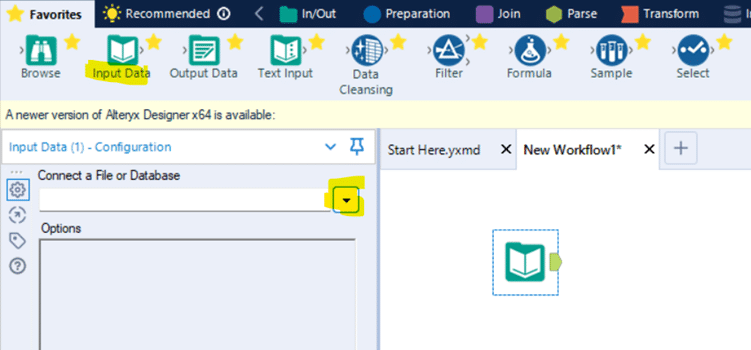
At this point we have the pieces to make a connection in Alteryx. Open Alteryx and start a new Workflow. Drag the Input Data action into the Workflow and click to “Connect a File or Database.”
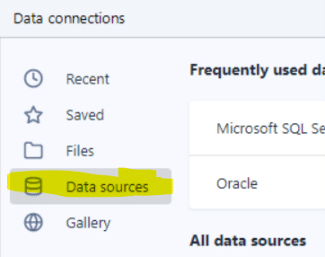
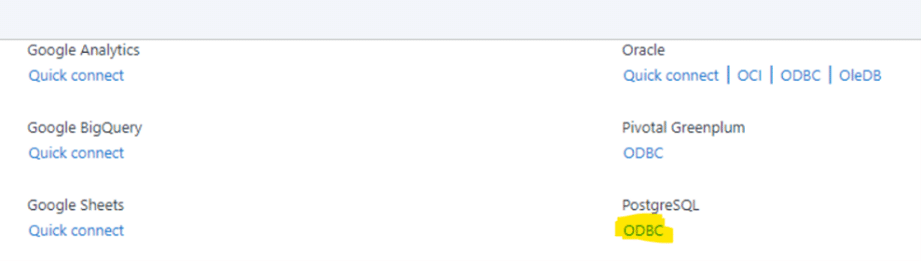
Select “Data sources” and scroll down to select “PostgresSQL ODBC”
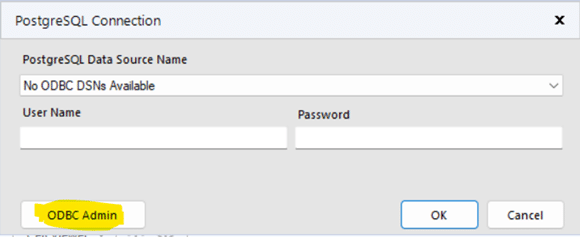
On the next screen click “ODBC Admin” to setup the connection.
Click “Add” to create a new connection and then select “PostgreSQL ANSI(x64)” then click “Finish.”

Now we need to configure the connection with the information we gathered from the connection strings.
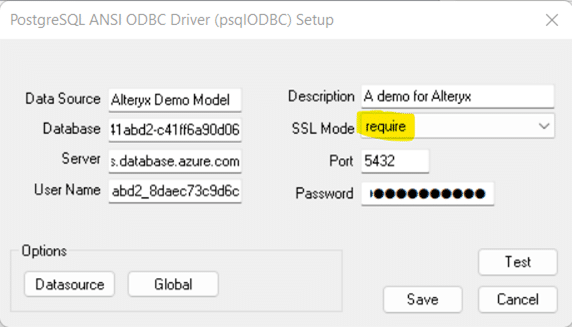
“Data Source” and “Description” allow you to name the connection, these can be named whatever you wish.
Copy the values for “Server”, “Database”, “User Name”, “Password” and “Port” from the connection string information copied from Optilogic Cloud Storage (see above).
DON’T FORGET to select “require” in “SSL Mode”
You may click “Test” to confirm the connection works or click “Save.”
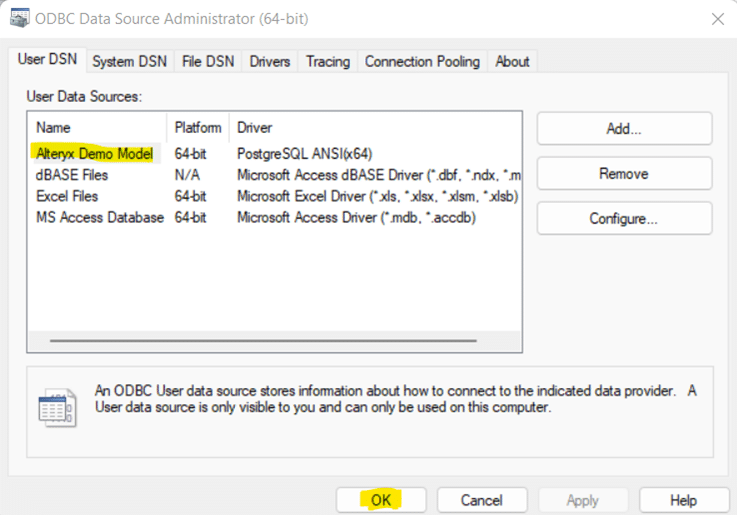
Now select the new connection, in this example “Alteryx Demo Model” and click “OK”
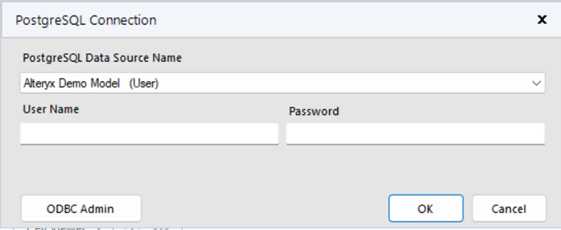
Now we need to select the same Data Source that we just built in ODBC within Alteryx. We need to enter the username and password for the connection for Alteryx authentication. These are the same credentials used to setup the ODBC connection. Remember to use your specific model’s credentials from the Connection String in the Optilogic platform Cloud Storage page.
Depending on your organization’s security protocols, one additional step might need to be taken to whitelist Optilogic’s Postgres SQL Server. This can be done by whitelisting the host URL (*.postgres.database.azure.com) and the port (6432). If you are unsure how to whitelist the server or do not have the necessary permissions, please contact your IT department or network administrator for assistance.
11/16/2023 – There is an issue connecting through ODBC with the latest version of Alteryx. While we await a fix in an updated version of Alteryx, you can still connect with an older version of Alteryx (2021.4.2.47884)
05/01/2024 – Alteryx has resolved the ODBC connection issue with their latest major version release of 2024.1. If your currently installed Alteryx version is not working as intended, please upgrade to latest.
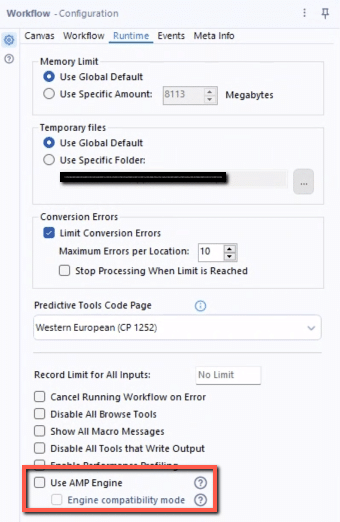
An alternative workaround is to disable the AMP engine on your Alteryx workflow. For any workflows that use the ODBC connection to a database hosted on the platform, you can uncheck the option in the Workflow Configuration for ‘Use AMP Engine’. The Workflow Configuration window will display on the left side of your screen if you click on the whitespace anywhere in your workflow.

The following instructions show how to establish a local connection, using Alteryx, to an Optilogic model that resides within our platform. These instructions will show you how to:
Watch the video for an overview of the connection process:
A step by step set of instructions can also be downloaded in the slide deck here: CosmicFrog-Alteryx-Connection-Instructions
To make a local connection you must first open a Firewall connection between your current IP address and the Optilogic platform. Navigate to the Cloud Storage app – note that the app selection found on the left-hand side of the screen might need to be expanded. Check to see if your current IP address is authorized and if not, add a rule to authorize this IP address. You can optionally set an expiration date for this authorization.
If you are working from a new IP Address, a banner notification should be displayed to let you know that the new IP Address will need to be authorized.
From the Databases section of the Cloud Storage page, click on the database that you want to connect to. Then, click on the Connection Strings button to display all of the required connection information.
We have connection information for the following formats:
To select the format of your connection information, use the drop-down menu labeled Select Connection String:
For this example, we will copy and paste the strings for the ‘PSQL’ connection. The screen should look something like the following:
You can click on any of the parameters to copy them to your clipboard, and then paste them into the relevant field when establishing the PSQL ODBC connection.
Many tools, including Alteryx, use Open Database Connectivity (ODBC) to enable a connection to the Cosmic Frog model database. To access the Cosmic Frog model, you will need to download and install the relevant ODBC drivers. Latest versions of the drivers are located here: https://www.postgresql.org/ftp/odbc/releases/
From here, click on the latest parent folder, which as of June 20, 2024 will be REL-16_00_0005. Select and download the psqlodbc_x64.msi file.
When installing, use the default settings from the installation wizard.
At this point we have the pieces to make a connection in Alteryx. Open Alteryx and start a new Workflow. Drag the Input Data action into the Workflow and click to “Connect a File or Database.”
Select “Data sources” and scroll down to select “PostgresSQL ODBC”
On the next screen click “ODBC Admin” to setup the connection.
Click “Add” to create a new connection and then select “PostgreSQL ANSI(x64)” then click “Finish.”
Now we need to configure the connection with the information we gathered from the connection strings.
“Data Source” and “Description” allow you to name the connection, these can be named whatever you wish.
Copy the values for “Server”, “Database”, “User Name”, “Password” and “Port” from the connection string information copied from Optilogic Cloud Storage (see above).
DON’T FORGET to select “require” in “SSL Mode”
You may click “Test” to confirm the connection works or click “Save.”
Now select the new connection, in this example “Alteryx Demo Model” and click “OK”
Now we need to select the same Data Source that we just built in ODBC within Alteryx. We need to enter the username and password for the connection for Alteryx authentication. These are the same credentials used to setup the ODBC connection. Remember to use your specific model’s credentials from the Connection String in the Optilogic platform Cloud Storage page.
Depending on your organization’s security protocols, one additional step might need to be taken to whitelist Optilogic’s Postgres SQL Server. This can be done by whitelisting the host URL (*.postgres.database.azure.com) and the port (6432). If you are unsure how to whitelist the server or do not have the necessary permissions, please contact your IT department or network administrator for assistance.
11/16/2023 – There is an issue connecting through ODBC with the latest version of Alteryx. While we await a fix in an updated version of Alteryx, you can still connect with an older version of Alteryx (2021.4.2.47884)
05/01/2024 – Alteryx has resolved the ODBC connection issue with their latest major version release of 2024.1. If your currently installed Alteryx version is not working as intended, please upgrade to latest.
An alternative workaround is to disable the AMP engine on your Alteryx workflow. For any workflows that use the ODBC connection to a database hosted on the platform, you can uncheck the option in the Workflow Configuration for ‘Use AMP Engine’. The Workflow Configuration window will display on the left side of your screen if you click on the whitespace anywhere in your workflow.


