The Model Manager in Cosmic Frog is the central place to create, view, organize, and maintain your supply chain models. It provides tools for quickly finding models, understanding their status, and performing common management actions such as editing, duplicating, and deleting models.
This guide walks you through the Model Manager interface step by step, explaining each major feature and control as it appears on screen. Screenshots are annotated with green outlines to highlight key areas, and numbered callouts are explained in corresponding lists so you can easily follow along.
Accessing the Model Manager
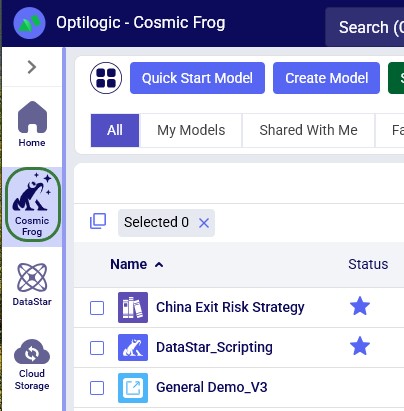
When logged into the Optilogic platform, you can open Cosmic Frog by clicking on its icon in the list of applications on the left. Note that the order of the applications may be different in your list so you may need to scroll down:
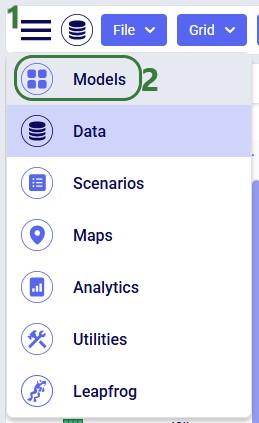
After opening Cosmic Frog, the model manager will typically be the active module. However, if you have been working in a specific model in Cosmic Frog previously, it may immediately open that model with its Data module being the active module. In that case, you can open the Model Manager from within Cosmic Frog by clicking on the icon with 3 horizontal bars at the left top to open the Module Menu, then select Models:
Model Manager Overview
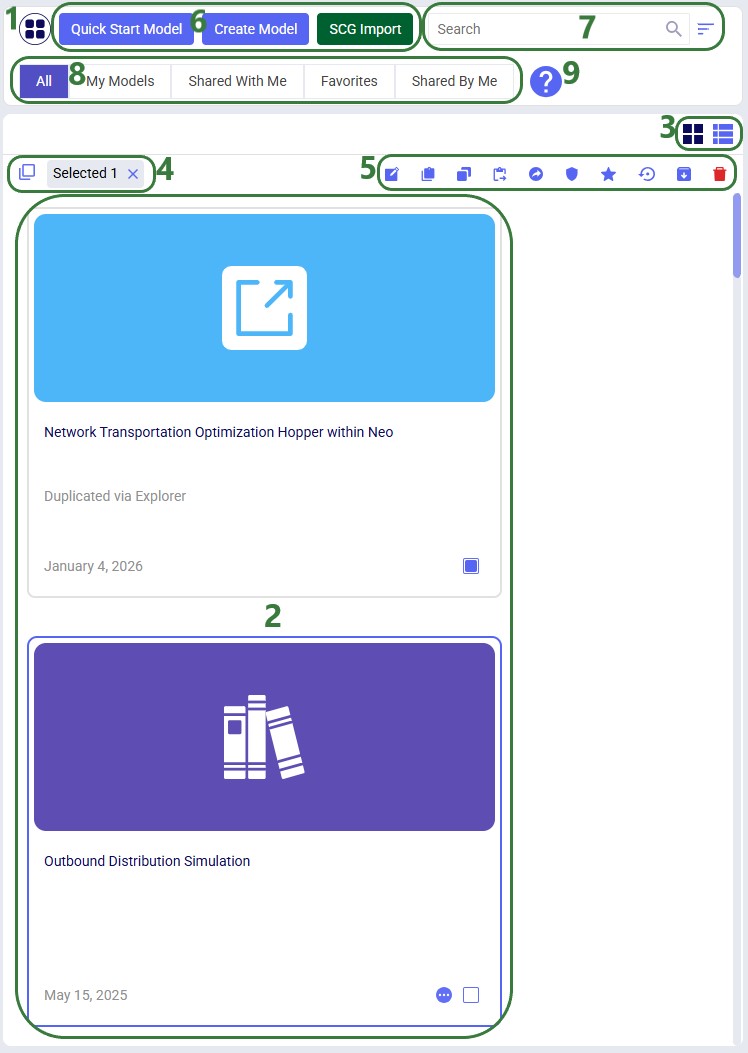
The Model Manager screen displays a table or grid of your existing models along with high level details such as name, status, and last modified date. This view is designed to give you immediate insight into your model library. The following screenshot shows at a high level the different features of the model manager. Each feature will be explained in more detail in subsequent sections of this documentation:
The icon at the left top indicates we are in the Models module (i.e. Model Manager) of Cosmic Frog.
In the main area of the Model Manager, the models available in the user's account are being shown.
Currently, the models are being show in card format, which is activated by clicking on the left of these 2 icons. Clicking on the right icon will switch the view to list format; the next screenshot shows this.
At the top left of the model grid/list there is an option to (de)select all models simultaneously and there is an indication of how many models are currently selected.
These icons represent common management actions for Cosmic Frog models; each will be explained in more detail in the "Model Management Actions" section further below.
At the top of the Model Manager, there are buttons that can be used to quickly create new Cosmic Frog models. These options are covered in the "Creating a New Model" section.
Search and sort options are available to enable users to quickly find the model(s) of interest. The "Search, Sort, and Filter" section walks through these.
Besides searching and sorting, standard filters can be applied to the model list/grid too to help users find the model(s) they are looking for. These are also explained in the "Search, Sort, and Filter" section.
Clicking on this question mark button will bring up the Help & Hints associated with the Model Manager; the next section "Help & Hints" covers this in more detail.
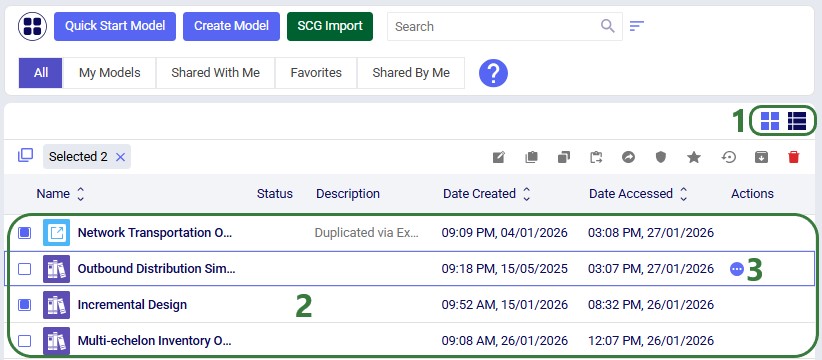
In the following screenshot we have switched from card view to list view:
The right icon of these 2 was clicked to switch to list view. One can recognize which view is the active one by the darker color of its icon.
Here we are showing the first 4 models in the list. We can see 2 of the models are selected (their checkboxes on the left hand-side are enabled) and for each model we can see details like status, description, date created, and date accessed.
Hovering in the Actions column, a button with 3 horizontal dots will be displayed. Clicking on it will bring up the list of model management actions which are covered in more detail in a later section.
Help & Hints
The Help & Hints area provides contextual guidance to help users understand the purpose of the Model Manager and how to use it effectively. These hints are especially useful for new users:
Click on the blue question mark to open the Help & Hints.
The part of the Model Manager that is being explained is highlighted, while the rest of the Model Manager is greyed out.
The text of the hint appears in a speech bubble, in this case above the area of interest in the Model Manager.
To go to the next hint, click on the Next button. This button also indicates how many hints there are available. From hint number 2 onwards, the user also has a Back button available to go back to an earlier hint.
If you want to close out of the Help & Hints, click on the cross at the right top of the hint.
Creating a new Model
From the Model Manager there are a few options to create a new Cosmic Frog model, which will be covered in this section. We will start with the option from which new empty models as well as copies from Resource Library models can be created:
Clicking on the Create Model button at the top of the Model Manager brings up the Create Frog Model form.
Enter a name in the Model Name text field.
Optionally, enter a description for the model in the Model Description area.
Choose to either create a new empty Cosmic Frog model or one from a template.
If creating a model from a template, select the template model from the drop-down list. This drop-down list contains the Cosmic Frog models available in the Resource Library, and the model created will be a copy of that model.
On the right-hand side of the form, help for the current form is displayed.
Once ready to create the new model, the user can click on the Create Model button.
If at any point the user does not want to go ahead with creating a new model, they can click on the cross at the right top of the form to close it.
Another option to create a new model is to create one with tables populated from an Excel template, click on the Quick Start Model button to open the Create Quick Start Model form:
Enter a name in the Model Name text field.
Optionally, enter a description for the model in the Model Description area.
Click on the Browse button to select an .xls of .xlsx template file from a local folder on your computer. Note that the template file needs to contain worksheets that have names matching Cosmic Frog model table names and that the column headings need to match too. See also this "Importing Data to Cosmic Frog" help center article for more details, especially the "Data Preparation Pointers" section.
When ready to create the model from the template file, click on the Create Model button.
Note that for this option there is help available on the right-hand side of the form too, including example Excel template files, which can be downloaded to function as a starting point to overwrite with your own data. A video on this Quick Start option can be accessed from here too:
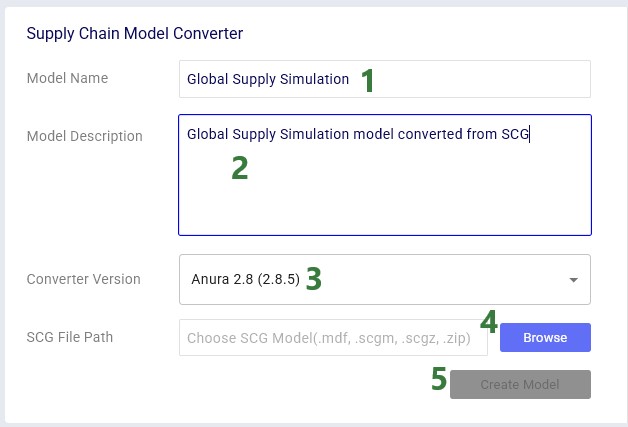
Finally, users also have the option to convert their Supply Chain Guru (SCG) models to a Cosmic Frog model. After clicking on the SCG Import button, the following Supply Chain Model Converter form comes up:
Enter a name in the Model Name text field.
Optionally, enter a description for the model in the Model Description area.
Select the Anura version to convert the SCG model to. It is best practice to use the latest version available.
Click on the Browse button to locate and select the SCG model for conversion on your local computer.
Once the model for conversion has been selected, the user can click on the Create Model button to start the conversion process.
Search, Sort, and Filter
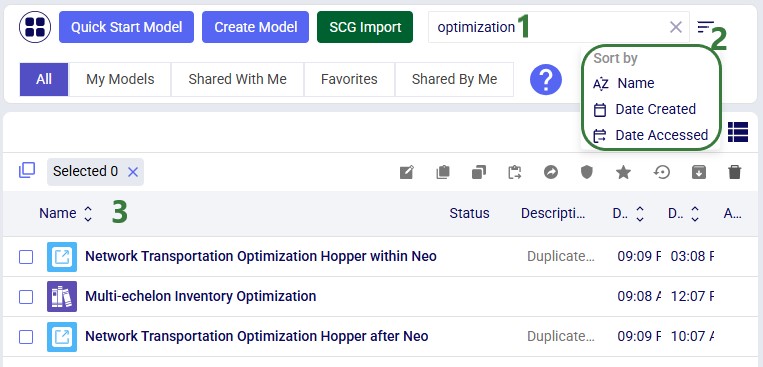
As your model library grows, search, sort, and filter tools help you quickly locate the models you need. The following screenshot shows the use of the search box and the available sort options:
When typing any text into the search box, models containing that text in their name or description will be filtered out.
Clicking on this Sort button brings up 3 options on how to sort the model grid/list:
A-Z Name: sorts the list in alphabetical order. Clicking on this option a second time will sort it in reverse alphabetical order.
Date Created: sorts the lists in the order of when the models were created, with the most recent one at the top. Clicking on this option a second time will sort the list in the reverse order, i.e. the oldest model will be at the top of the list now.
Date Accessed: sorts the lists in the order of when the models were last accessed, with the one most recently accessed at the top. This is the default sort order. Clicking on this option a second time will sort the list in the reverse order, i.e. the model that was accessed the longest time ago will be at the top of the list now.
Clicking on the Name, Date Created, and Date Accessed column headings while in list view will sort the models by those columns too.
Standard filters to reduce the list of models to those of interest are also available:
The standard filters include:
All - shows all models, which is the default filter applied.
My Models - models that are owned by me.
Shared With Me - models that someone else has shared with me: the user/team who shared the model still owns the model, but I can access and modify it too. These models have a round icon containing an arrow in their Status column (list view) or at the right top in their card (card view). Hovering over this icon will indicate who shared this model with me.
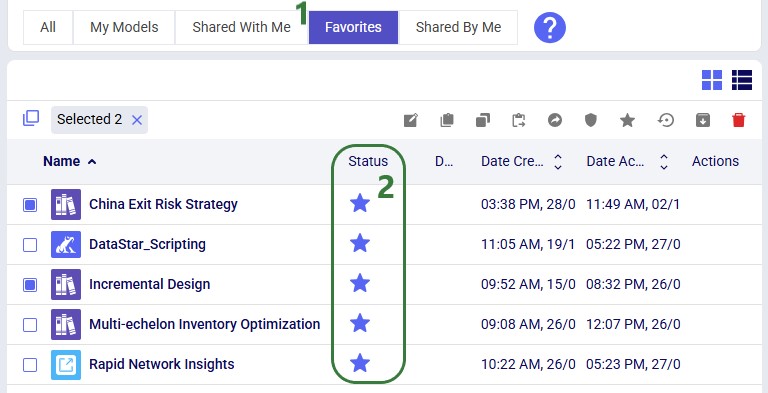
Favorites - users can mark models as a favorite, for example those that are accessed often, and this filter will show only those models marked as favorite. This filter is currently applied as is indicated by the blue background color of the filter. These favorite models have a star icon in their Status column (list view) or at the right top in their card (card view).
Shared By Me - models that I have shared with someone else. I am still the owner of the model, but the user/team the model was shared with can access and modify it too. These models also have a round icon containing an arrow in their Status column (list view) or at the right top in their card (card view). Hovering over this icon will indicate who I shared this model with.
As mentioned in the previous bullet, the Favorite filter is applied in this example, so only those models are shown in the list. They can be recognized by the star in the Status column.
The Model Manager provides comprehensive model management capabilities through both the action toolbar and context menus. The first 2 screenshots in this section show these in card view, while the last screenshot shows the options while in list view:
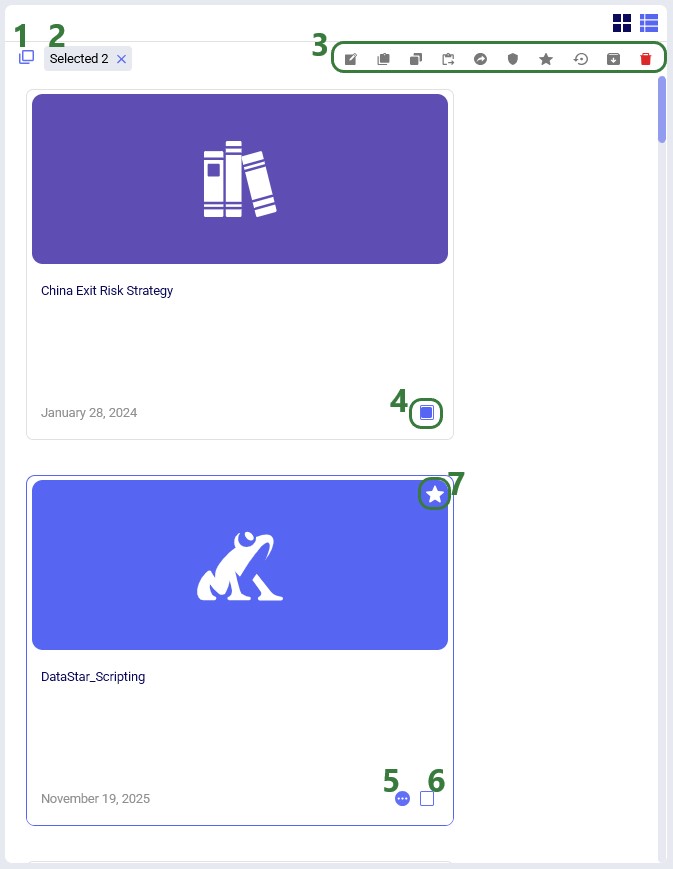
This checkbox can be used to select or deselect all models that are currently shown simultaneously.
This indicator tells us how many models are selected at the moment.
At the right top of the model grid/list, the model management actions are available. When more than one model is selected, only the most right option to delete the selected models is available as indicated by its red color. The other model management options are greyed out; the become available when just 1 model is selected.
The models that are selected will show an enabled checkbox at the right bottom of their card.
When hovering over a model in the card view, an icon with 3 horizontal dots becomes visible, which will bring up the model management actions context menu, see next screenshot.
This checkbox also becomes visible when hovering over a model while in card view. Users can select or deselect a model using this checkbox.
The status of a model is indicated at the right top of the card. In this example, this model is marked as a favorite and has a star icon showing. If a model was shared by me or with me, this would also be indicated here by a round icon containing an arrow. Hovering over the icon will pop up hover text of who the model was shared with/who shared the model with me.
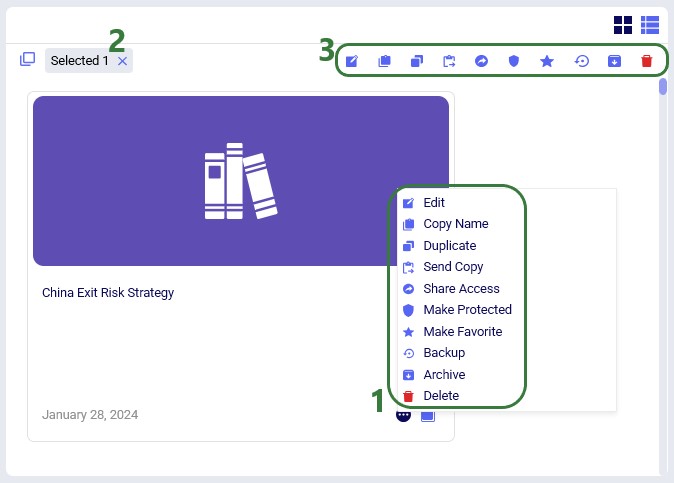
The model management actions available from the toolbar and from the context menu of a model in card view are shown in this next screenshot:
Clicking on the icon with 3 horizontal dots brings up the model management actions context menu, which has the following options:
Edit - change the name, description and/or image of the model
Copy Name - copy the name of the model to the clipboard
Duplicate - make a copy of the model. Users can edit the name of the copied model; if left unchanged it will be the name of the original model, appended with (1), (2), etc.
Send Copy - allows a user to send a copy of the model to another user/team. The original and copy will not be connected to each other after sending a copy, changes made in the one do not affect the other and vice versa.
Make Protected - using this option essentially locks a model: users cannot change the inputs or run any scenarios. If a model is protected, its status will also indicate this and the Make Protected option changes to Make Writable. Choosing to make a protected model writable again takes off the protection, and users will be able to edit and run the model again.
Make Favorite - mark the model as a favorite, which will be indicated with a star icon as the status of the model.
Backup - make a backup of the model, especially recommended before making any big changes to the model, so user has the option to revert to the state of the model before those changes were made, in case needed. See the "Model Sharing & Backups for Multi-User Collaboration in Cosmic Frog" help center article for more details on making and restoring backups.
Archive - archive the model which makes a backup of it and takes it off the list of models. It does not count towards a user's model quota anymore then. It can be unarchived however, in case needed. See the "Auto-Archiving Databases" help center article for details on archiving and unarchiving.
Delete - removes the model permanently.
Here, only 1 model is selected.
Because only 1 model is selected, all options from the Model Management Actions toolbar are available. They are the same as those listed under bullet number 1 above.
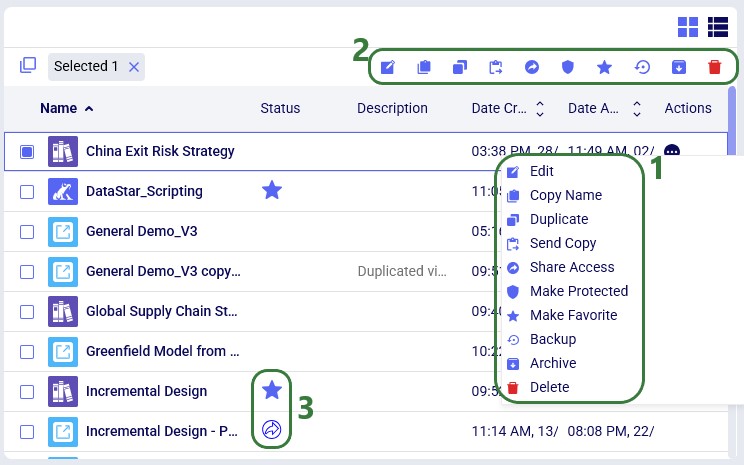
Lastly, the next screenshot shows the Model Management Actions while in list view:
Hovering over the Actions column of the first model brings up the button with 3 horizontal dots. Clicking on it brings up the context menu with model management actions. These are the same as those described above under bullet number 1 of the previous screenshot.
The same as for card view, all model management actions are available from the toolbar if only 1 model is selected, if more than 1 model is selected, only the Delete option will be available.
Here we see examples of the Status of 2 models: the top one has been marked as favorite as indicated by the star icon and the bottom one was shared by me as can be seen from the arrow icon.
Other Helpful Resources
Please note that Cosmic Frog models can also be found and managed through the Explorer application, please see the "Getting Started with the Explorer" Help Center article for more details.
Learn more about Cosmic Frog and modeling from the "Navigating Cosmic Frog" page on the Help Center.
The Model Manager in Cosmic Frog is the central place to create, view, organize, and maintain your supply chain models. It provides tools for quickly finding models, understanding their status, and performing common management actions such as editing, duplicating, and deleting models.
This guide walks you through the Model Manager interface step by step, explaining each major feature and control as it appears on screen. Screenshots are annotated with green outlines to highlight key areas, and numbered callouts are explained in corresponding lists so you can easily follow along.
Accessing the Model Manager
When logged into the Optilogic platform, you can open Cosmic Frog by clicking on its icon in the list of applications on the left. Note that the order of the applications may be different in your list so you may need to scroll down:
After opening Cosmic Frog, the model manager will typically be the active module. However, if you have been working in a specific model in Cosmic Frog previously, it may immediately open that model with its Data module being the active module. In that case, you can open the Model Manager from within Cosmic Frog by clicking on the icon with 3 horizontal bars at the left top to open the Module Menu, then select Models:
Model Manager Overview
The Model Manager screen displays a table or grid of your existing models along with high level details such as name, status, and last modified date. This view is designed to give you immediate insight into your model library. The following screenshot shows at a high level the different features of the model manager. Each feature will be explained in more detail in subsequent sections of this documentation:
The icon at the left top indicates we are in the Models module (i.e. Model Manager) of Cosmic Frog.
In the main area of the Model Manager, the models available in the user's account are being shown.
Currently, the models are being show in card format, which is activated by clicking on the left of these 2 icons. Clicking on the right icon will switch the view to list format; the next screenshot shows this.
At the top left of the model grid/list there is an option to (de)select all models simultaneously and there is an indication of how many models are currently selected.
These icons represent common management actions for Cosmic Frog models; each will be explained in more detail in the "Model Management Actions" section further below.
At the top of the Model Manager, there are buttons that can be used to quickly create new Cosmic Frog models. These options are covered in the "Creating a New Model" section.
Search and sort options are available to enable users to quickly find the model(s) of interest. The "Search, Sort, and Filter" section walks through these.
Besides searching and sorting, standard filters can be applied to the model list/grid too to help users find the model(s) they are looking for. These are also explained in the "Search, Sort, and Filter" section.
Clicking on this question mark button will bring up the Help & Hints associated with the Model Manager; the next section "Help & Hints" covers this in more detail.
In the following screenshot we have switched from card view to list view:
The right icon of these 2 was clicked to switch to list view. One can recognize which view is the active one by the darker color of its icon.
Here we are showing the first 4 models in the list. We can see 2 of the models are selected (their checkboxes on the left hand-side are enabled) and for each model we can see details like status, description, date created, and date accessed.
Hovering in the Actions column, a button with 3 horizontal dots will be displayed. Clicking on it will bring up the list of model management actions which are covered in more detail in a later section.
Help & Hints
The Help & Hints area provides contextual guidance to help users understand the purpose of the Model Manager and how to use it effectively. These hints are especially useful for new users:
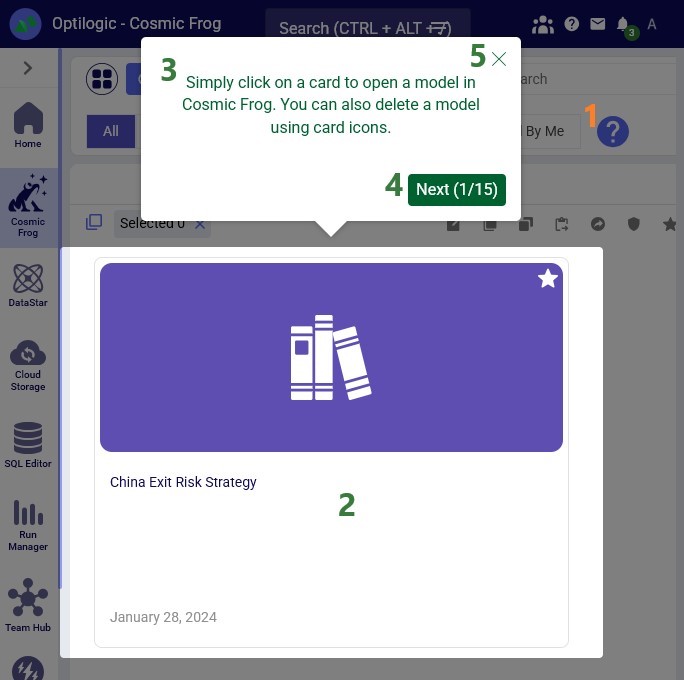
Click on the blue question mark to open the Help & Hints.
The part of the Model Manager that is being explained is highlighted, while the rest of the Model Manager is greyed out.
The text of the hint appears in a speech bubble, in this case above the area of interest in the Model Manager.
To go to the next hint, click on the Next button. This button also indicates how many hints there are available. From hint number 2 onwards, the user also has a Back button available to go back to an earlier hint.
If you want to close out of the Help & Hints, click on the cross at the right top of the hint.
Creating a new Model
From the Model Manager there are a few options to create a new Cosmic Frog model, which will be covered in this section. We will start with the option from which new empty models as well as copies from Resource Library models can be created:
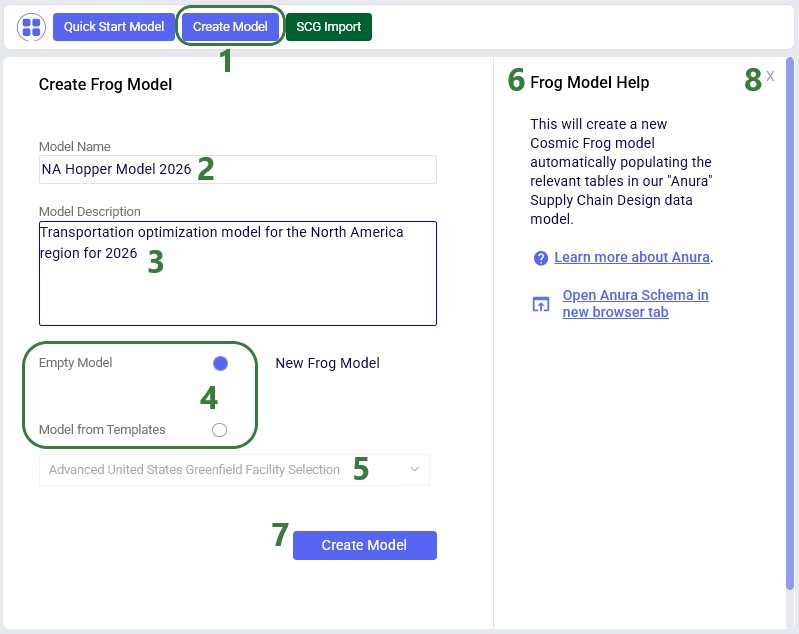
Clicking on the Create Model button at the top of the Model Manager brings up the Create Frog Model form.
Enter a name in the Model Name text field.
Optionally, enter a description for the model in the Model Description area.
Choose to either create a new empty Cosmic Frog model or one from a template.
If creating a model from a template, select the template model from the drop-down list. This drop-down list contains the Cosmic Frog models available in the Resource Library, and the model created will be a copy of that model.
On the right-hand side of the form, help for the current form is displayed.
Once ready to create the new model, the user can click on the Create Model button.
If at any point the user does not want to go ahead with creating a new model, they can click on the cross at the right top of the form to close it.
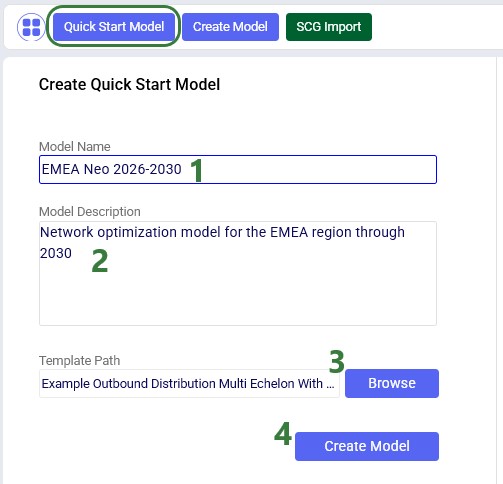
Another option to create a new model is to create one with tables populated from an Excel template, click on the Quick Start Model button to open the Create Quick Start Model form:
Enter a name in the Model Name text field.
Optionally, enter a description for the model in the Model Description area.
Click on the Browse button to select an .xls of .xlsx template file from a local folder on your computer. Note that the template file needs to contain worksheets that have names matching Cosmic Frog model table names and that the column headings need to match too. See also this "Importing Data to Cosmic Frog" help center article for more details, especially the "Data Preparation Pointers" section.
When ready to create the model from the template file, click on the Create Model button.
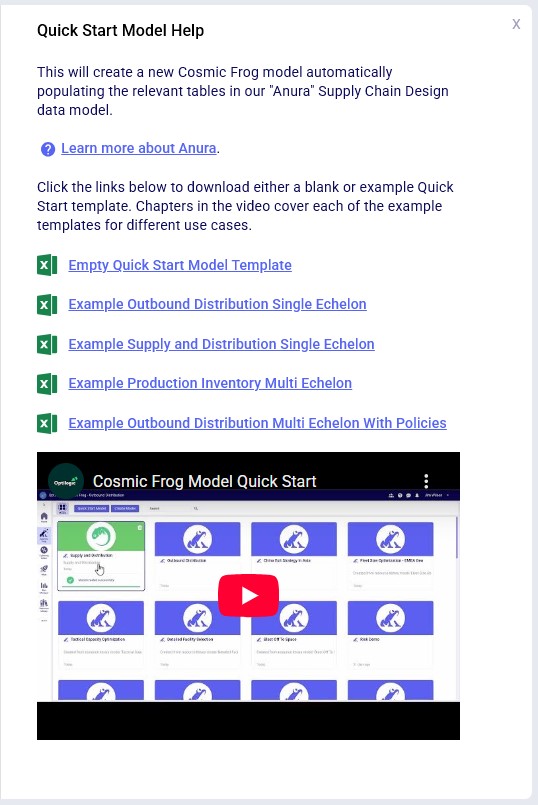
Note that for this option there is help available on the right-hand side of the form too, including example Excel template files, which can be downloaded to function as a starting point to overwrite with your own data. A video on this Quick Start option can be accessed from here too:
Finally, users also have the option to convert their Supply Chain Guru (SCG) models to a Cosmic Frog model. After clicking on the SCG Import button, the following Supply Chain Model Converter form comes up:
Enter a name in the Model Name text field.
Optionally, enter a description for the model in the Model Description area.
Select the Anura version to convert the SCG model to. It is best practice to use the latest version available.
Click on the Browse button to locate and select the SCG model for conversion on your local computer.
Once the model for conversion has been selected, the user can click on the Create Model button to start the conversion process.
Search, Sort, and Filter
As your model library grows, search, sort, and filter tools help you quickly locate the models you need. The following screenshot shows the use of the search box and the available sort options:
When typing any text into the search box, models containing that text in their name or description will be filtered out.
Clicking on this Sort button brings up 3 options on how to sort the model grid/list:
A-Z Name: sorts the list in alphabetical order. Clicking on this option a second time will sort it in reverse alphabetical order.
Date Created: sorts the lists in the order of when the models were created, with the most recent one at the top. Clicking on this option a second time will sort the list in the reverse order, i.e. the oldest model will be at the top of the list now.
Date Accessed: sorts the lists in the order of when the models were last accessed, with the one most recently accessed at the top. This is the default sort order. Clicking on this option a second time will sort the list in the reverse order, i.e. the model that was accessed the longest time ago will be at the top of the list now.
Clicking on the Name, Date Created, and Date Accessed column headings while in list view will sort the models by those columns too.
Standard filters to reduce the list of models to those of interest are also available:
The standard filters include:
All - shows all models, which is the default filter applied.
My Models - models that are owned by me.
Shared With Me - models that someone else has shared with me: the user/team who shared the model still owns the model, but I can access and modify it too. These models have a round icon containing an arrow in their Status column (list view) or at the right top in their card (card view). Hovering over this icon will indicate who shared this model with me.
Favorites - users can mark models as a favorite, for example those that are accessed often, and this filter will show only those models marked as favorite. This filter is currently applied as is indicated by the blue background color of the filter. These favorite models have a star icon in their Status column (list view) or at the right top in their card (card view).
Shared By Me - models that I have shared with someone else. I am still the owner of the model, but the user/team the model was shared with can access and modify it too. These models also have a round icon containing an arrow in their Status column (list view) or at the right top in their card (card view). Hovering over this icon will indicate who I shared this model with.
As mentioned in the previous bullet, the Favorite filter is applied in this example, so only those models are shown in the list. They can be recognized by the star in the Status column.
The Model Manager provides comprehensive model management capabilities through both the action toolbar and context menus. The first 2 screenshots in this section show these in card view, while the last screenshot shows the options while in list view:
This checkbox can be used to select or deselect all models that are currently shown simultaneously.
This indicator tells us how many models are selected at the moment.
At the right top of the model grid/list, the model management actions are available. When more than one model is selected, only the most right option to delete the selected models is available as indicated by its red color. The other model management options are greyed out; the become available when just 1 model is selected.
The models that are selected will show an enabled checkbox at the right bottom of their card.
When hovering over a model in the card view, an icon with 3 horizontal dots becomes visible, which will bring up the model management actions context menu, see next screenshot.
This checkbox also becomes visible when hovering over a model while in card view. Users can select or deselect a model using this checkbox.
The status of a model is indicated at the right top of the card. In this example, this model is marked as a favorite and has a star icon showing. If a model was shared by me or with me, this would also be indicated here by a round icon containing an arrow. Hovering over the icon will pop up hover text of who the model was shared with/who shared the model with me.
The model management actions available from the toolbar and from the context menu of a model in card view are shown in this next screenshot:
Clicking on the icon with 3 horizontal dots brings up the model management actions context menu, which has the following options:
Edit - change the name, description and/or image of the model
Copy Name - copy the name of the model to the clipboard
Duplicate - make a copy of the model. Users can edit the name of the copied model; if left unchanged it will be the name of the original model, appended with (1), (2), etc.
Send Copy - allows a user to send a copy of the model to another user/team. The original and copy will not be connected to each other after sending a copy, changes made in the one do not affect the other and vice versa.
Make Protected - using this option essentially locks a model: users cannot change the inputs or run any scenarios. If a model is protected, its status will also indicate this and the Make Protected option changes to Make Writable. Choosing to make a protected model writable again takes off the protection, and users will be able to edit and run the model again.
Make Favorite - mark the model as a favorite, which will be indicated with a star icon as the status of the model.
Backup - make a backup of the model, especially recommended before making any big changes to the model, so user has the option to revert to the state of the model before those changes were made, in case needed. See the "Model Sharing & Backups for Multi-User Collaboration in Cosmic Frog" help center article for more details on making and restoring backups.
Archive - archive the model which makes a backup of it and takes it off the list of models. It does not count towards a user's model quota anymore then. It can be unarchived however, in case needed. See the "Auto-Archiving Databases" help center article for details on archiving and unarchiving.
Delete - removes the model permanently.
Here, only 1 model is selected.
Because only 1 model is selected, all options from the Model Management Actions toolbar are available. They are the same as those listed under bullet number 1 above.
Lastly, the next screenshot shows the Model Management Actions while in list view:
Hovering over the Actions column of the first model brings up the button with 3 horizontal dots. Clicking on it brings up the context menu with model management actions. These are the same as those described above under bullet number 1 of the previous screenshot.
The same as for card view, all model management actions are available from the toolbar if only 1 model is selected, if more than 1 model is selected, only the Delete option will be available.
Here we see examples of the Status of 2 models: the top one has been marked as favorite as indicated by the star icon and the bottom one was shared by me as can be seen from the arrow icon.
Other Helpful Resources
Please note that Cosmic Frog models can also be found and managed through the Explorer application, please see the "Getting Started with the Explorer" Help Center article for more details.
Learn more about Cosmic Frog and modeling from the "Navigating Cosmic Frog" page on the Help Center.