

Named Filters are an exciting new feature which allows users to create and save specific filters directly on grid views, to then be utilized seamlessly across all policies tables, scenario items and map layers. For example, if you create a filter named “DCs” in the Facilities table to capture all entries with “DC” in their designation, this Named Filter can then be applied in a policy table, providing a dynamic alternative to the traditional Group function.
Unlike Groups, named filters automatically update: adding or removing a DC record in the Facilities table will instantly reflect in the Named Filter, streamlining the workflow and eliminating the need for manual updates. Additionally, when creating Scenario Items or defining Map Layers, users can easily select Named Filters to represent specific conditions, easily previewing the data, making the process much quicker and simpler.
In this help article, how Named Filters are created will be covered first. In the sections after, we will discuss how Named Filters can be used on input tables, in scenario items, and on map layers, while the final section contains a few notes on deleting Named Filters.
Named Filters can be set up and saved on any Cosmic Frog table: input tables, output tables, and custom tables. These tables are found in the Data module of a Cosmic Frog model:
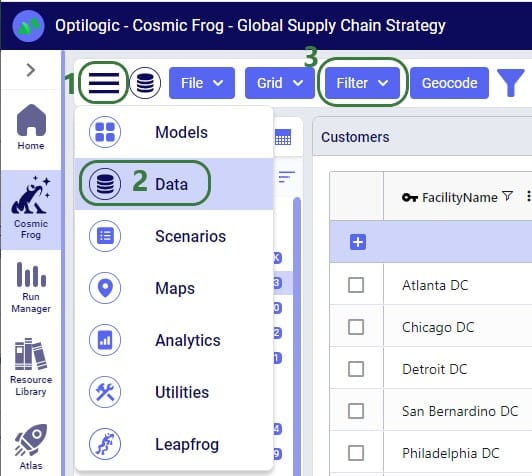
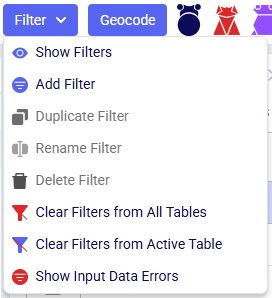
A quick description of each of the options available in the Filter drop-down menu follows here, we will cover most of these in more detail in the remainder of this Help Article:
Note that an additional Save Filter option becomes available in this menu in case a filter has been created (added) and next changes have been made to the table's filter conditions. The Save Filter option can then be used to update the existing named filter to reflect these changes.
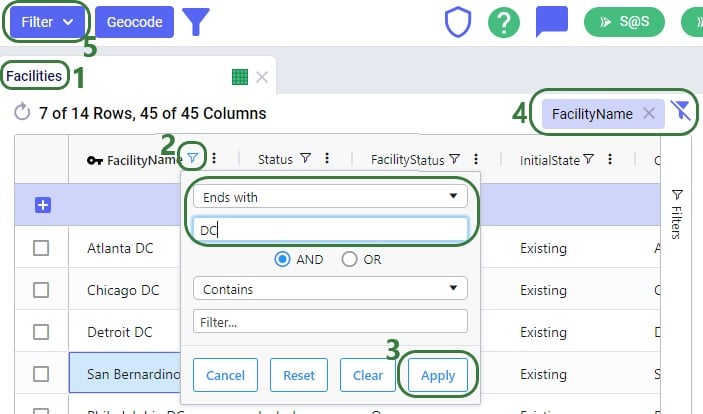
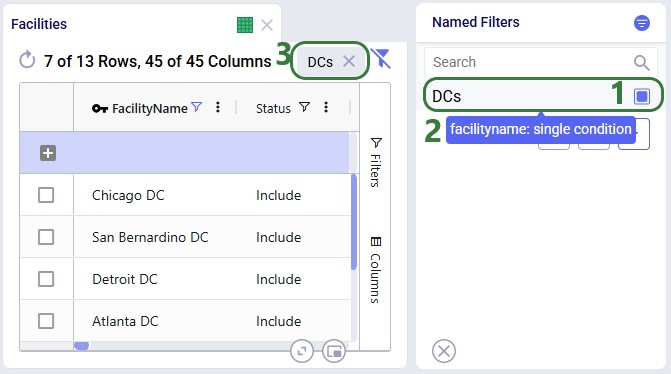
Let’s walk through setting up a filter on the Facilities table that filters out records where the Facility Name ends in “DC” and save it as a named filter called “DCs”:

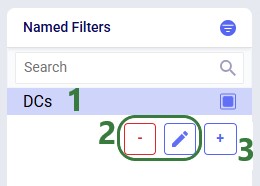
There are 3 buttons below the list of filters as follows (these were obscured by the hover text in the previous screenshot):
There is a right-click context menu available for filters listed in the Named Filters pane, which allows the user to perform some of the same actions as those in the main Filter menu shown above:

Named Filters can use filtering conditions that are applied to multiple fields in a table. The next example shows a Named Filter called “CZ2* Space Suit demand >6k” on the Customer Demand input table which uses filtering conditions on three fields:
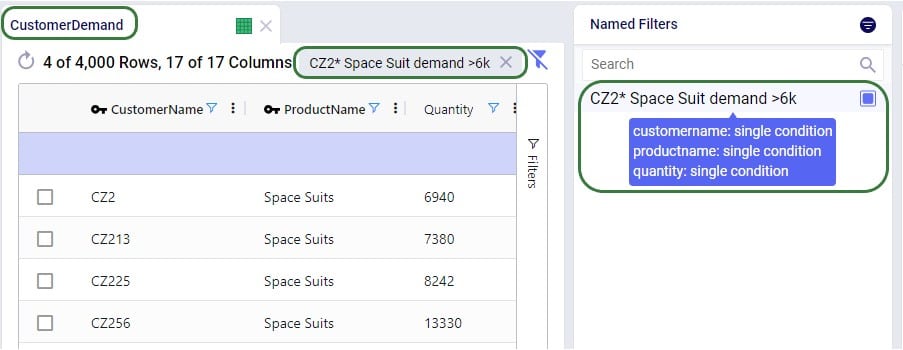
Conditions were applied to 3 fields in the Customer Demand table, as follows: 1) Customer Name Begins With “CZ2”, 2) Product Name Contains “Space”, and 3) Quantity Greater Than “6000”. The resulting filter was saved as a Named Filter with the name “CZ2* Space Suit demand >6k” which is applied in the screenshot above. When hovering over this Named Filter, we indeed see the 3 fields and that they each have a single condition on them.
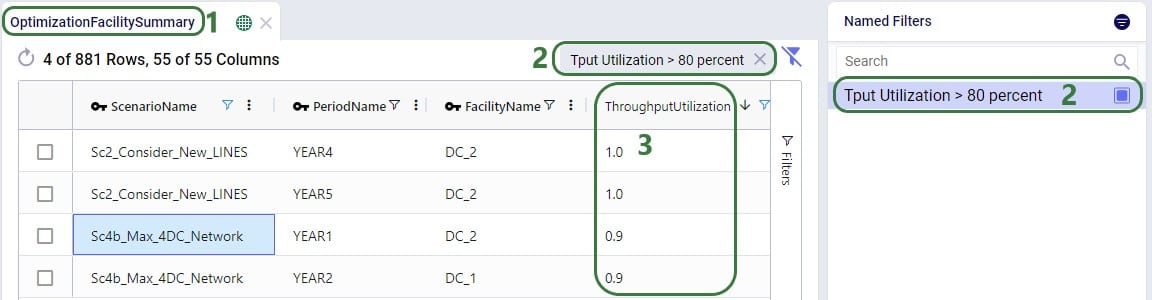
Besides being able to create Named Filters on input tables, they can also be created on output and custom tables. On output tables this can for example expedite the review of results after running additional scenarios where one can apply a pre-saved set of Named Filters one after the other once the runs are done instead of having to re-type each filter that shows the outputs of interest each time. This example shows a Named Filter on the Optimization Facility Summary output table to show records where the Throughput Utilization is greater than 0.8:
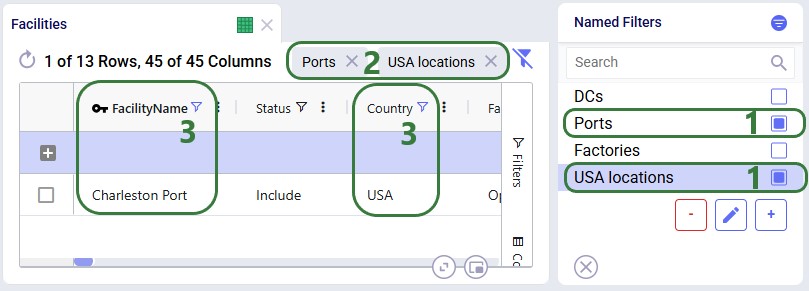
Next, we will see how multiple Named Filters can be applied to a table. In the example we will use, there are 4 Named Filters set up on the Facilities table:

Next, we will apply another Named Filter in addition to this first one ("USA locations"). How the Named Filters work together depends on if they are filtering on the same field or on different fields:
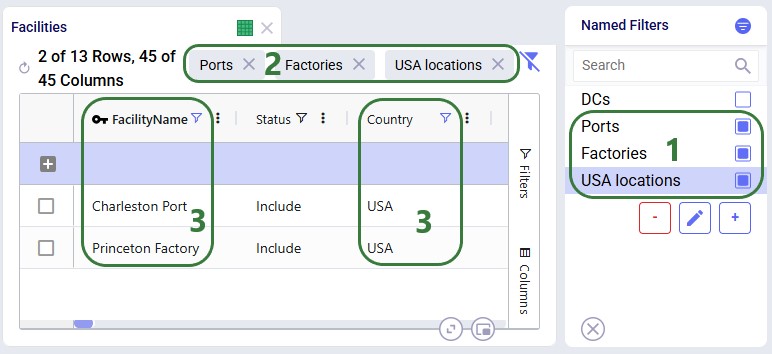
Now, if we want to filter out only Ports located in the USA, we can apply 2 of the Named Filters simultaneously:
To show an example of how multiple named filters that filter on the same field work, we will add a third Named Filter:
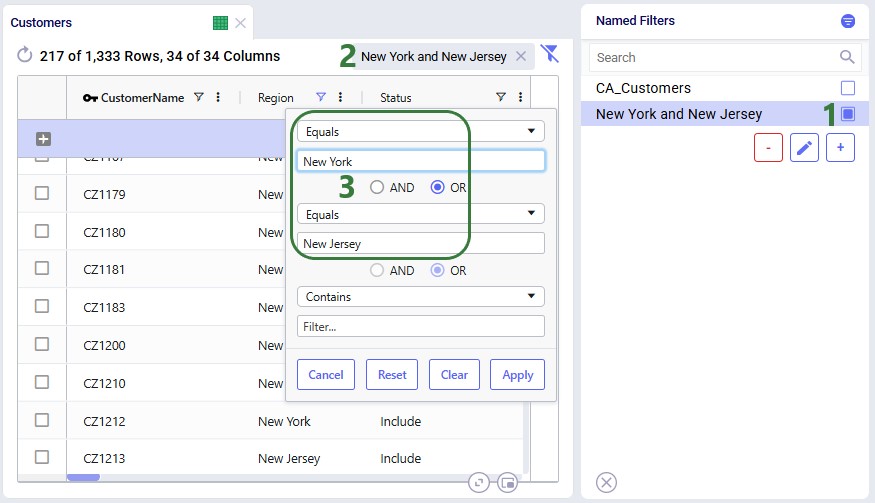
To alter an existing filter, we can change the criteria of this existing filter, and then save the resulting filter, replacing the original Named Filter. Let’s illustrate this through an example: in a model with about 1.3k customers in the US, we have created a Named Filter “New York and New Jersey”, but later on realize that this filter also includes customers in New Hampshire and New Mexico:
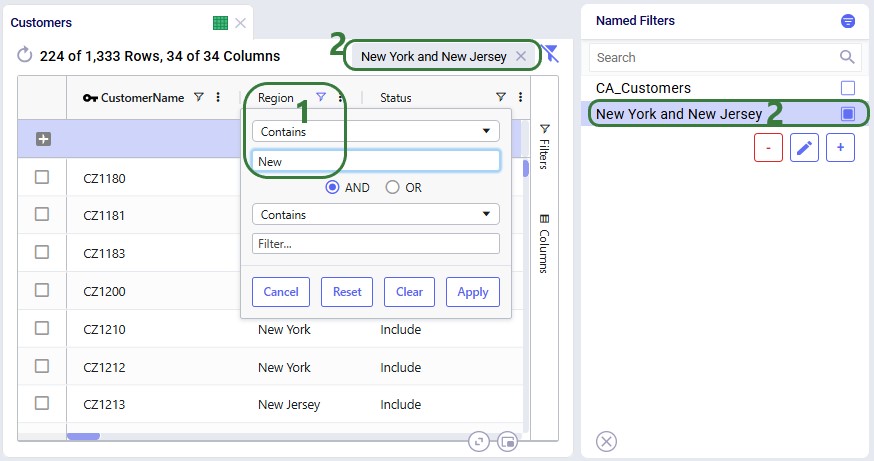
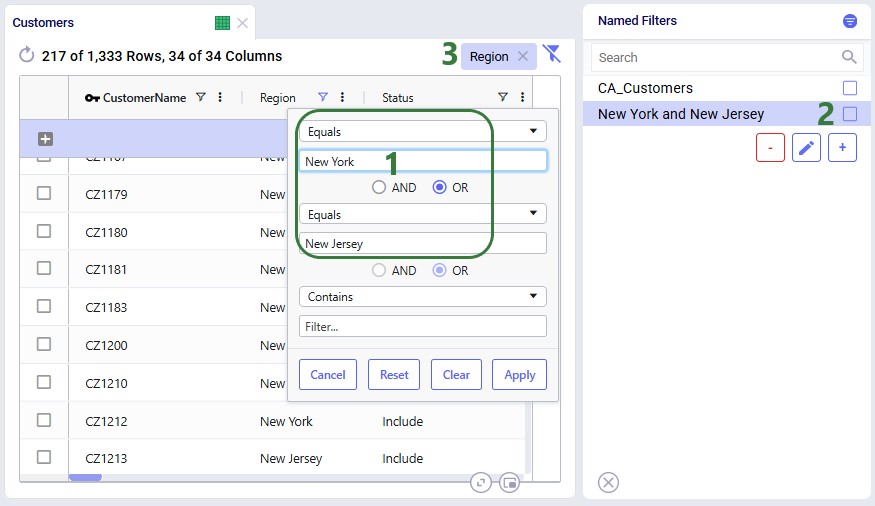
In reality, this filter also filters out customers located in the regions (states) of New Hampshire and New Mexico in addition to those in New York and New Jersey. So, the next step is to update the filter to only filter out the New York and New Jersey customers:
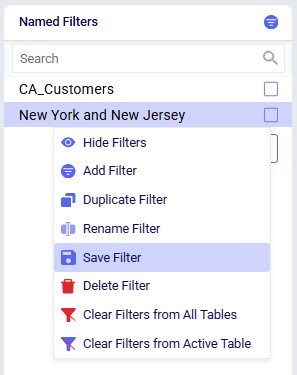
Next, we can use the Save Filter option from either the Filter menu drop-down list or the context menu after right-clicking on the filter in the Named Filters pane to update the existing "New York and New Jersey" named filter to use the updated condition. The following screenshot shows the latter method:
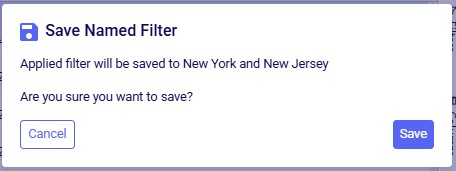
After choosing Save Filter from the context menu, the following message is shown for the user to confirm they want to overwrite the original named filter using the current filter conditions:
After clicking Save, the existing named filter has been updated:
So far, the only examples were of filters applied to one field in an input table. The next example shows a Named Filter called “CZ2* Space Suit demand >6k” on the Customer Demand input table which uses filtering conditions on multiple fields:
Conditions were applied to 3 fields in the Customer Demand table, as follows: 1) Customer Name Begins With “CZ2”, 2) Product Name Contains “Space”, and 3) Quantity Greater Than “6000”. The resulting filter was saved as a Named Filter with the name “CZ2* Space Suit demand >6k” which is applied in the screenshot above. When hovering over this Named Filter, we indeed see the 3 fields and that they each have a single condition on them.
Besides being able to create Named Filters on input tables, they can also be created on output and custom tables. On output tables this can for example expedite the review of results after running additional scenarios where one can apply a pre-saved set of Named Filters one after the other once the runs are done instead of having to re-type each filter that shows the outputs of interest each time. This example shows a Named Filter on the Optimization Facility Summary output table to show records where the Throughput Utilization is greater than 0.8:
The last option of Show Input Data Errors in the Filter menu creates a special filter named ERRORS and filters out records in the input table it is used on that have errors in the input data. This can be very helpful as records with input errors may have these in different fields and the types of errors may be different, so a user is not able to create 1 single filter that would capture multiple different types of errors. When this filter is applied, any record that has 1 or multiple fields with a red outline will be filtered out and shown. Hovering over the field gives a short description of the problem with the value in the field.

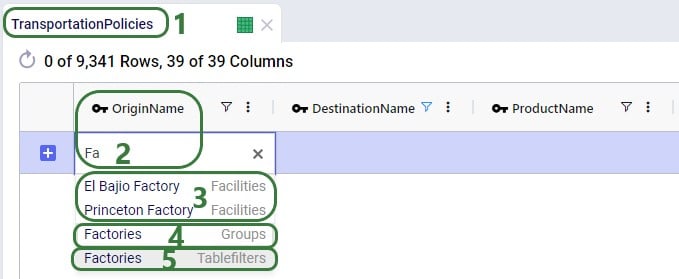
Named Filters for certain model elements (i.e. Customers, Facilities, Suppliers, Products, Periods, Modes, Shipments, Transportation Assets, Processes, Bills Of Materials, Work Centers, and Work Resources) can be used in other input tables, very similar to how Groups work in Cosmic Frog: instead of setting up multiple records for individual elements, for example a transportation policy from A to B for each finished good, a Named Filter that filters out all finished goods on the Products table can be used to set up 1 transportation policy for these finished goods from A to B (which at run-time will be expanded into a policy for each finished good). The advantage of using Named Filters instead of Groups is that Named Filters are dynamic. If records are added to tables containing model elements and they match the conditions of any Named Filters, they are automatically added to those Named Filters. Think for example of Products with the pre-fix FG_ to indicate they are finished goods and a Named Filter “Finished Goods” that filters the Product Name on Begins With “FG_”. If a new product is added where the Product Name starts with FG_, it is automatically added to the Finished Goods Named Filter and anywhere this filter is used this new finished good is now included too. We will look at 2 examples in the next few screenshots.
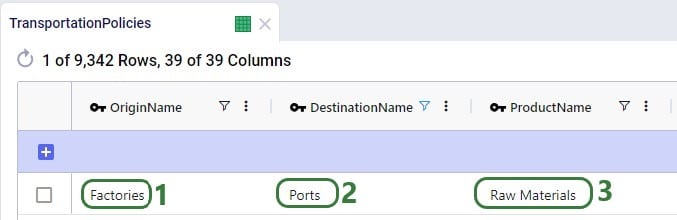
The completed transportation policy record uses Named Filters for the Origin Name, Destination Name, and Product Name, making this record flexible as long as the naming conventions of the factories, ports, and raw materials keep following the same rules.
The next example is on one of the Constraints tables, Production Constraints. On the Constraints tables, the Group Behavior fields dictate how an element name that is a Group or a Named Filter should be used. When set to Enumerate, the constraint is applied to each individual member of the group or named filter. If it is set to Aggregate, the constraint applies to all members of the group or named filter together. This Production Constraint states that at each factory a maximum amount of 150,000 units over all finished goods together can be produced:

When setting up a scenario item, previously, the records that the scenario item’s change needed to be applied to could be set by using the Condition Builder. Now users have the added option to use a saved Named Filter instead, which makes it easier as the user does not need to know the syntax for building a condition, and it also makes it more flexible as Named Filters are dynamic as was discussed in the previous section. In addition, users can preview the records that the change will be made to so the chance of mistakes is reduced.
Please note that a maximum of 1 Named Filter can be used on a scenario item.
The following example changes the Suppliers table of a model which has around 70 suppliers, about half of these are in Europe and the other half in China:

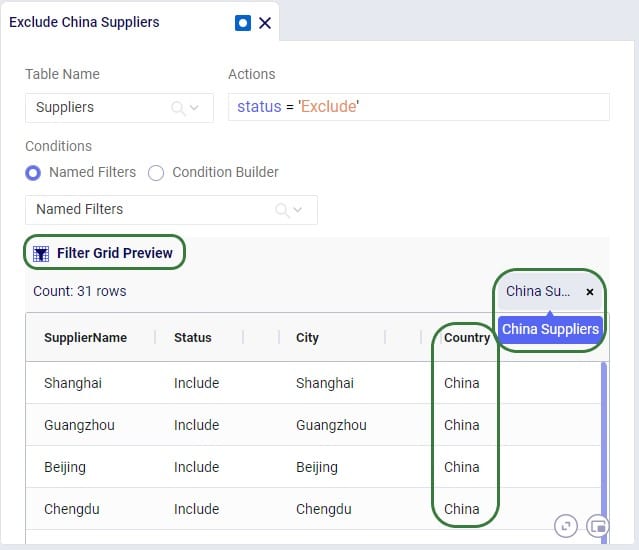
The Named Filters drop-down collapses after choosing the China Suppliers Named Filter as the condition, and now we see the Preview of the filtered grid. This is the Suppliers table with the Named Filter China Suppliers applied. At the right top of the grid the name of the applied Named Filter(s) is shown, and we can see that in the preview we indeed only see Suppliers for which the Country is China. So these are the records the change (setting Status = Exclude) will be made to in scenarios that use this scenario item.
A few notes on the Filter Grid Preview:
Besides using Named Filters on other input tables and for setting up conditions for scenario items, they can also be used as conditions for Map Layers, which will be covered in this final section of this Help Article. Like for scenario items, there is also a Filter Grid Preview for Map Layers to double-check which records will be filtered out when applying the condition(s) of 1 or multiple Named Filters.
In this first example, a Named Filter on the Facilities table filters out only the Facilities that are located in the USA:
Another example of the same model is to use a different Named Filter from the Facilities table to show only Factories on the map:
If the Factories and the Ports Named Filters had both been enabled, then all factories and ports would be showing on the map. So, like for scenario items, applying multiple Named Filters to a Map Layer is additive (acts like OR statements).
The same notes that were listed for the Filter Grid Preview for scenario items apply to the Filter Grid Preview for Map Layers too: columns with conditions have the filter icon on them, users can resize and (multi-)sort the columns, however, re-ordering the columns is not possible.
Named Filters can be deleted, and this affects other input tables, scenario items, and map layers that used the now deleted Named Filter(s). This will be explained further in this final section of the Help Article on Named Filters.
A Named Filter can be deleted by using one of three methods:
After choosing to delete a named filter, the following message comes up to ask the user for confirmation. In this example we are deleting the filter named "New York and New Jersey" which is a filter on the Customers input table:
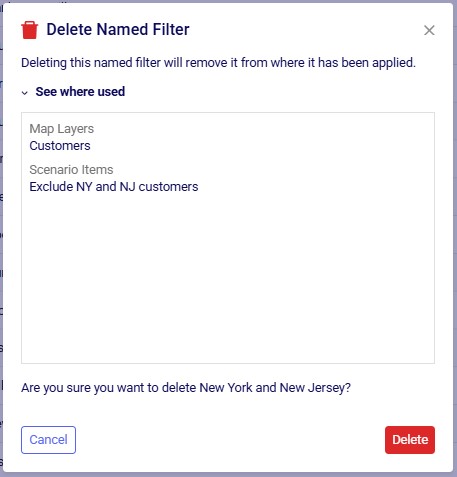
The message will let the user know if the named filter that is about to be deleted was used in any Map Layers and/or Scenario Items. If so, it lists the names of these layers/items in the "See where used" section which can be expanded and collapsed by clicking on the caret symbol. Note that currently this message does not indicate if the named filter is used in any input tables.
The results of deleting a Named Filter that was used are as follows:
Named Filters are an exciting new feature which allows users to create and save specific filters directly on grid views, to then be utilized seamlessly across all policies tables, scenario items and map layers. For example, if you create a filter named “DCs” in the Facilities table to capture all entries with “DC” in their designation, this Named Filter can then be applied in a policy table, providing a dynamic alternative to the traditional Group function.
Unlike Groups, named filters automatically update: adding or removing a DC record in the Facilities table will instantly reflect in the Named Filter, streamlining the workflow and eliminating the need for manual updates. Additionally, when creating Scenario Items or defining Map Layers, users can easily select Named Filters to represent specific conditions, easily previewing the data, making the process much quicker and simpler.
In this help article, how Named Filters are created will be covered first. In the sections after, we will discuss how Named Filters can be used on input tables, in scenario items, and on map layers, while the final section contains a few notes on deleting Named Filters.
Named Filters can be set up and saved on any Cosmic Frog table: input tables, output tables, and custom tables. These tables are found in the Data module of a Cosmic Frog model:
A quick description of each of the options available in the Filter drop-down menu follows here, we will cover most of these in more detail in the remainder of this Help Article:
Note that an additional Save Filter option becomes available in this menu in case a filter has been created (added) and next changes have been made to the table's filter conditions. The Save Filter option can then be used to update the existing named filter to reflect these changes.
Let’s walk through setting up a filter on the Facilities table that filters out records where the Facility Name ends in “DC” and save it as a named filter called “DCs”:
There are 3 buttons below the list of filters as follows (these were obscured by the hover text in the previous screenshot):
There is a right-click context menu available for filters listed in the Named Filters pane, which allows the user to perform some of the same actions as those in the main Filter menu shown above:
Named Filters can use filtering conditions that are applied to multiple fields in a table. The next example shows a Named Filter called “CZ2* Space Suit demand >6k” on the Customer Demand input table which uses filtering conditions on three fields:
Conditions were applied to 3 fields in the Customer Demand table, as follows: 1) Customer Name Begins With “CZ2”, 2) Product Name Contains “Space”, and 3) Quantity Greater Than “6000”. The resulting filter was saved as a Named Filter with the name “CZ2* Space Suit demand >6k” which is applied in the screenshot above. When hovering over this Named Filter, we indeed see the 3 fields and that they each have a single condition on them.
Besides being able to create Named Filters on input tables, they can also be created on output and custom tables. On output tables this can for example expedite the review of results after running additional scenarios where one can apply a pre-saved set of Named Filters one after the other once the runs are done instead of having to re-type each filter that shows the outputs of interest each time. This example shows a Named Filter on the Optimization Facility Summary output table to show records where the Throughput Utilization is greater than 0.8:
Next, we will see how multiple Named Filters can be applied to a table. In the example we will use, there are 4 Named Filters set up on the Facilities table:
Next, we will apply another Named Filter in addition to this first one ("USA locations"). How the Named Filters work together depends on if they are filtering on the same field or on different fields:
Now, if we want to filter out only Ports located in the USA, we can apply 2 of the Named Filters simultaneously:
To show an example of how multiple named filters that filter on the same field work, we will add a third Named Filter:
To alter an existing filter, we can change the criteria of this existing filter, and then save the resulting filter, replacing the original Named Filter. Let’s illustrate this through an example: in a model with about 1.3k customers in the US, we have created a Named Filter “New York and New Jersey”, but later on realize that this filter also includes customers in New Hampshire and New Mexico:
In reality, this filter also filters out customers located in the regions (states) of New Hampshire and New Mexico in addition to those in New York and New Jersey. So, the next step is to update the filter to only filter out the New York and New Jersey customers:
Next, we can use the Save Filter option from either the Filter menu drop-down list or the context menu after right-clicking on the filter in the Named Filters pane to update the existing "New York and New Jersey" named filter to use the updated condition. The following screenshot shows the latter method:
After choosing Save Filter from the context menu, the following message is shown for the user to confirm they want to overwrite the original named filter using the current filter conditions:
After clicking Save, the existing named filter has been updated:
So far, the only examples were of filters applied to one field in an input table. The next example shows a Named Filter called “CZ2* Space Suit demand >6k” on the Customer Demand input table which uses filtering conditions on multiple fields:
Conditions were applied to 3 fields in the Customer Demand table, as follows: 1) Customer Name Begins With “CZ2”, 2) Product Name Contains “Space”, and 3) Quantity Greater Than “6000”. The resulting filter was saved as a Named Filter with the name “CZ2* Space Suit demand >6k” which is applied in the screenshot above. When hovering over this Named Filter, we indeed see the 3 fields and that they each have a single condition on them.
Besides being able to create Named Filters on input tables, they can also be created on output and custom tables. On output tables this can for example expedite the review of results after running additional scenarios where one can apply a pre-saved set of Named Filters one after the other once the runs are done instead of having to re-type each filter that shows the outputs of interest each time. This example shows a Named Filter on the Optimization Facility Summary output table to show records where the Throughput Utilization is greater than 0.8:
The last option of Show Input Data Errors in the Filter menu creates a special filter named ERRORS and filters out records in the input table it is used on that have errors in the input data. This can be very helpful as records with input errors may have these in different fields and the types of errors may be different, so a user is not able to create 1 single filter that would capture multiple different types of errors. When this filter is applied, any record that has 1 or multiple fields with a red outline will be filtered out and shown. Hovering over the field gives a short description of the problem with the value in the field.
Named Filters for certain model elements (i.e. Customers, Facilities, Suppliers, Products, Periods, Modes, Shipments, Transportation Assets, Processes, Bills Of Materials, Work Centers, and Work Resources) can be used in other input tables, very similar to how Groups work in Cosmic Frog: instead of setting up multiple records for individual elements, for example a transportation policy from A to B for each finished good, a Named Filter that filters out all finished goods on the Products table can be used to set up 1 transportation policy for these finished goods from A to B (which at run-time will be expanded into a policy for each finished good). The advantage of using Named Filters instead of Groups is that Named Filters are dynamic. If records are added to tables containing model elements and they match the conditions of any Named Filters, they are automatically added to those Named Filters. Think for example of Products with the pre-fix FG_ to indicate they are finished goods and a Named Filter “Finished Goods” that filters the Product Name on Begins With “FG_”. If a new product is added where the Product Name starts with FG_, it is automatically added to the Finished Goods Named Filter and anywhere this filter is used this new finished good is now included too. We will look at 2 examples in the next few screenshots.
The completed transportation policy record uses Named Filters for the Origin Name, Destination Name, and Product Name, making this record flexible as long as the naming conventions of the factories, ports, and raw materials keep following the same rules.
The next example is on one of the Constraints tables, Production Constraints. On the Constraints tables, the Group Behavior fields dictate how an element name that is a Group or a Named Filter should be used. When set to Enumerate, the constraint is applied to each individual member of the group or named filter. If it is set to Aggregate, the constraint applies to all members of the group or named filter together. This Production Constraint states that at each factory a maximum amount of 150,000 units over all finished goods together can be produced:
When setting up a scenario item, previously, the records that the scenario item’s change needed to be applied to could be set by using the Condition Builder. Now users have the added option to use a saved Named Filter instead, which makes it easier as the user does not need to know the syntax for building a condition, and it also makes it more flexible as Named Filters are dynamic as was discussed in the previous section. In addition, users can preview the records that the change will be made to so the chance of mistakes is reduced.
Please note that a maximum of 1 Named Filter can be used on a scenario item.
The following example changes the Suppliers table of a model which has around 70 suppliers, about half of these are in Europe and the other half in China:
The Named Filters drop-down collapses after choosing the China Suppliers Named Filter as the condition, and now we see the Preview of the filtered grid. This is the Suppliers table with the Named Filter China Suppliers applied. At the right top of the grid the name of the applied Named Filter(s) is shown, and we can see that in the preview we indeed only see Suppliers for which the Country is China. So these are the records the change (setting Status = Exclude) will be made to in scenarios that use this scenario item.
A few notes on the Filter Grid Preview:
Besides using Named Filters on other input tables and for setting up conditions for scenario items, they can also be used as conditions for Map Layers, which will be covered in this final section of this Help Article. Like for scenario items, there is also a Filter Grid Preview for Map Layers to double-check which records will be filtered out when applying the condition(s) of 1 or multiple Named Filters.
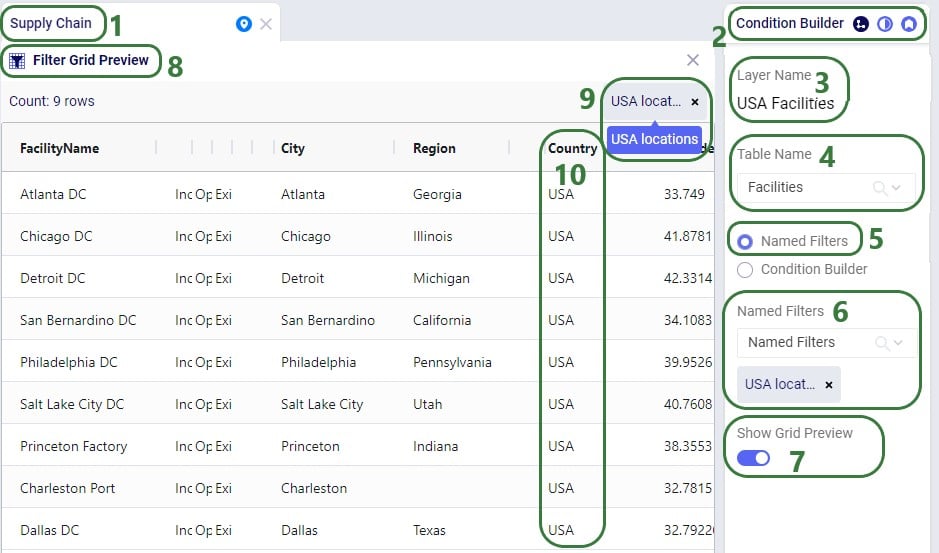
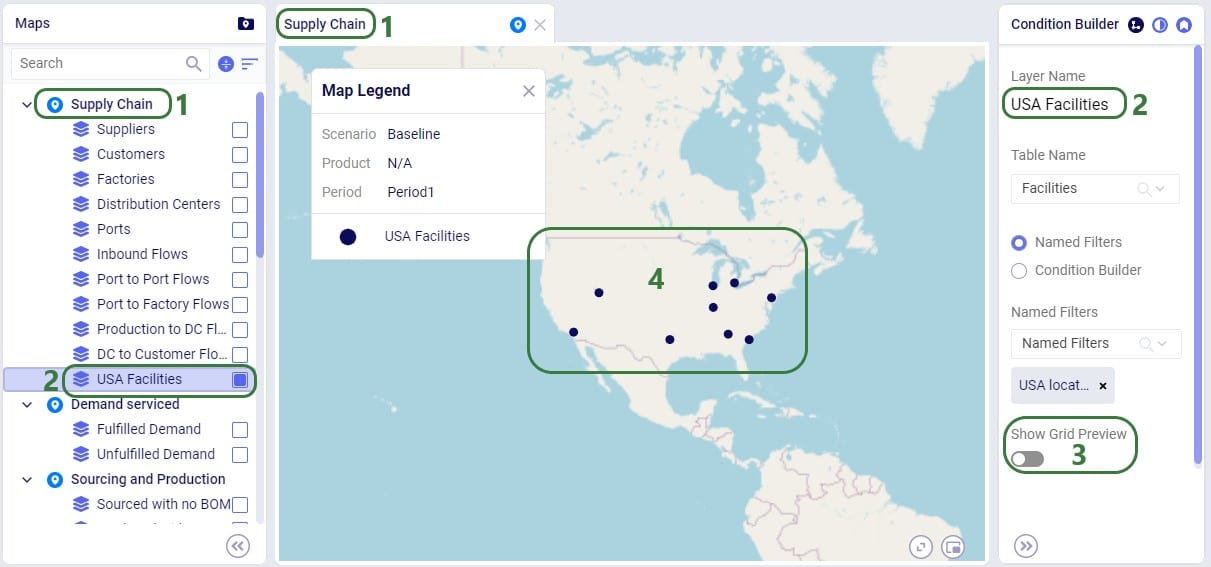
In this first example, a Named Filter on the Facilities table filters out only the Facilities that are located in the USA:
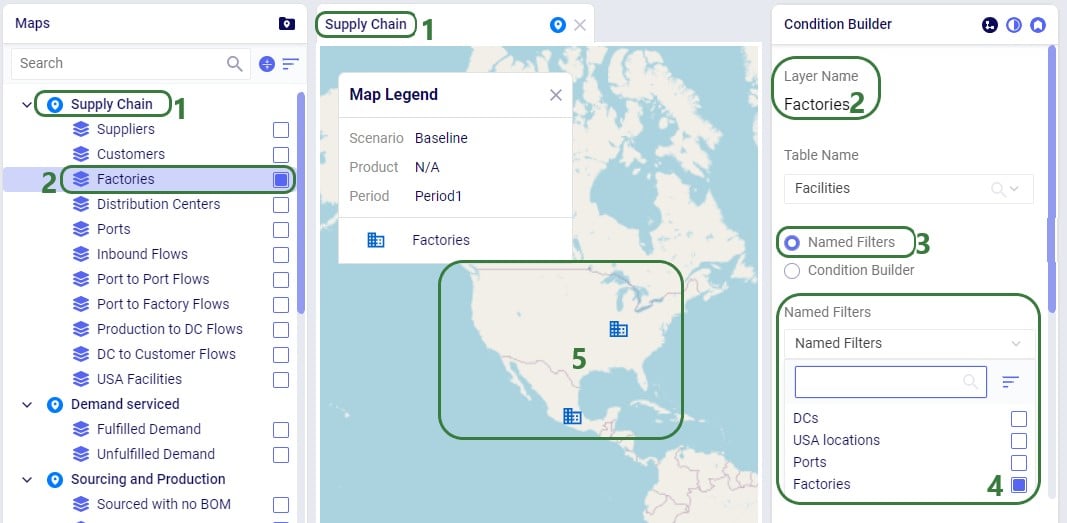
Another example of the same model is to use a different Named Filter from the Facilities table to show only Factories on the map:
If the Factories and the Ports Named Filters had both been enabled, then all factories and ports would be showing on the map. So, like for scenario items, applying multiple Named Filters to a Map Layer is additive (acts like OR statements).
The same notes that were listed for the Filter Grid Preview for scenario items apply to the Filter Grid Preview for Map Layers too: columns with conditions have the filter icon on them, users can resize and (multi-)sort the columns, however, re-ordering the columns is not possible.
Named Filters can be deleted, and this affects other input tables, scenario items, and map layers that used the now deleted Named Filter(s). This will be explained further in this final section of the Help Article on Named Filters.
A Named Filter can be deleted by using one of three methods:
After choosing to delete a named filter, the following message comes up to ask the user for confirmation. In this example we are deleting the filter named "New York and New Jersey" which is a filter on the Customers input table:
The message will let the user know if the named filter that is about to be deleted was used in any Map Layers and/or Scenario Items. If so, it lists the names of these layers/items in the "See where used" section which can be expanded and collapsed by clicking on the caret symbol. Note that currently this message does not indicate if the named filter is used in any input tables.
The results of deleting a Named Filter that was used are as follows:


