

With Optilogic’s new Teams feature set (see the "Getting Started with Optilogic Teams" help center article) working collaboratively on Cosmic Frog models has never been easier: all members of a team have access to all contents added to that team’s workspace. Centralizing data using Teams ensures there is a single source of truth for files/models which prevents version conflicts. It also enables real-time collaboration where files/models are seamlessly shared across all team members, and updates to any files/models are instantaneous for all team members.
However, whether your organization uses Teams or not, there can be a need to share Cosmic Frog models, for example to:
In this documentation we will cover how to share models, and the different options for sharing. Sharing models can be from an individual user or a team to an individual user or a team. As the risk of something undesirable happening with the model when multiple people work on it increases, it is important to be able to go back to a previous version of the model. Therefore, it is best practice to make a backup of a model prior to sharing it. Continue making backups when important/major changes are going to be made or when wanting to try out something new. How to make a backup of a model will be explained in this documentation too and will be covered first.
A backup of a model is a snapshot of its exact state at a certain point in time. Once a backup has been made, users can use them to revert to if needed. Initiating the creation of a backup of a Cosmic Frog model can be done from 3 locations within the Optilogic platform: 1) from the Models module within Cosmic Frog, 2) through the Explorer and 3) from within the Cloud Storage application on the Optilogic platform. The option from within Cosmic Frog will be covered first:
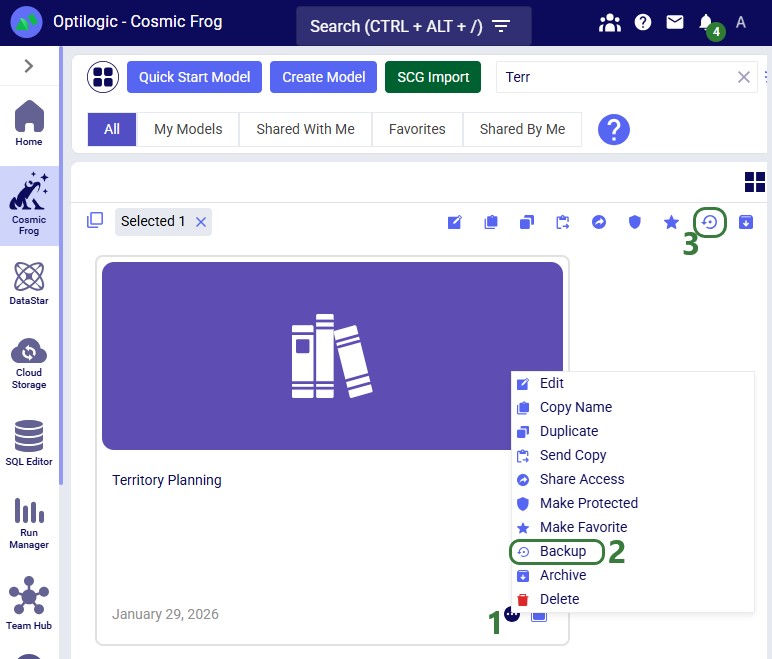
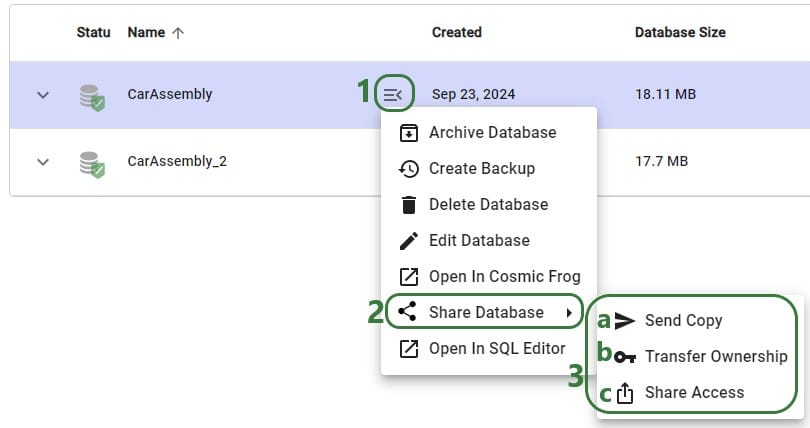
When in the Models module of Cosmic Frog (aka the Model Manager), hover over the model you want to create a backup for, and click on the icon with 3 horizontal dots that comes up at the bottom right of the model card (1). This brings up the model management options context menu, from which you can choose the Backup option (2). If only 1 model is selected, the Backup option can also be accessed from the toolbar at the top of the model list/grid (3).
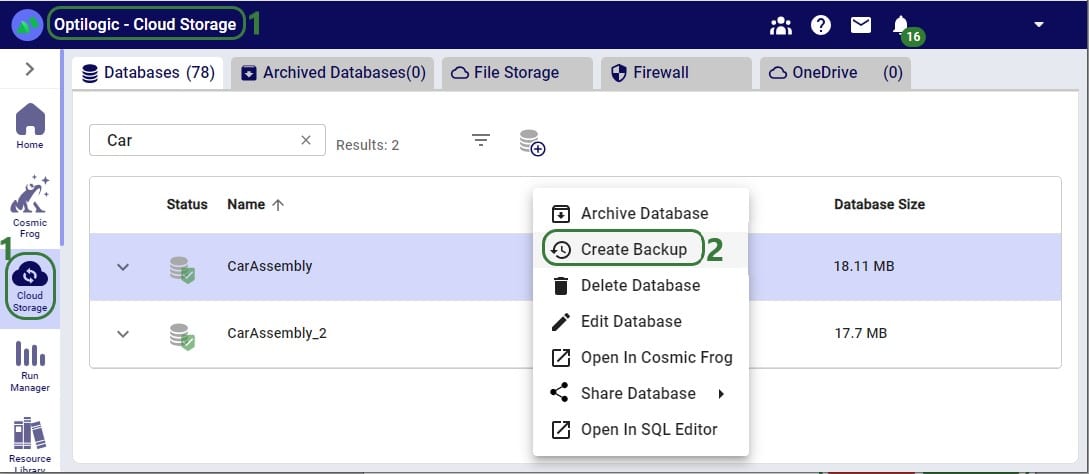
From the Cloud Storage application it works as follows:
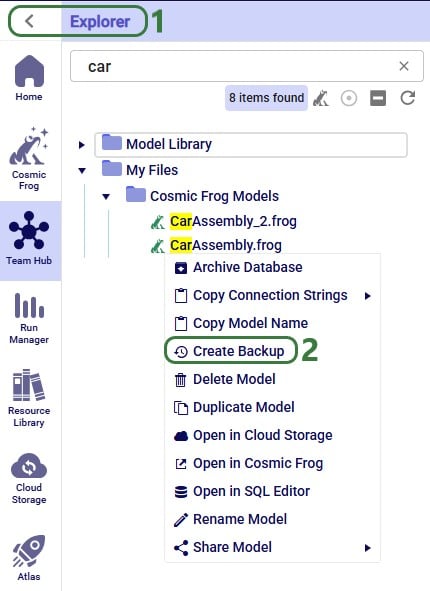
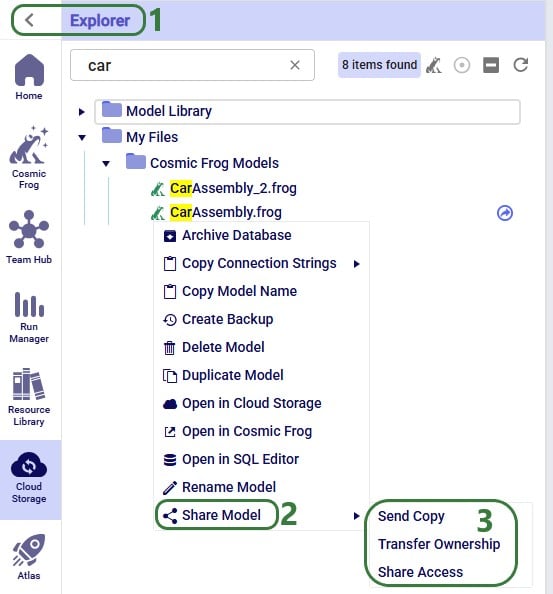
Through the Explorer, the process is similar:
Whether from the Models module within Cosmic Frog, through the Cloud Storage application or via the Explorer, in all 3 cases the Create Backup form comes up:
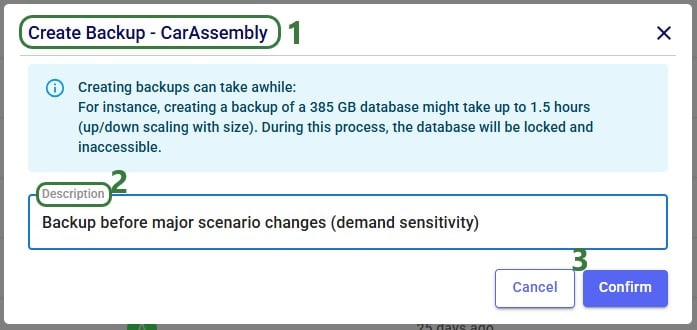
After clicking on Confirm, a notification at the top of the user’s screen will pop up saying that the creation of a backup has been started:

At the same time, a locked database icon with hover over text of “Backup in progress…” appears in the Status field of the model database (this is in the Cloud Storage application’s list of databases):

This locked database icon will disappear again once the backup is complete.
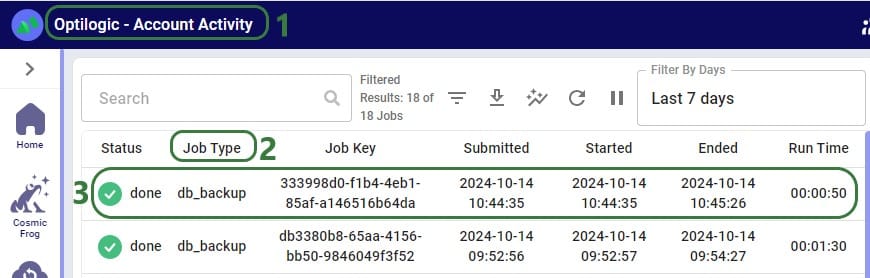
Users can check progress of the backup by going to the user’s Account menu under their username at the right top of the screen and selecting “Account Activity” from the drop-down menu:
To access any backups, users can expand individual model databases in the Cloud Storage application:

There are 2 more columns in the list of databases that are not shown in the screenshot above:

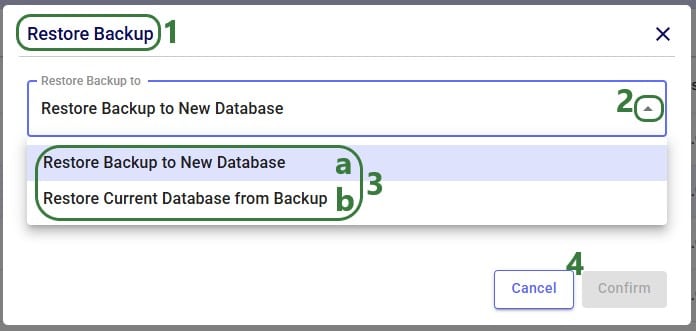
When choosing to restore a backup, the following form comes up:
Now that we have discussed how models can be backed up, we will cover how models can be shared. Note that it is best practice to make a backup of your model before sharing it.
If your organization uses Teams, first make sure you are in the correct workspace, either a Team’s or your personal My Account area, from which you want to share a model. You can switch between workspaces using the Team Hub application, which is explained in this "Optilogic Teams - User Guide" help center article.
Like making a backup of a model database, sharing a model can also be done through the Cloud Storage application and the Explorer. Starting with the Cloud Storage option:
The Share Model options can also be accessed through the Explorer:
Now we will cover the steps of sending a copy of a model to another user or team. The original and the copy are not connected to each other after the model was shared in this way: updates to one are not reflected in the other and vice versa.

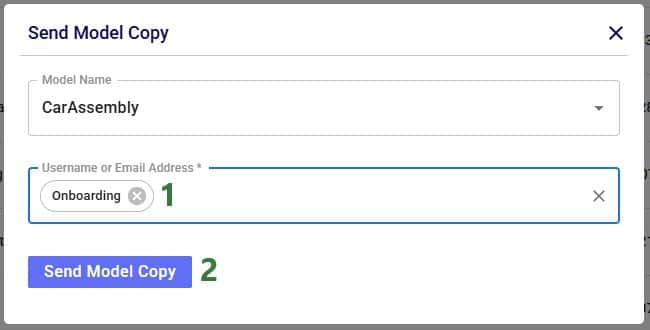
After clicking on the Send Model Copy button, a message that says “Model Copy Sent Successfully” will be displayed in the Send Model Copy form. Users can go ahead and send copies of other models to other user(s)/teams(s) or close out of the form by clicking on the cross icon at the right top of the form.
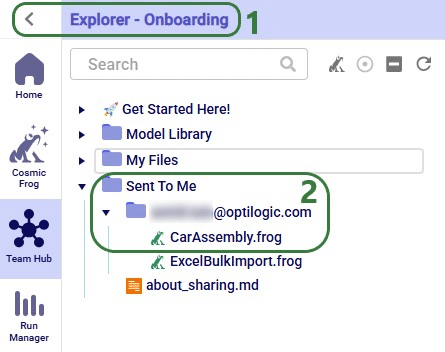
In this example, a copy of the CarAssembly model was sent to the Onboarding team. In the Onboarding team’s workspace this model will then appear in the Explorer:
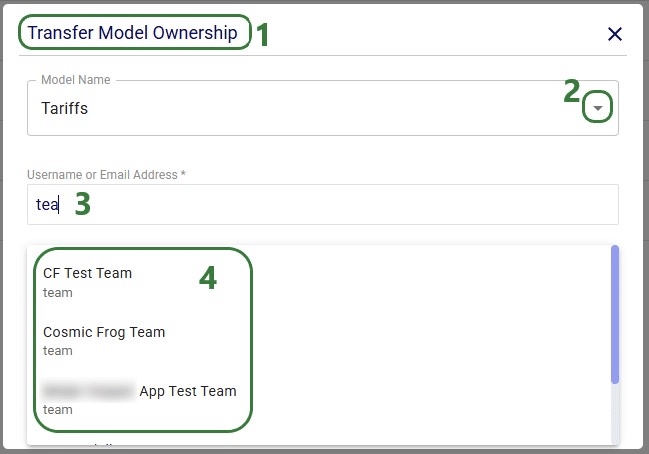
Next, we will step through transferring ownership of a model to another user or team. The original owner will no longer have access to the model after transferring ownership. In the example here, the Onboarding team will transfer ownership of the Tariffs model to an individual user.
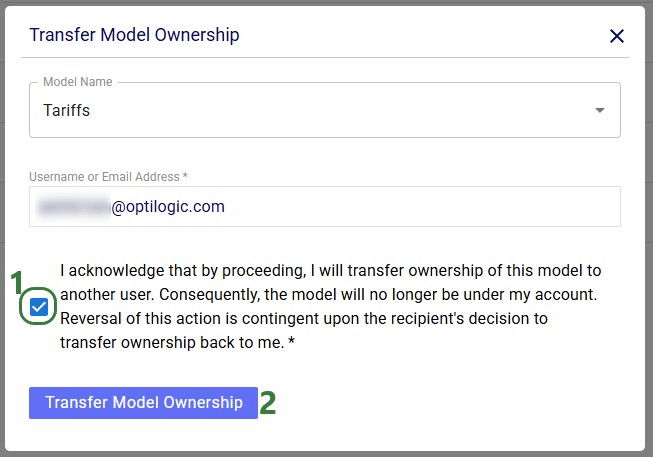
After clicking on the Transfer Model Ownership button, a message that says “Transferred Ownership Successfully” will be displayed in the Transfer Model Ownership form. Users can go ahead and transfer ownership of other models to other user(s)/teams(s) or close out of the form by clicking on the cross icon at the right top of the form.
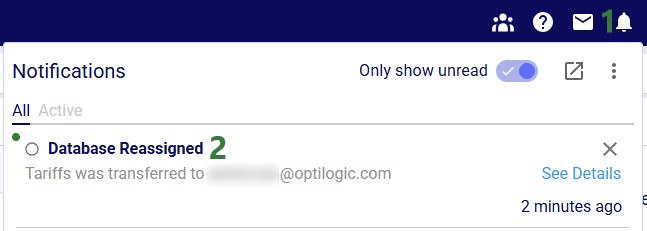
There will be a notification of the model ownership transfer in the workspace of the user/team that performed the transfer:
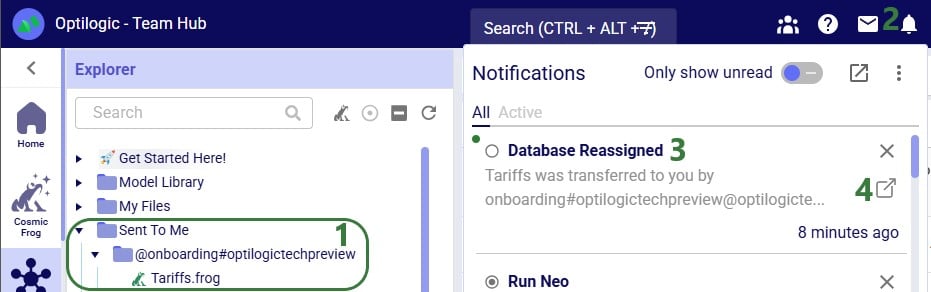
The model now becomes visible in the My Account workspace of the individual user the ownership of the model was transferred to:
Lastly, we will show the steps of sharing access to a model with a user or team. Note that Sharing Access to a model can be done from Explorer and from the Cloud Storage application (same as for the Send Copy and Transfer Ownership options), but can also be done from the Models module in Cosmic Frog:

In Cosmic Frog's Models module (aka Model Manager), hover over the model card of the model you wan to share access to and then click on the icon with 3 horizontal dots that comes up in the bottom right of the model card (1). Clicking on this icon brings up the model management actions context menu, from which you can choose the Share Access option (2). If only 1 model is selected, the Share Access option is also available from the model management actions toolbar at the top of the model list/grid (3).
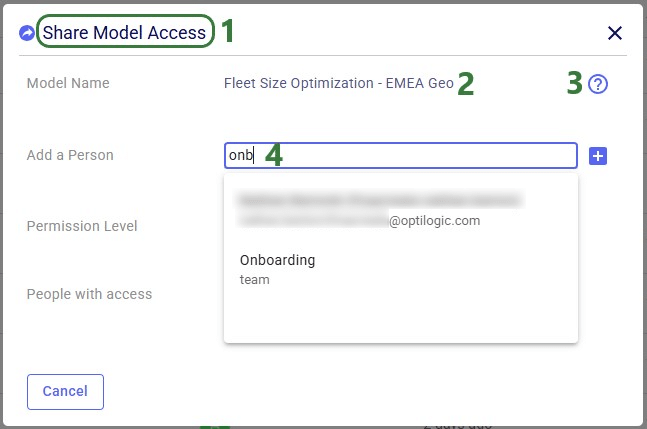
In our walk-through example, an individual user will share access to a model called "Fleet Size Optimization - EMEA Geo" with the Onboarding team.
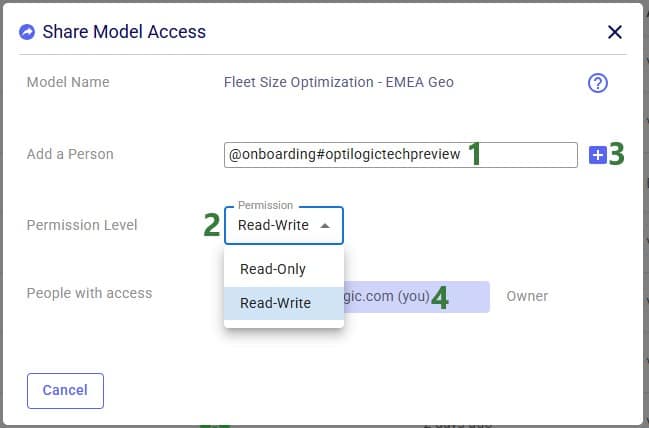
After the plus button was clicked to share access of the Fleet Size Optimization - EMEA Geo model with the Onboarding team, this team is now listed in the People with access list:
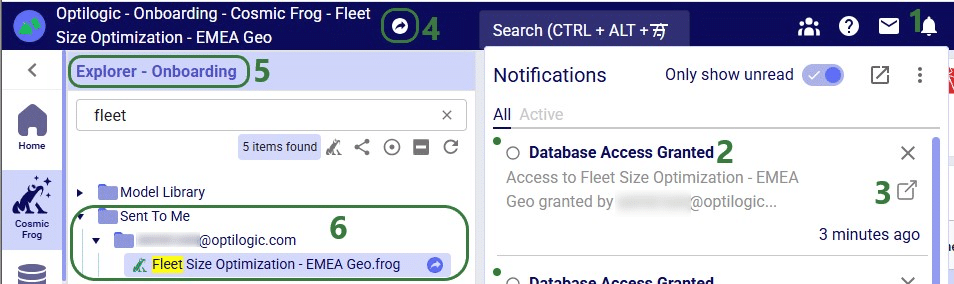
Now, in the Onboarding team’s workspace, we can access this model, of which the team receives a notification too:
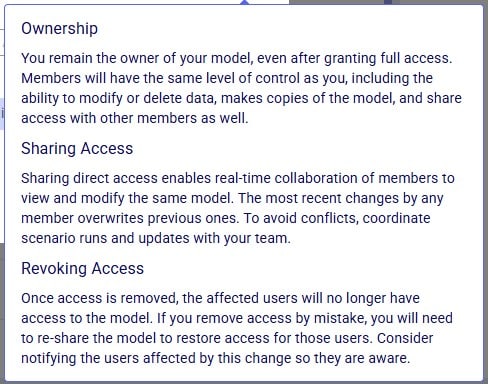
Now that the Onboarding team has access to this model, they can share it with other users/teams too: they can either send a copy of it or share access, but they cannot transfer ownership as they are not the model’s owner.
In the Explorer of the workspace of the user/team who shared access to the model, a similar round icon with arrow inside it will be shown next to the model’s name. The icon colors are just inverted (blue arrow in white circle) and here the hover text is “You have shared this database”, see the screenshot below. There will also be a notification about having granted access to this model and to whom (not shown in the screenshot):

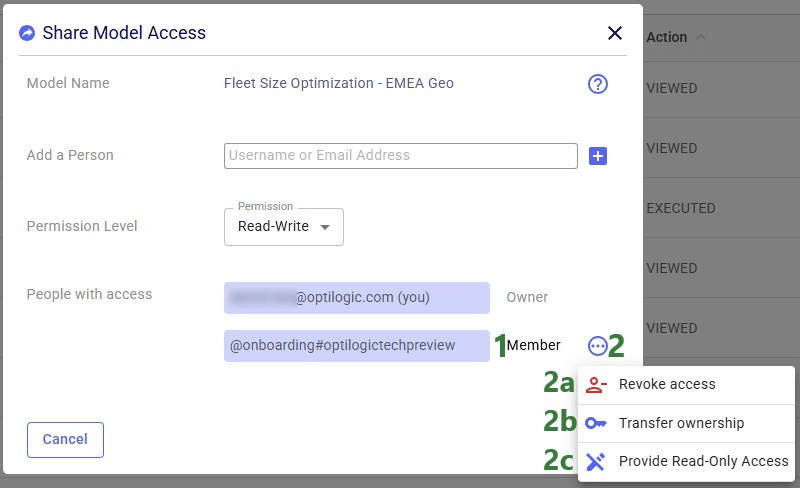
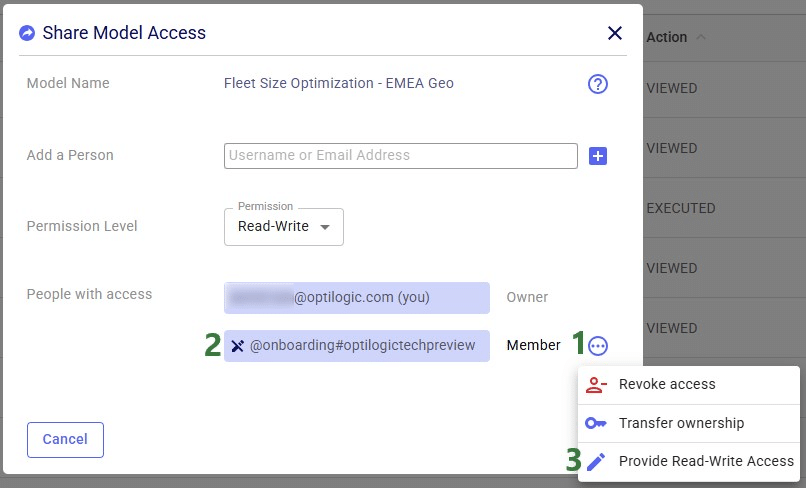
If the model owner decides to revoke access or change the permission level to a shared model, they need to open the Share Model Access form again by choosing Share Access from the Share Model options / clicking on the Share icon when hovering over the model's card on the Cosmic Frog start page:
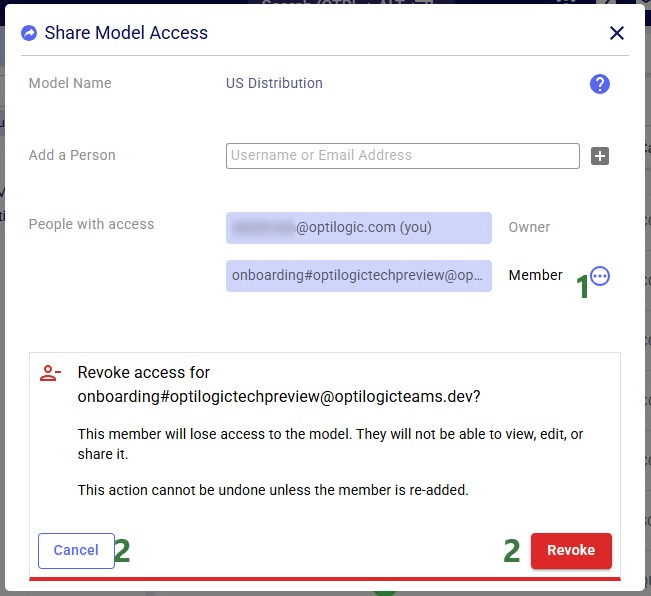
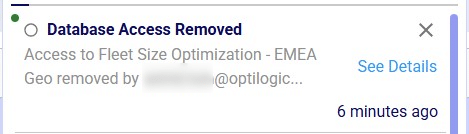
If access to a model is revoked, the team/user that was previously granted access but now no longer will have access, receives a notification about this:
With Read-Only access, teammates and stakeholders can explore a shared model, view maps, dashboards, and analytics, and provide feedback — all while ensuring that the data remains unchanged and secure.
Read-Only mode is best suited for situations where protecting data integrity is a priority, for example:
See the Appendix for a complete list of actions and whether they are allowed in Read-Only Access mode or not.
Similar to revoking access to a previously shared model, in order to change the permission level of a shared model, user opens the Share Model Access form again by choosing Share Access from the Share Model options / clicking on the Share icon when hovering over the model's card on the Cosmic Frog start page:
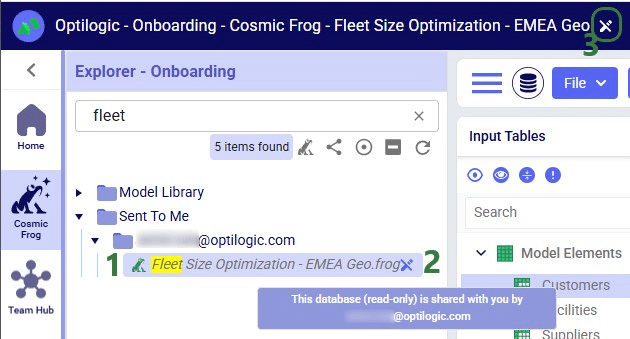
Models with Read-Only access can be recognized on the Optilogic platform as follows:
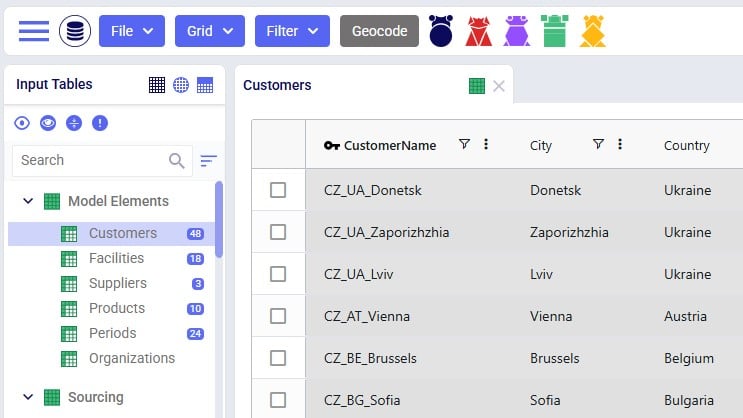
Input tables of Read-Only Cosmic Frog models are greyed out (like output tables already are by default), and and write actions (insert, delete, modify) are disabled:
Read-Only models can be recognized as follows in other Optilogic applications:
When working with models that have shared access, please keep following in mind:
In addition to the various ways model files can be shared between users, there is a way to share a copy of all contents of a folder with another user/team too:
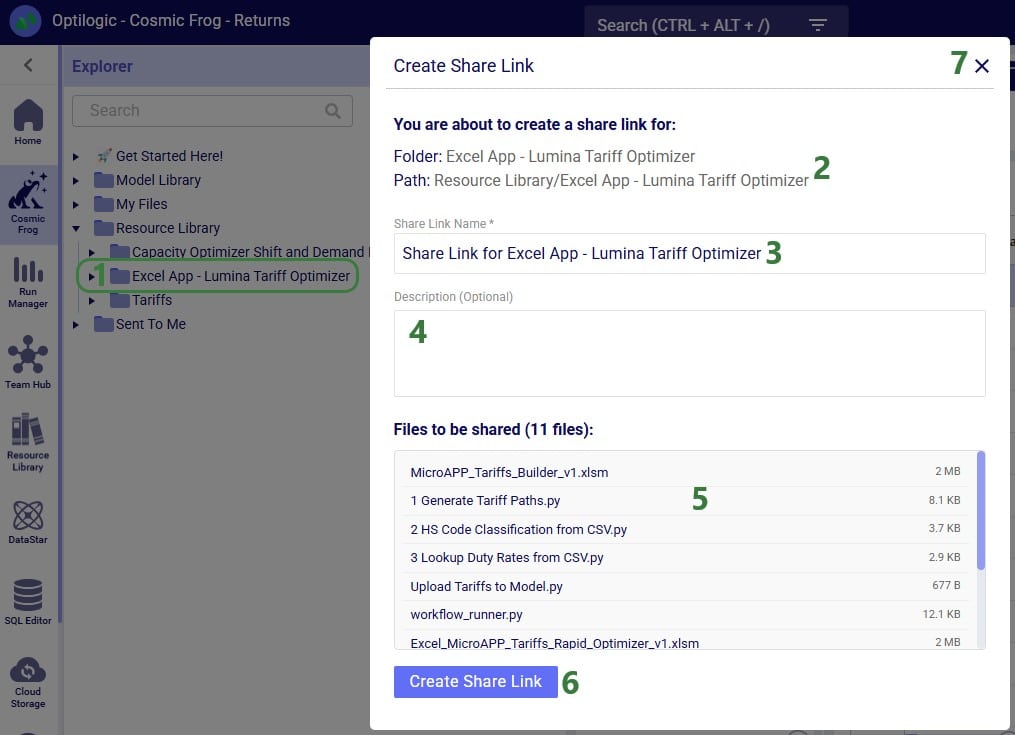
After clicking on the Create Share Link button, the share link is copied to the clipboard. A toast notification of this is temporarily displayed at the right top in the Optilogic platform. The user can paste the link and send it to the user(s) they want to share the contents of the folder with.
When a user who has received the share link copies it into their browser while logged into the Optilogic platform, the following form will be opened:

Folders copied using the share link option will be copied into a subfolder of the Sent To Me folder. The name of this subfolder will be the username / email of the user / team that sent the share link. The file structure of the sent folder will be maintained and appear the same as it was in the account of the sender of the share link.
See the View Share Links section in the Getting Started with the Explorer help center article on how to manage your share links.
Action - Allowed? - Notes:

With Optilogic’s new Teams feature set (see the "Getting Started with Optilogic Teams" help center article) working collaboratively on Cosmic Frog models has never been easier: all members of a team have access to all contents added to that team’s workspace. Centralizing data using Teams ensures there is a single source of truth for files/models which prevents version conflicts. It also enables real-time collaboration where files/models are seamlessly shared across all team members, and updates to any files/models are instantaneous for all team members.
However, whether your organization uses Teams or not, there can be a need to share Cosmic Frog models, for example to:
In this documentation we will cover how to share models, and the different options for sharing. Sharing models can be from an individual user or a team to an individual user or a team. As the risk of something undesirable happening with the model when multiple people work on it increases, it is important to be able to go back to a previous version of the model. Therefore, it is best practice to make a backup of a model prior to sharing it. Continue making backups when important/major changes are going to be made or when wanting to try out something new. How to make a backup of a model will be explained in this documentation too and will be covered first.
A backup of a model is a snapshot of its exact state at a certain point in time. Once a backup has been made, users can use them to revert to if needed. Initiating the creation of a backup of a Cosmic Frog model can be done from 3 locations within the Optilogic platform: 1) from the Models module within Cosmic Frog, 2) through the Explorer and 3) from within the Cloud Storage application on the Optilogic platform. The option from within Cosmic Frog will be covered first:
When in the Models module of Cosmic Frog (aka the Model Manager), hover over the model you want to create a backup for, and click on the icon with 3 horizontal dots that comes up at the bottom right of the model card (1). This brings up the model management options context menu, from which you can choose the Backup option (2). If only 1 model is selected, the Backup option can also be accessed from the toolbar at the top of the model list/grid (3).
From the Cloud Storage application it works as follows:
Through the Explorer, the process is similar:
Whether from the Models module within Cosmic Frog, through the Cloud Storage application or via the Explorer, in all 3 cases the Create Backup form comes up:
After clicking on Confirm, a notification at the top of the user’s screen will pop up saying that the creation of a backup has been started:
At the same time, a locked database icon with hover over text of “Backup in progress…” appears in the Status field of the model database (this is in the Cloud Storage application’s list of databases):
This locked database icon will disappear again once the backup is complete.
Users can check progress of the backup by going to the user’s Account menu under their username at the right top of the screen and selecting “Account Activity” from the drop-down menu:
To access any backups, users can expand individual model databases in the Cloud Storage application:
There are 2 more columns in the list of databases that are not shown in the screenshot above:
When choosing to restore a backup, the following form comes up:
Now that we have discussed how models can be backed up, we will cover how models can be shared. Note that it is best practice to make a backup of your model before sharing it.
If your organization uses Teams, first make sure you are in the correct workspace, either a Team’s or your personal My Account area, from which you want to share a model. You can switch between workspaces using the Team Hub application, which is explained in this "Optilogic Teams - User Guide" help center article.
Like making a backup of a model database, sharing a model can also be done through the Cloud Storage application and the Explorer. Starting with the Cloud Storage option:
The Share Model options can also be accessed through the Explorer:
Now we will cover the steps of sending a copy of a model to another user or team. The original and the copy are not connected to each other after the model was shared in this way: updates to one are not reflected in the other and vice versa.
After clicking on the Send Model Copy button, a message that says “Model Copy Sent Successfully” will be displayed in the Send Model Copy form. Users can go ahead and send copies of other models to other user(s)/teams(s) or close out of the form by clicking on the cross icon at the right top of the form.
In this example, a copy of the CarAssembly model was sent to the Onboarding team. In the Onboarding team’s workspace this model will then appear in the Explorer:
Next, we will step through transferring ownership of a model to another user or team. The original owner will no longer have access to the model after transferring ownership. In the example here, the Onboarding team will transfer ownership of the Tariffs model to an individual user.
After clicking on the Transfer Model Ownership button, a message that says “Transferred Ownership Successfully” will be displayed in the Transfer Model Ownership form. Users can go ahead and transfer ownership of other models to other user(s)/teams(s) or close out of the form by clicking on the cross icon at the right top of the form.
There will be a notification of the model ownership transfer in the workspace of the user/team that performed the transfer:
The model now becomes visible in the My Account workspace of the individual user the ownership of the model was transferred to:
Lastly, we will show the steps of sharing access to a model with a user or team. Note that Sharing Access to a model can be done from Explorer and from the Cloud Storage application (same as for the Send Copy and Transfer Ownership options), but can also be done from the Models module in Cosmic Frog:
In Cosmic Frog's Models module (aka Model Manager), hover over the model card of the model you wan to share access to and then click on the icon with 3 horizontal dots that comes up in the bottom right of the model card (1). Clicking on this icon brings up the model management actions context menu, from which you can choose the Share Access option (2). If only 1 model is selected, the Share Access option is also available from the model management actions toolbar at the top of the model list/grid (3).
In our walk-through example, an individual user will share access to a model called "Fleet Size Optimization - EMEA Geo" with the Onboarding team.
After the plus button was clicked to share access of the Fleet Size Optimization - EMEA Geo model with the Onboarding team, this team is now listed in the People with access list:
Now, in the Onboarding team’s workspace, we can access this model, of which the team receives a notification too:
Now that the Onboarding team has access to this model, they can share it with other users/teams too: they can either send a copy of it or share access, but they cannot transfer ownership as they are not the model’s owner.
In the Explorer of the workspace of the user/team who shared access to the model, a similar round icon with arrow inside it will be shown next to the model’s name. The icon colors are just inverted (blue arrow in white circle) and here the hover text is “You have shared this database”, see the screenshot below. There will also be a notification about having granted access to this model and to whom (not shown in the screenshot):
If the model owner decides to revoke access or change the permission level to a shared model, they need to open the Share Model Access form again by choosing Share Access from the Share Model options / clicking on the Share icon when hovering over the model's card on the Cosmic Frog start page:
If access to a model is revoked, the team/user that was previously granted access but now no longer will have access, receives a notification about this:
With Read-Only access, teammates and stakeholders can explore a shared model, view maps, dashboards, and analytics, and provide feedback — all while ensuring that the data remains unchanged and secure.
Read-Only mode is best suited for situations where protecting data integrity is a priority, for example:
See the Appendix for a complete list of actions and whether they are allowed in Read-Only Access mode or not.
Similar to revoking access to a previously shared model, in order to change the permission level of a shared model, user opens the Share Model Access form again by choosing Share Access from the Share Model options / clicking on the Share icon when hovering over the model's card on the Cosmic Frog start page:
Models with Read-Only access can be recognized on the Optilogic platform as follows:
Input tables of Read-Only Cosmic Frog models are greyed out (like output tables already are by default), and and write actions (insert, delete, modify) are disabled:
Read-Only models can be recognized as follows in other Optilogic applications:
When working with models that have shared access, please keep following in mind:
In addition to the various ways model files can be shared between users, there is a way to share a copy of all contents of a folder with another user/team too:
After clicking on the Create Share Link button, the share link is copied to the clipboard. A toast notification of this is temporarily displayed at the right top in the Optilogic platform. The user can paste the link and send it to the user(s) they want to share the contents of the folder with.
When a user who has received the share link copies it into their browser while logged into the Optilogic platform, the following form will be opened:
Folders copied using the share link option will be copied into a subfolder of the Sent To Me folder. The name of this subfolder will be the username / email of the user / team that sent the share link. The file structure of the sent folder will be maintained and appear the same as it was in the account of the sender of the share link.
See the View Share Links section in the Getting Started with the Explorer help center article on how to manage your share links.
Action - Allowed? - Notes:


