Cosmic Frog’s Integrity Checker
Finding problems with any Cosmic Frog model’s data has just become easier with the release of the Integrity Checker. This tool scans all tables or a selected table in a model and flags any records with potential issues. Field level checks to ensure fields contain the right type of data or a valid value from a drop-down list are included, as are referential integrity checks to ensure the consistency and validity of data relationships across the model’s input tables.
In this documentation we will first cover the Integrity Checker tool’s scope, how to run it, and how to review its results. Next, we will compare the Integrity Checker to other Cosmic Frog data validation tools, and we will wrap up with several tips & tricks to help users make optimal use of the tool.
Integrity Checker Scope
The Integrity Checker extends cell validation and data entry helper capabilities to support users identify a range of issues relating to referential integrity and data types before running a model. The following types of data and referential integrity issues are being checked for when the Integrity Checker is run:
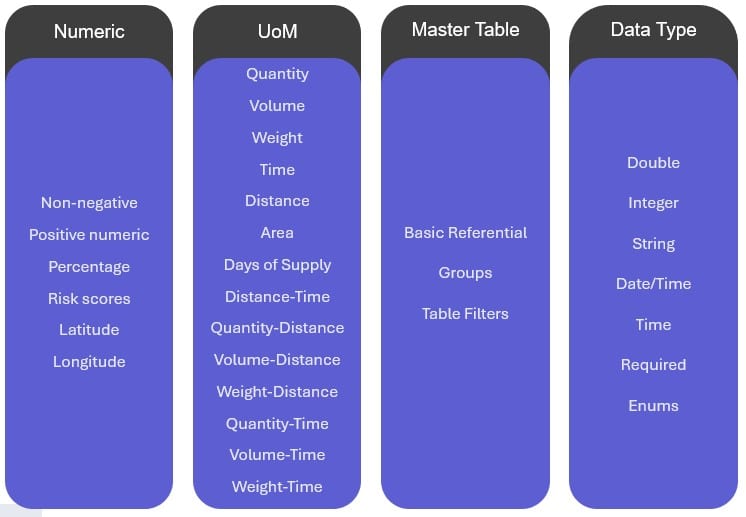
Here, we provide a high-level description for each of these 4 categories; in the appendix at the end of this help center article more details and examples for each type of check are given. From left to right:
- Numeric: checks that the field contains a number within the expected valid range.
- Unit of Measure (UoM): checks that UoM fields contain valid values from the Units of Measure table Symbol column for any of the allowed Unit of Measure Types for that field.
- Master table: these are referential integrity checks to ensure data relationships between input tables are consistent and valid.
- Data Type: checks that the type of data that is entered into the field matches the data type of the field.
Running the Integrity Checker
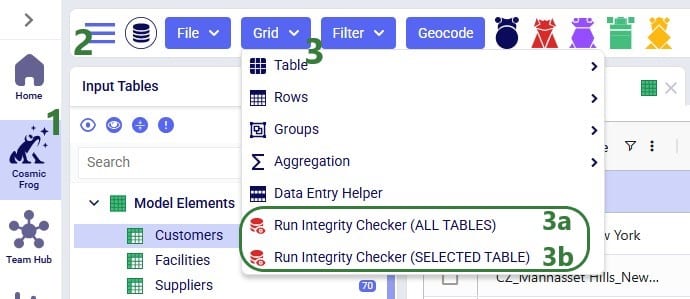
The Integrity Checker can be accessed in two ways while in Cosmic Frog’s Data module: from the pane on the right-hand side that also contains Model Assistant and Scenario Errors or from the Grid drop-down menu. The latter is shown in the next screenshot:
- We are in Cosmic Frog on the Optilogic platform (optilogic.app).
- If you are not in the Data module yet, click on the Module Menu icon (the icon with 3 horizontal bars) and select “Data”.
- From the Grid drop-down menu, user can choose from 2 options to run the Integrity Checker:
- Check all tables* in the model.
- Check only the selected table, which is the active table showing in the center of Cosmic Frog.
*Please note that in this first version of the Integrity Checker, the Inventory Policies and Inventory Policies Multi-Time Period tables are not included in any checks the Integrity Checker performs. All other tables are.
The second way to access the Integrity Checker is, as mentioned above, from the pane on the right-hand side in Cosmic Frog:

- This pane on the right-hand side either shows the Model Assistant when the first of the 3 icons (the one with the check mark) is clicked, Scenario Errors when the second icon (with the exclamation mark) is clicked, or the Integrity Checker when the third icon (with the database picture) is clicked. Here the Integrity Checker icon has been clicked, which you can tell by the color of the icon: it is a darker blue than the other 2 icons.
- When you run the Integrity Checker for the very first time on a model, 2 buttons are available here:
- Click on the top button to run the Integrity Checker on all tables in the model (except on the Inventory Policies and Inventory Policies Multi-Time Period tables).
- Click on the second button to run the Integrity Checker on the selected table, which is the active table showing in the center of Cosmic Frog, which would be the Products table here.
If the Integrity Checker has been run previously on a model, opening it again will show the previous results and gives user the option to re-run it by clicking on a “Rerun Check” button which we will see in screenshots further below.
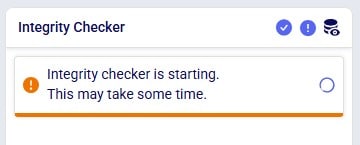
After starting the Integrity Checker in one of the 2 ways described above, a message indicating it is starting will appear in the Integrity Checker pane on the right-hand side:
Integrity Checker Results
While the Integrity Checker is running, the status of the run will be continuously updated, while results will be added underneath as checks on individual tables complete. Only tables which have errors in them will be listed in the results.
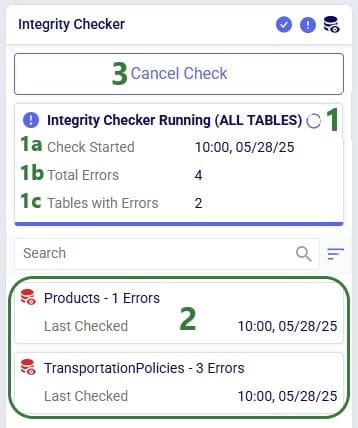
- In the top part of the Integrity Checker pane, the status of the run is listed. Here, the run is still in progress (“Running”). In parentheses it tells the user if this is a run on all tables, like it is here, or on an individual table (the “selected table” option). If it is on an individual table, the name of the table is listed in the parentheses. A summary of the results so far is included in this part:
- The time and date when the Integrity Checker run started.
- The total number of errors found so far.
- The number of tables that have errors in them so far.
- For each table with any errors in it, a card appears in the bottom part of the Integrity Checker. It lists the table name, the number of errors found, and the time and date when this table was last checked. So far, the Integrity Checker found errors in the Products table (1 error) and the Transportation Policies table (3 errors).
- To stop the Integrity Checker run before it has completed, user can click on the Cancel Check button.
Once the Integrity Checker run is finished, its status changes to Completed:
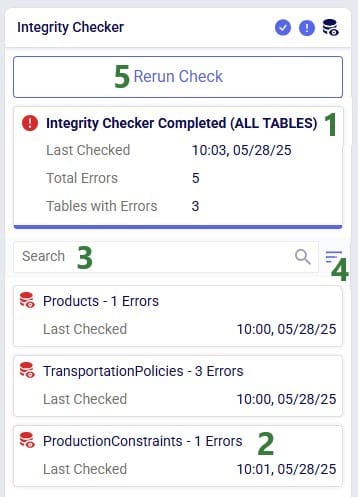
- Now the status of the Integrity Checker has changed to Completed after the run has finished. The red exclamation mark icon in front of the status indicates that errors were found by the Integrity Checker. When an Integrity Checker run does not find any errors, this icon will be a green checkmark instead.
- Besides the errors in the Products and Transportation Policies tables, there is a third table with errors, the Production Constraints table.
- Users can type into the Search box to filter the list of tables with errors in them down to those containing the search text in their name.
- Sorting the list of tables with errors in them can be done too: click on the icon with horizontal bars and choose 1 of 3 sorting options:
- Default – this will sort the tables in the same order as they are in the Input Tables list.
- A-Z – this will sort the tables alphabetically; in ascending order when selected for the first time, in descending order if clicked on a second time.
- Checked Time – this will sort tables in the order of when their checks completed from first to last; clicking on this option again will sort in the reverse order from last to first completed check.
- After addressing the errors identified by an Integrity Checker run, user may want to double-check they have mitigated all the issues. They can then run the Integrity Checker again by clicking on the Rerun Check button.
Users can see the errors identified by the Integrity Checker by clicking on one of the table cards which will open the table and the Integrity Checker Errors table beneath it:
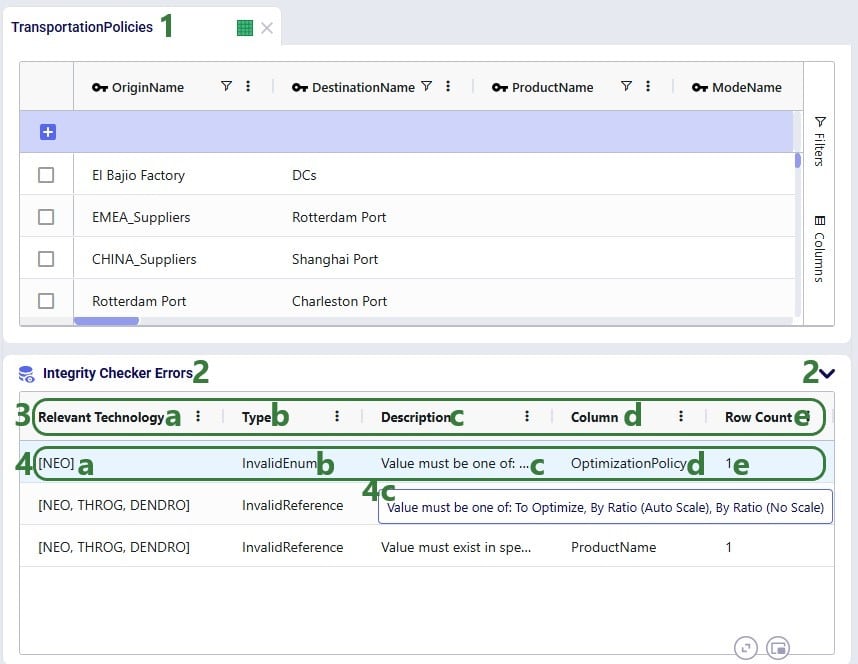
- User clicked on the Transportation Policies table card in the bottom part of the Integrity Checker where it was listed that this table contains 3 errors, this opens the Transportation Policies table.
- At the bottom another table named Integrity Checker Errors is opened as well. By default, it is expanded; it can be collapsed by clicking on the down caret button. The button then changes to an up caret one, which will expand the table when clicked on.
- For each of the errors identified by the Integrity Checker this table contains 1 record describing the error using the following fields:
- Relevant Technology: this lists the technology/technologies the error applies to. If you are using the model to run a technology not listed here, you can ignore the error, as the technology does not use the column that has the error. As a reminder, the 5 technologies available in Cosmic Frog and their names are:
- Neo – network
- Throg – simulation
- Hopper – transportation
- Dendro – inventory
- Triad – Greenfield
- Type: what sort of error was found; this can for example be one of the following (for a full list of the error types see the high-level overview in the Integrity Checker Scope section above and for more details and examples see the Appendix – Integrity Checker Scope Details further below):
- Required Field – the field is required to have a value, it cannot be empty.
- Invalid Enum – the value the column should have can be one of a finite set of options, as listed in the field’s drop-down list when double-clicking in it.
- Invalid Reference – the value in the field should exist in another Cosmic Frog Model Elements input table, or as a group or named filter.
- Non Negative – the value in the field cannot be negative, it should be greater than or equal to 0.
- Positive Numeric – the value in the field cannot be negative or 0, it should be greater than or equal to 1.
- Description: explains the type of error and in case the value of the field should be one of a finite number of options (e.g. there is a drop-down list in the column), it lists the valid values.
- Column: the column (/field) the error was found in.
- Row Count: the number of rows (/records) in the table that have this error in this column.
- Relevant Technology: this lists the technology/technologies the error applies to. If you are using the model to run a technology not listed here, you can ignore the error, as the technology does not use the column that has the error. As a reminder, the 5 technologies available in Cosmic Frog and their names are:
- Let us walk through the first error listed for the Transportation Policies table:
- The error only applies to the Neo technology (network optimization): if user is planning to run a network optimization on this model, then the error should be addressed. If they are planning to run another technology on this model, they can ignore this error.
- The error type is Invalid Enum – the value should be one of a finite number of options but is something different currently.
- The description column explains the error in more detail. In this screenshot, the whole description is not visible due to the width of the Description column, but hovering over shows the full text: “Value must be one of: To Optimize, By Ratio (Auto Scale), By Ratio (No Scale)”. In other words, there are 3 valid values for this field, and the current value is not one of these.
- Column indicates which column in the Transportation Policies table the error was found in, this is the Optimization Policy column in this case.
- The Row Count for this error is 1 – there is 1 record in the transportation policies table that has this error where the Optimization Policy field contains an invalid value.
Clicking on a record in the Integrity Checker Errors table will filter the table above (here the Transportation Policies table) down to the record(s) with that error:
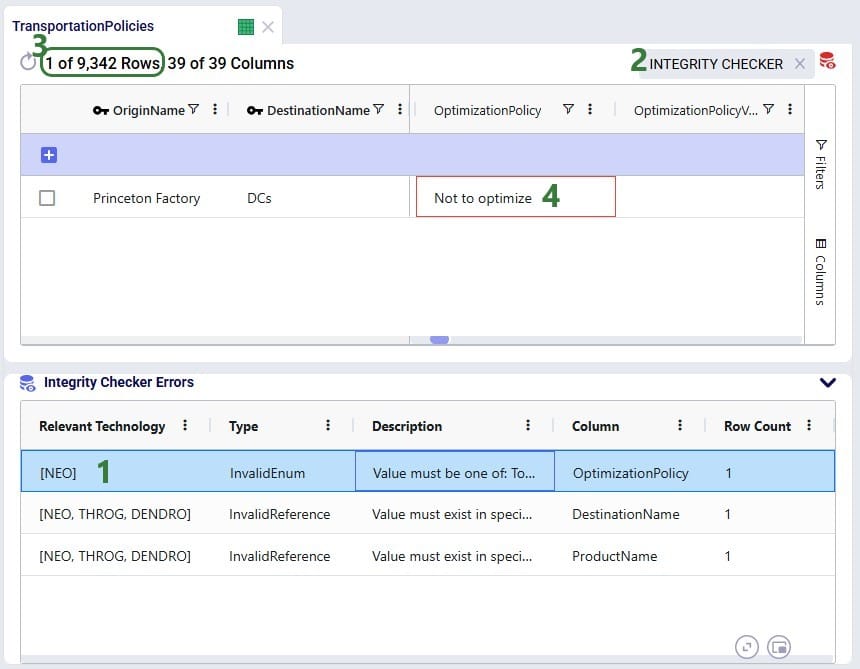
- We have clicked on the first record in the Integrity Checker Errors table underneath the Transportation Policies table. As covered in the previous screenshot, this error applies to the Neo technology only, and it says that 1 record in the Transportation Policies table has an invalid value in the Optimization Policy column.
- By clicking on the record in the Integrity Checker Errors table, the Transportation Policies table is filtered for the record(s) with that error. User can recognize this by the label at the right top of the table that the “Integrity Checker” filter is applied, which has a red database icon associated with it. User can take this filter off by clicking on the x on the right of the filter name.
- We see that indeed 1 of 9,342 rows in this table has been filtered out.
- In this record, the Optimization Policy field is set to “Not to optimize” which is not one of the three valid values for this field.
User can go through each record in the Integrity Checker Errors table at the bottom and filter out the associated records with the errors in the table above to review the errors and possibly fix them. In the next screenshot, user has moved onto the second record in the Integrity Checker Errors table:
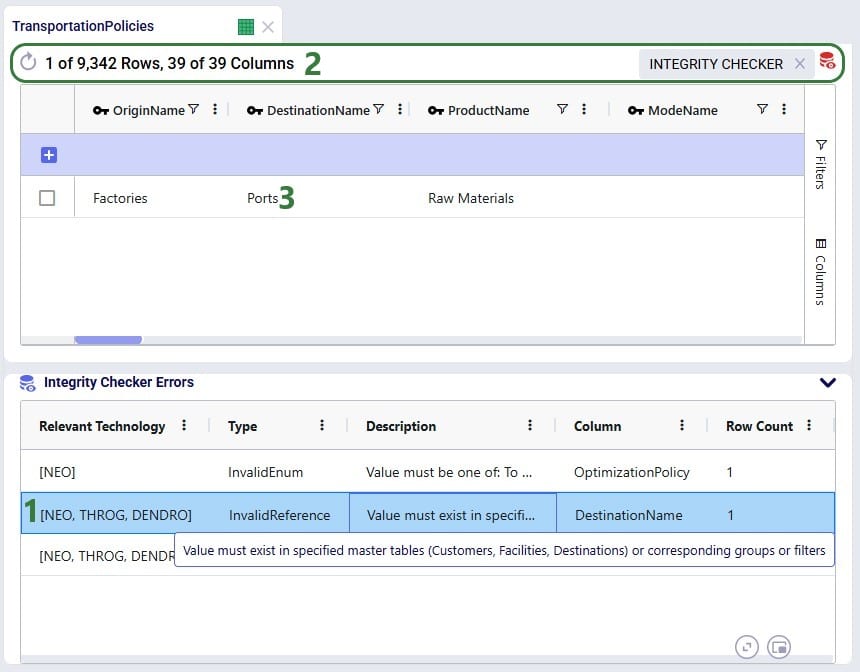
- User has clicked on the second record in the Integrity Checker Errors table. This error applies to 3 technologies (Neo, Throg, and Dendro) and it is an Invalid Reference type of error in the Destination Name column found in 1 record in the Transportation Policies table. The description explains that the value of this field has to exist in one of 3 master tables (Customers, Facilities, Destinations) or corresponding groups or filters.
- We see again that an Integrity Checker filter is applied and that this results in 1 record being filtered out in the Transportation Policies table.
- The Destination Name of this record is set to Ports. Checking the master tables, there are no Customers, Facilities or Suppliers named Ports present in the model. Neither are there any named filters named Ports present in these master tables. Lastly, there also are no groups with a group name of Ports present in the Groups table. Therefore, Ports is not a valid destination for a transportation policy.
We will look at one more error, the one that was found on the Products table:
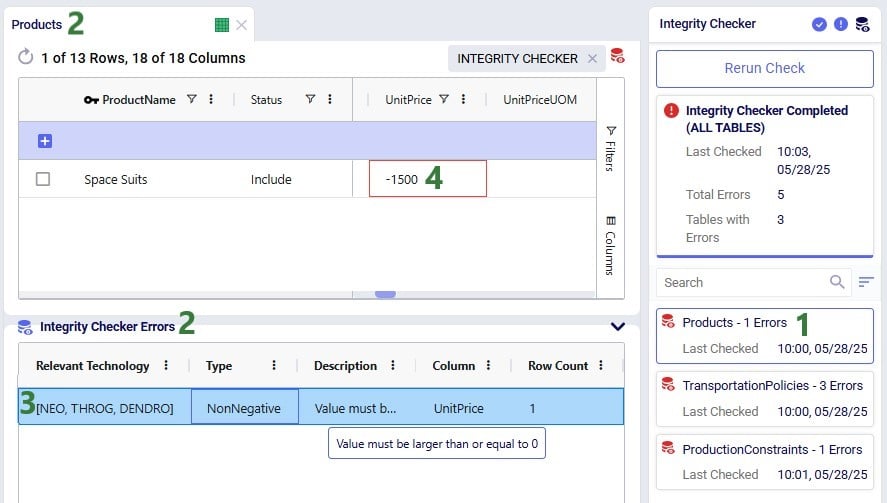
- In the Integrity Checker results, user clicks on the Products card.
- This opens the Products table and the Integrity Checker Errors table beneath it.
- There is 1 error listed here, which user has clicked on to filter the Products table down to the 1 record that has this Non Negative error in the Unit Price column. The description explains that the value for this field should be larger than or equal to 0. This error applies to the Neo, Throg, and Dendro technologies.
- Looking at the filtered out record with the error, the Unit Price field contains a value of -1500, which is an invalid value for this column.
Finally, the following screenshot shows what it looks like when the Integrity Checker was run on an individual table and in the case no errors are found:
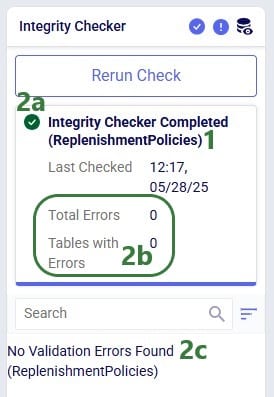
- The Integrity Checker was run on an individual table by selecting the “Selected Table” option. The name of the table, Replenishment Policies here, is listed in the parentheses.
- There were no errors found, which can be seen from:
- The green checkmark icon as opposed to the red exclamation mark icon when errors have been found.
- Total errors and tables with errors both are 0.
- The text “No Validation Errors Found” in the lower part of the Integrity Checker.
Comparison with other Cosmic Frog Data Validation Tools
There are additional tools in Cosmic Frog which can help with finding problems in the model’s data and overall construction, the table below gives an overview of how these tools compare to each other to help users choose the most suitable one for their situation
| Tool | What does it do? | Example | Automatic or Manual? | Where is it? |
| Data Entry Helper | Provides a list of valid values for selected cells where there is a primary key relationship, or a list of predefined values. | Quantity UOM field in the Bills Of Materials table: when selected will show all UoM Names in the Data Entry Helper drop-down list, which it is sourcing from the Units Of Measure table. | Manual | Grid menu > Data Entry Helper |
| Cell Validation | Highlights invalid cell values. Tooltip indicates the parameters of which the cell value would be considered valid. | Entering a latitude in an element table that does not fall between -90 and 90. | Automatic, upon cell entry in grid | Table Grid |
| Integrity Checker | Data entry helper and cell validation checks applied across the entire input data model. | Facility listed within the Production Policies table is not within the Facilities table or a corresponding group or named filter. | Manual, upon data entry / import | Grid menu > Run Integrity Checker (Selected & All Tables)
Panel on the right (Selected & All Tables)
|
| Scenario Errors | Identifies technology errors by scenario based on the pre-processing process. Same content as Validation Error Report output table. | Highlighting that a customer has not been used in a solve by the message details associated with ‘Unused Model Element’ type. | Automatic, upon run completion | Panel on the right
|
| Model Assistant | Checklist limited to identifying a single valid record across dependent tables to support a NEO model solve. | Indicating that Production Policies has no rows and providing you with the instructions to open the table, import records and populate the table. | Automatic, upon data entry / import | Panel on the right
|
Tips & Tricks
Please take note of the following so you can make optimal use of the Integrity Checker capabilities:
- You do not have to wait for the Integrity Checker tool to complete to start looking at its results. Once a table card has appeared in the results indicating a table has errors, you can click on the card and start reviewing the errors in that table. You can also go to other parts of Cosmic Frog or even out of the model and back in at a later time while the Integrity Checker is running, and the results will be available to you once you get back into the Data module of the model you ran the Integrity Checker on.
- If the Integrity Checker has been run on a model previously, the next time you open the model, the most recent results of the Integrity Checker are still available to you. Depending on what was run previously (all tables or selected table) and in the case of selected table, which table, running the Integrity Checker again will behave as follows:
- If the Integrity Checker was run on all tables previously, then clicking on the “Rerun Check” button will run the Integrity Checker on all tables again. If you want to run the Integrity Checker on 1 selected table, you will need to do it from the Grid drop-down menu.
- If the Integrity Checker was run on the selected table previously, then there will be a “Rerun Check” button if the same table is the currently active table and the check will be run on that table again. If a different table is the currently active table, the button will read “Run Check” and clicking on it will run the Integrity Checker on the 1 selected table. If you want to run the Integrity Checker on all tables, you will need to do it from the Grid drop-down menu.
- The Integrity Checker Errors table has a lot of the same options for configuration as the other Cosmic Frog input and output tables have, such as dragging and dropping the columns to change their order, clicking on column headers to sort by that column, resizing columns, etc. In addition, user can choose certain configuration actions from a context menu:
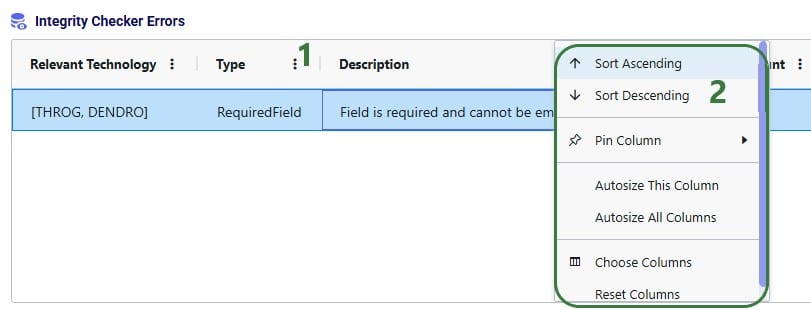
-
- To open the context menu for configuring the table and its columns, click on the icon with 3 dots next to the column you want to configure.
- The context menu comes up: select your desired configuration action from the list.
- Progress of the Integrity Checker and optionally cancelling it, can be done from within the Integrity Checker pane on the right-hand side in Cosmic Frog as we have seen above. In addition, user can also check progress of or cancel Integrity Checker runs, through the Run Manager application on the Optilogic platform:
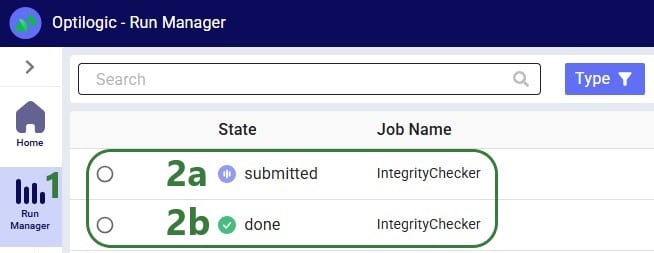
-
- User has opened the Run Manager application.
- Two jobs are showing here, both are of Integrity Checker runs in Cosmic Frog:
- This integrity checker job has been submitted and is still running. If needed it can be cancelled by right-clicking on it and selecting “Cancel Job”.
- This integrity checker job has finished running successfully as indicated by its “done” status.
Appendix – Integrity Checker Scope Details
We saw the next diagram further above in the Integrity Checker Scope section. Here we will expand on each of these categories and provide examples.
From left to right:
- Numeric: checks that the field contains a number within the expected valid range. Specific checks for this type of issue are:
- Non-negative: the field needs to have a value greater than or equal to 0. Example: the Unit Price field on the Products table will be flagged if it contains a numeric value <0.
- Positive numeric: the fields need to have a value greater than 0. Example: the Lot Size field on the Processes table will be flagged if it has a value <1.
- Percentage: the field needs to have a value between 0 and 100 as it represents a percentage. Example: the Service Band Percentage field on the Greenfield Service Bands table will be flagged if it has a value > 100 or < 0.
- Risk scores: a risk score field needs to have a value between 0 and 10. Example: the Risk Score field on the Risk Band Definitions table will be flagged if it has a value <0 or >10.
- Latitude: any field that contains a latitude of a location needs to have a value between -90 and 90. Example: the Latitude field on the Customers table will be flagged if it has a value <-90 or >90.
- Longitude: any field that contains a longitude of a location needs to have a value between -90 and 90. Example: the Longitude field on the Facilities table will be flagged if it has a value <-90 or >90.
- Unit of Measure (UoM): checks that UoM fields contain valid values from the Units of Measure table Symbol column for any of the allowed Unit of Measure Types for that field.
- Example: valid unit of measure types for the Unit Cost UOM field on the Customer Fulfillment Policies table are: Quantity, Volume, and Weight. So, if a non-existing Unit of Measure or one of a different type is entered here, the field is flagged. If the field contains “MI”, which is a valid Distance type unit of measure, it will be flagged, because it can only accept unit of measure types of Quantity (e.g. EA for each), Volume (e.g. CFT for cubic foot), and Weight (e.g. LB for pound).
- Please note that UoM fields can be left blank, in which case it will use the primary UoM of one of the allowed UoM types for the field. Primary UoMs are defined on the Model Settings table. If in the previous example the Unit Cost UoM field on the Customer Fulfillment Policies table is left blank, the Primary Quantity UoM value on the Model Settings table is used (can also see this by hovering over the column name, which shows a tooltip containing a “Default Value” among other details of the field). By default, the Primary Quantity UoM on the Model Settings table is set to EA; users can update this to another valid UoM of Type = Quantity listed on the Units of Measure table.
- Master table: these are referential integrity checks to ensure data relationships between input tables are consistent and valid. The entities of the supply chain being modeled are entered into the Model Elements input tables (i.e. Master tables) – Customers, Facilities, Suppliers, Products, Periods, and Organizations, and several other model-type specific tables (Processes, Work Centers, Work Resources, Bills of Materials, Transportation Modes, Transportation Assets, and Shipments). In addition to the single entities specified in these tables, they can be grouped together either through the Groups table or by using Named Filters. When members of a group behave the same way in (parts of) the supply chain (e.g. same cost structure, same O-D pairs, etc.) the group’s name / named filter’s name can be used in the other input tables which define the supply chain’s behavior in terms of costs, demand, policies, constraints, etc. instead of having to define a record for each individual member of the group. These master table integrity checks ensure that for fields that reference a master supply chain element the value of that element exists in its master table(s) or as a corresponding group or named filter.
- Example: the Product Name field on the Transportation Policies table will be flagged by the Integrity Checker if the value in the field does not match the Product Name of a record on the Products table (“basic referential”), does not match the name of a saved filter on the Products table (“table filter”), and does not match the Group Name of 1 or multiple records on the Groups table (“groups”).
- Data Type: checks that the type of data that is entered into the field matches the data type of the field. Specific checks for this type of issue are:
- Double, integer, string, date/time, time: if the data in the field is not of the specified data type it will be flagged. Example: the Optimization Policy Value field on the Customer Fulfillment Policies table will be flagged if it contains a string (e.g. “ten”) instead of a numeric value (type double) like for example 20.5 or 60.
- Required: the field cannot be blank. Example: the Product Name field on the Production Policies table needs to be populated, it will be flagged if it is left blank.
- Enums: the field needs to contain a value from a finite list of valid values (i.e. there is a drop-down list available when double-clicking in the field). Example: there are only 2 valid values for the Status field on the Warehousing Policies table – Include and Exclude (leaving blank is fine too, it will then default to use Include); entering for example “Consider” into the field will be flagged as an error.
Note that the numeric and data type checks sound similar, but they are different: a value in a field can pass the data type check (e.g. a double field contains the value -2000), but not the numeric check (a latitude field can only contain values between -90 and 90, so -2000 would be invalid).
We hope you will find the Integrity Checker to be a helpful additional tool to facilitate your model building in Cosmic Frog! For any questions, please contact Optilogic support on support@optilogic.com.