

The nature of LTL freight rating is complex and multi-faceted. The RateWare® XL LTL rating engine of SMC3 enables customers to manage parcel pricing and LTL rating complexity, for both class and density rates, with comprehensive rating solutions.
Cosmic Frog users that hold a license to the RateWare XL LTL Rating Engine of SMC3 can easily use it within Cosmic Frog to lookup LTL rates and use them in their models. In this documentation we will explain where to find the SMC3 RateWare utility within Cosmic Frog and how to use it. First, we will cover the basic inputs needed in Cosmic Frog models, then how to configure and run the SMC3 RateWare Utility to look up LTL rates, and finally how to add those rates for usage in the model.
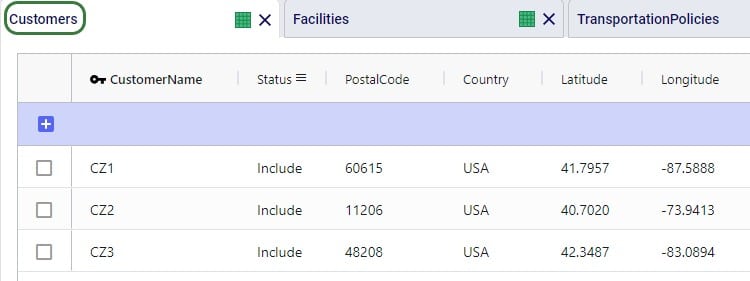
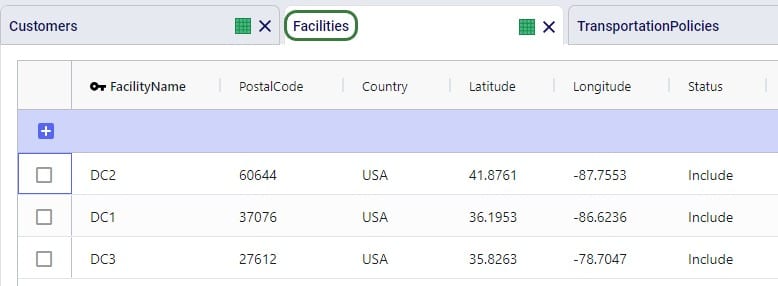
Before running the SMC3 RateWare Utility to retrieve LTL rates, we need to set up our model, including the origin-destination pairs for which we want to look up the LTL rates. Here, we will cover the inputs of a basic demo model showing how to use the SMC3 RateWare Utility. Of course, models using this utility may be much more complex in setup as compared to what is shown here.
The next 3 screenshots show:
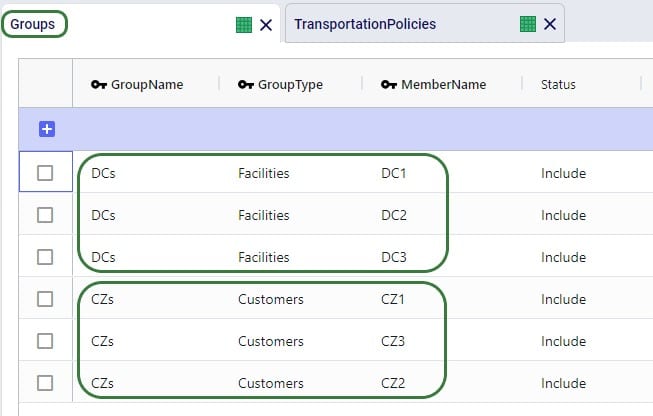
To facilitate model building, this model uses groups for Customer and DCs, as shown in the next screenshot. All DCs are members of the DCs group and all CZs are members of the Customers group:
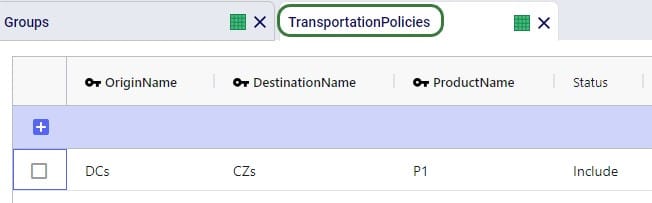
Using these groups, the Transportation Policies table is easily set up with 1 record from the DCs group to the CZs group as shown in the next screenshot. At runtime this 1 record is expanded into all possible OriginName-DestinationName combinations of the group members. So, this is an all DCs to all Customers policy that covers 9 possible origin-destination combinations.
Besides these tables, this simple model also has several other tables that are populated:
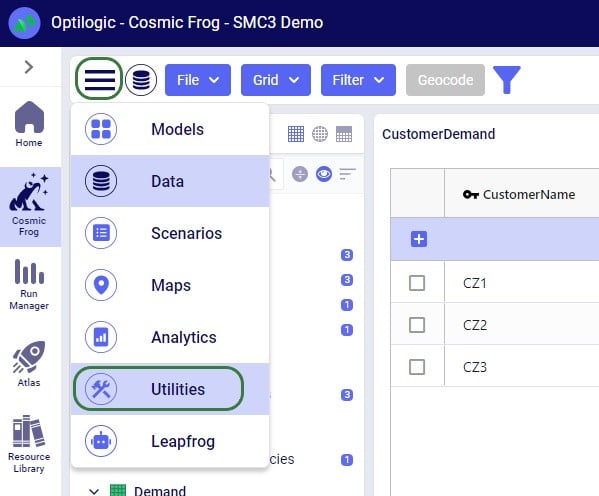
The SMC3 RateWare Utility is available by default from the Utilities module in Cosmic Frog, see next screenshot. Click on the Module Menu icon with 3 horizontal bars at the top left in Cosmic Frog, then click on Utilities in the menu that pops up:
You will now see a list of Utilities, similar to the one shown in this next screenshot (your Utilities are likely all expanded, whereas most are collapsed in this screenshot):
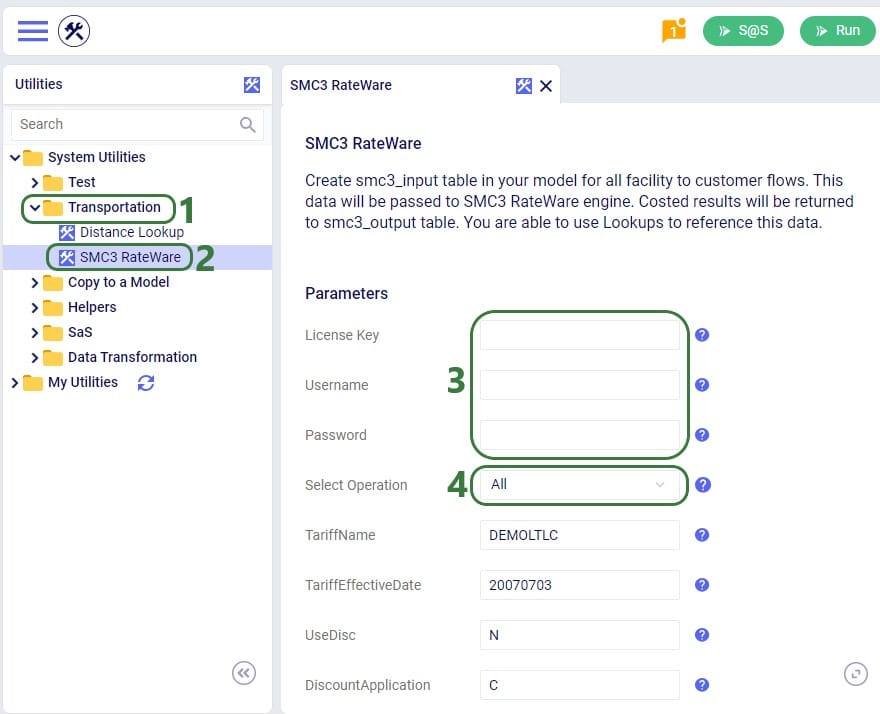
The rest of the inputs that can be configured are specific to the RateWare XL LTL Rating Engine and we refer user to SMC3’s documentation for the configuration of these settings.
When the utility is finished running, we can have a look at the smc3_inputs and smc3_outputs tables (if the option of All was used for Select Operation). First, here is a screenshot of the smc3_inputs table:

The next screenshot shows the smc3_outputs table in Optilogic’s SQL Editor. This is also a table with many columns as it contains origin and destination information, repeats the inputs of the utility, and contains details of the retrieved rates. Here, we are only showing the 3 most relevant columns: originname (the source DC), destinationname (the customer), and detailrate_1 which is the retrieved LTL rate:
Now that we have used the SMC3 RateWare Utility to retrieve the LTL rates for our 9 origin-destination pairs, we need to configure the model to use them as they are currently only listed in the smc3_outputs custom table. We use the Lookups table (an Input table in the Functional Tables section) to create a lookup link between the smc3_outputs custom table and the Transportation Policies input table, as follows:
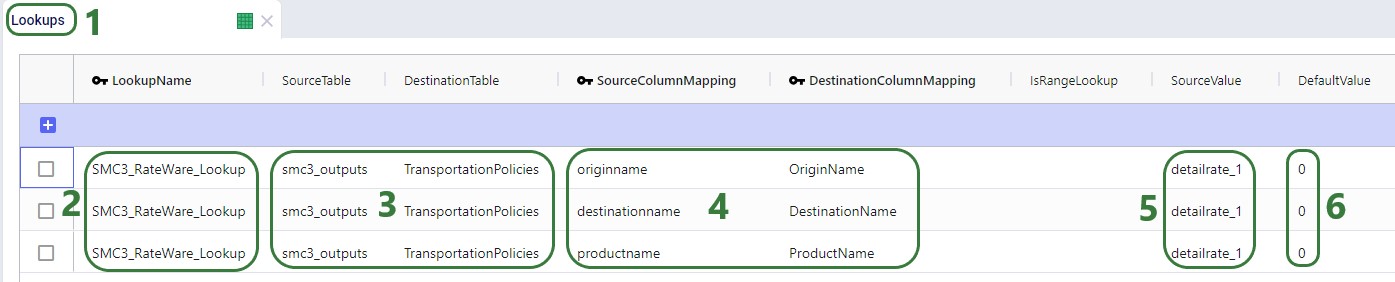
To finalize setting up the Lookup, we now apply it to the UnitCost field on the TransportationPolicies table, where we set the field to the name of the Lookup, see screenshot below. Now, when the model is run, the 1 transportation policy is expanded into the 9 origin-destination pairs it represents and the Unit Cost field is populated with the detailrate_1 value of the smc3_outputs table based on matching origin name, destination name, and product name between the 2 tables.

Lastly, we run a network optimization (NEO engine) on our small example model and look at the Optimization Flow Summary output table:
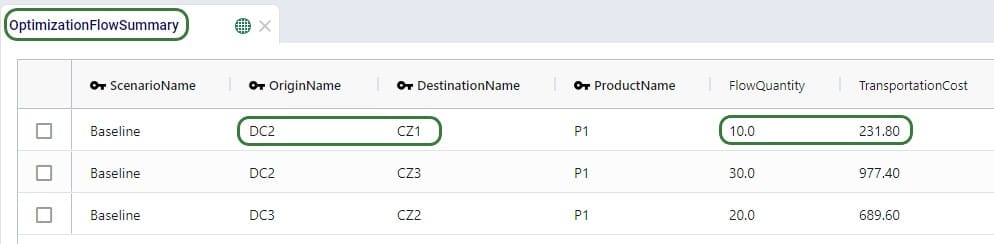
The optimization has correctly used DC2 as the source for CZ1 as it has the lowest rate for going to CZ1 of the 3 DCs (see screenshot further above of the smc3_outputs table). The rate is 23.18 and for 10 units moved (FlowQuantity) this results in a TransportationCost of 231.80. Similarly, we can double-check that indeed DC2 has the cheapest rate for going to CZ3 as well, DC3 has the cheapest rate for going to CZ2, and the Transportation Costs are correctly calculated as the LTL rate * flow quantity.
The nature of LTL freight rating is complex and multi-faceted. The RateWare® XL LTL rating engine of SMC3 enables customers to manage parcel pricing and LTL rating complexity, for both class and density rates, with comprehensive rating solutions.
Cosmic Frog users that hold a license to the RateWare XL LTL Rating Engine of SMC3 can easily use it within Cosmic Frog to lookup LTL rates and use them in their models. In this documentation we will explain where to find the SMC3 RateWare utility within Cosmic Frog and how to use it. First, we will cover the basic inputs needed in Cosmic Frog models, then how to configure and run the SMC3 RateWare Utility to look up LTL rates, and finally how to add those rates for usage in the model.
Before running the SMC3 RateWare Utility to retrieve LTL rates, we need to set up our model, including the origin-destination pairs for which we want to look up the LTL rates. Here, we will cover the inputs of a basic demo model showing how to use the SMC3 RateWare Utility. Of course, models using this utility may be much more complex in setup as compared to what is shown here.
The next 3 screenshots show:
To facilitate model building, this model uses groups for Customer and DCs, as shown in the next screenshot. All DCs are members of the DCs group and all CZs are members of the Customers group:
Using these groups, the Transportation Policies table is easily set up with 1 record from the DCs group to the CZs group as shown in the next screenshot. At runtime this 1 record is expanded into all possible OriginName-DestinationName combinations of the group members. So, this is an all DCs to all Customers policy that covers 9 possible origin-destination combinations.
Besides these tables, this simple model also has several other tables that are populated:
The SMC3 RateWare Utility is available by default from the Utilities module in Cosmic Frog, see next screenshot. Click on the Module Menu icon with 3 horizontal bars at the top left in Cosmic Frog, then click on Utilities in the menu that pops up:
You will now see a list of Utilities, similar to the one shown in this next screenshot (your Utilities are likely all expanded, whereas most are collapsed in this screenshot):
The rest of the inputs that can be configured are specific to the RateWare XL LTL Rating Engine and we refer user to SMC3’s documentation for the configuration of these settings.
When the utility is finished running, we can have a look at the smc3_inputs and smc3_outputs tables (if the option of All was used for Select Operation). First, here is a screenshot of the smc3_inputs table:
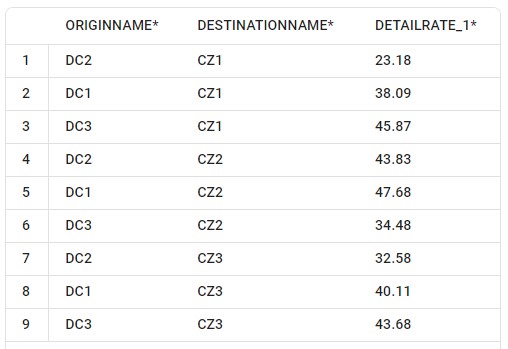
The next screenshot shows the smc3_outputs table in Optilogic’s SQL Editor. This is also a table with many columns as it contains origin and destination information, repeats the inputs of the utility, and contains details of the retrieved rates. Here, we are only showing the 3 most relevant columns: originname (the source DC), destinationname (the customer), and detailrate_1 which is the retrieved LTL rate:
Now that we have used the SMC3 RateWare Utility to retrieve the LTL rates for our 9 origin-destination pairs, we need to configure the model to use them as they are currently only listed in the smc3_outputs custom table. We use the Lookups table (an Input table in the Functional Tables section) to create a lookup link between the smc3_outputs custom table and the Transportation Policies input table, as follows:
To finalize setting up the Lookup, we now apply it to the UnitCost field on the TransportationPolicies table, where we set the field to the name of the Lookup, see screenshot below. Now, when the model is run, the 1 transportation policy is expanded into the 9 origin-destination pairs it represents and the Unit Cost field is populated with the detailrate_1 value of the smc3_outputs table based on matching origin name, destination name, and product name between the 2 tables.
Lastly, we run a network optimization (NEO engine) on our small example model and look at the Optimization Flow Summary output table:
The optimization has correctly used DC2 as the source for CZ1 as it has the lowest rate for going to CZ1 of the 3 DCs (see screenshot further above of the smc3_outputs table). The rate is 23.18 and for 10 units moved (FlowQuantity) this results in a TransportationCost of 231.80. Similarly, we can double-check that indeed DC2 has the cheapest rate for going to CZ3 as well, DC3 has the cheapest rate for going to CZ2, and the Transportation Costs are correctly calculated as the LTL rate * flow quantity.


