At Optilogic, we have built the next generation (next-gen) platform to complement our AI. It is a modern, unified workspace where users:
Never lose their place: switch between applications like SQL Editor or Run manager without losing context
Engage in a way that is natural to them, whether this is fully AI guided, using AI-as-copilot, or working heads-down in familiar tools
Work in an environment that reduces clutter and only surfaces what matters: the platform grows with your session and persists where you left off
Experience a cohesive framework that handles artifacts and iterative workflows seamlessly
While the next-gen platform is still in development, there is plenty available already for users to start working with it. Especially the AI-first approach will be a gamechanger for many. This documentation gives a high-level overview of the new platform. Please see the separate Getting Started with Ada & Agentic AI documentation for in-depth documentation on Ada, your supply chain modeling partner.
Logging in and First Time Configuration
Optilogic users can log into the next-gen platform at https://ai.optilogic.app, using the same credentials as those used to log into the current platform (on https://optilogic.app).
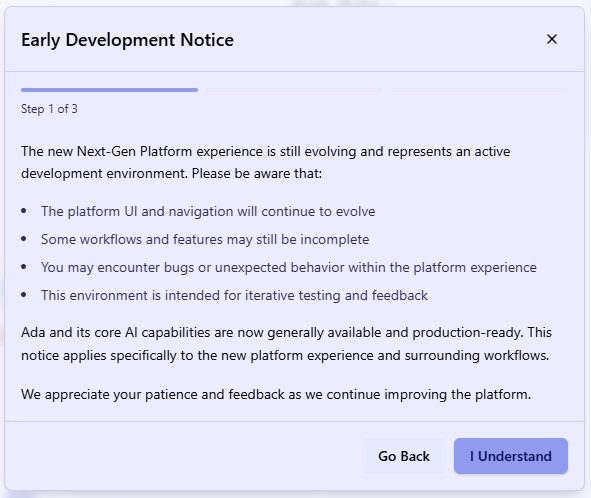
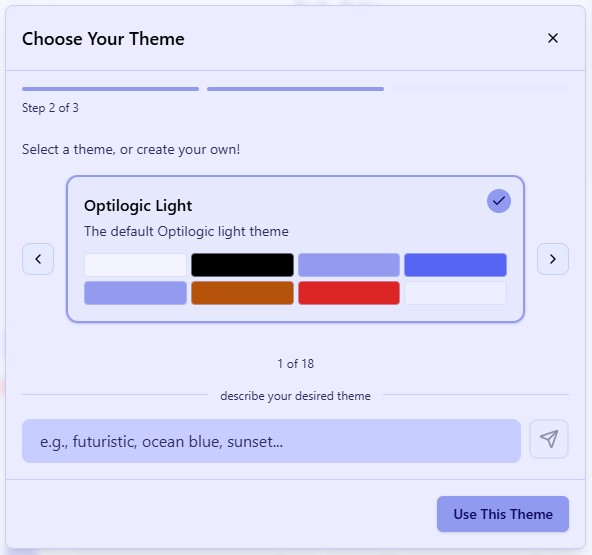
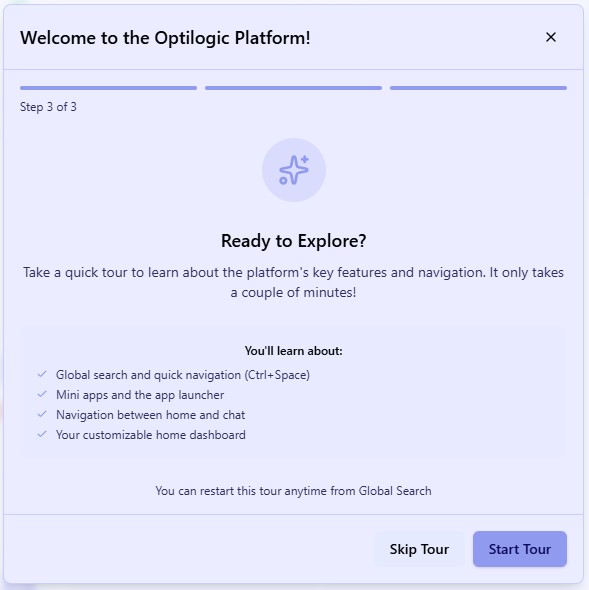
Once logged in, you are walked through 3 setup windows, shown in the following screenshots.
It is recommended to take the quick tour to learn about the platform. After it completes, you can follow another walkthrough, this one centered around using Ada through the chat UI. If you want to return to either of these tours later, you can find these in the Actions results part of Global Search (Ctrl + Space) after typing “introduction tour” or “Ada tour” in the search textbox.
Home Page and Sidebar
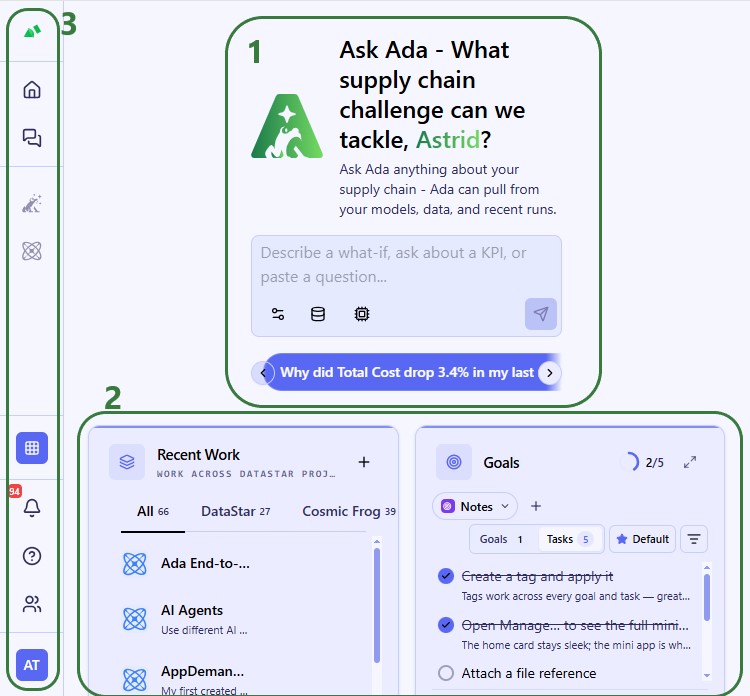
Your Home page will look similar to this:
In the top central part of the platform, Ada is available to immediately dive into any questions and tasks.
Further below, there are additional widgets, in this case a Recent Work one showing all recent DataStar and Cosmic Frog work and a Goals one for users to jump straight back in from where they left off.
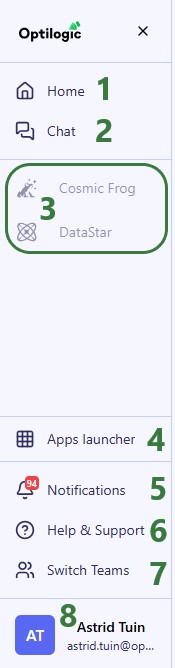
The sidebar on the left provides quick access to all features.
Clicking anywhere in the sidebar will expand it:
Click on Home to return to the home page as shown in the previous screenshot.
Click on Chat to open the chat UI full screen, including historical conversations with Ada.
In this area, applications that have been opened will be added to the rail, like a taskbar with open applications. Note that:
Cosmic Frog and DataStar are by default pinned here as these are the most used Optilogic applications. They are greyed out when not open; click on them to open the application.
Use the Apps launcher (next bullet) to open other applications.
Applications can be active multiple times, e.g. 2 instances of Lightning Editor can be active showing 2 different files, see also the next section.
Right-clicking on an application brings up a context menu, see also the next section.
The Apps Launcher can be used to open any of the Optilogic applications, but also to do a global search through files, databases, settings, and tours. Use the Ctrl + Space shortcut to open the Apps Launcher/Global Search at any time. See also the Apps Launcher section further below.
When activity happens within your Optilogic account, notifications alert you to this. This includes notifications for Cosmic Frog model and scenario runs, utilizing geocoding or the Integrity Checker within Cosmic Frog, DataStar Macro runs, database archival, and more. See also the Notifications section further below.
Click on Help & Support to easily access several helpful resources, use the AI Help Guide or to contact Optilogic support. This Help & Support window can also be brought up by using the F1 function key. See also the Help & Support section further below.
Use the Switch Teams option to change context between your own account (“My Account”) and any teams you may be part of. See Getting Started with Optilogic Teams for more information on using the Teams features. See also the Switch Teams section below.
Access your account settings by clicking on your profile picture. These include items like settings, preferences, and signing out. See also the Account Settings section further below.
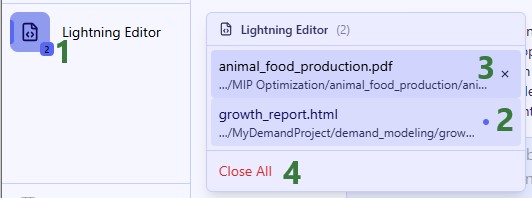
Applications Added to the Taskbar
When an application has been opened, it is added to the taskbar. If multiple instances of it are active, we can see that too:
The Lightning Editor is showing in the taskbar, the 2 at the right bottom of the icon indicates that 2 instances of this application are active.
Hovering over the Lightning Editor icon in the taskbar brings up the list of active instances. The 1 that is open and showing in the UI, by default to the right-hand side of the Home page or Ada chat, is indicated with a blue dot to the right.
Hovering over an instance in the list of active instances shows the close button to close that specific instance.
At the bottom of the list, a Close All button is available to close all instances of the Lightning Editor with one click.
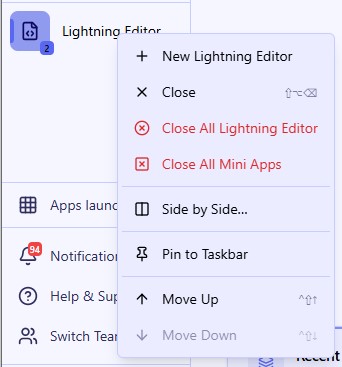
A context-menu is also available when right-clicking on applications added to the taskbar:
From top to bottom:
Open another instance of this application, in this case of the Lightning Editor.
Close the oldest instance of this application.
Close all instances of this application.
Close all active applications in the taskbar.
Use Side by Side… to see this application next to another. Choosing this option opens the Apps Launcher where you can choose what to show next to this application.
Pin the application to the taskbar, it will then be shown in the part of the sidebar just above (with Cosmic Frog and DataStar), so it can be opened from there immediately. If an application is already pinned to the taskbar, this option changes to Unpin from Taskbar.
Use Move Up and Move Down to change the position of the application in the taskbar.
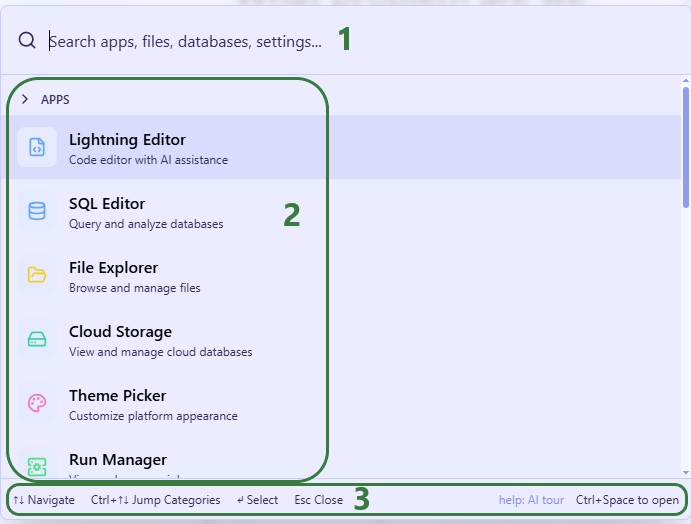
Apps Launcher
The following modal comes up when clicking on the Apps Launcher in the sidebar:
Use the search textbox to find applications, databases, settings, tours, etc.
At the top of the list, all available applications are listed.
Shortcuts on how to scroll through the list are shown at the bottom.
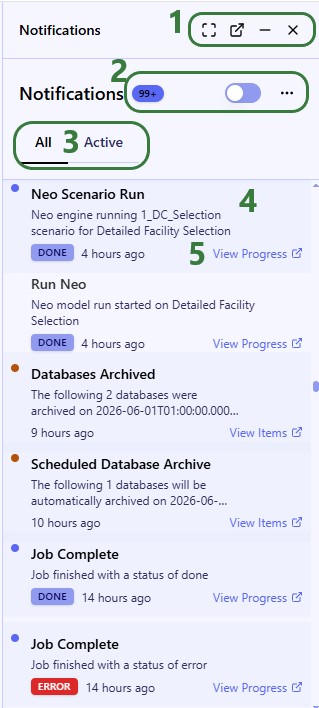
Notifications
When clicking on Notifications in the sidebar, the notifications list will open up on the right-hand side of the platform, next to the Home page or active chat with Ada:
Use these buttons to, respectively, make the Notifications app full screen, pop it out to a new window, minimize it, or close it.
Here, the number of notifications is shown, users can toggle between showing only unread ones or showing all, and under the 3 horizontal dots button 2 additional options to mark all messages as read and to delete all messages are available.
By default, all notifications are shown; users can switch to Active view to only show notifications of processes which are currently in progress.
For each notification, there is a card which indicates the type of notification, status, and when this activity happened.
For notifications of activities that are listed in the Run Manager application’s job list, this View Progress option is available. It opens the job in the Run Manager application.
It is not shown in the screenshot, but hovering over a Notification card will bring up a checkmark icon and an x icon which can be used to mark the notification as read and to close it.
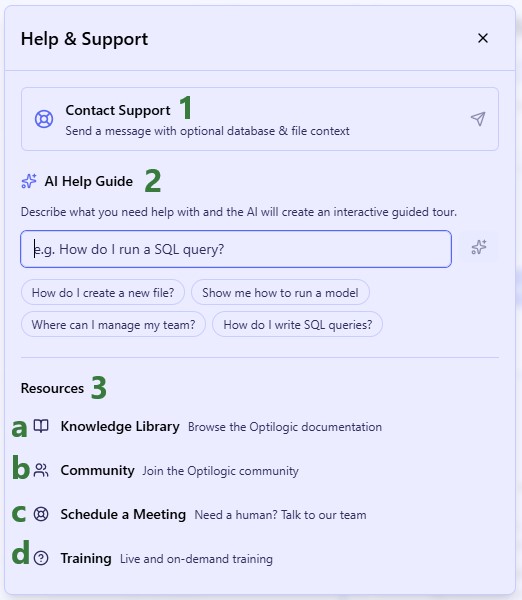
Help & Support
Clicking on Help & Support in the sidebar brings up the following modal:
Clicking on Contact Support brings up a window where you can write a message to the Optilogic Support team, attach databases/files to it, and submit it.
In the AI Help Guide textbox write what you need help with, and it will create a guided tour for you.
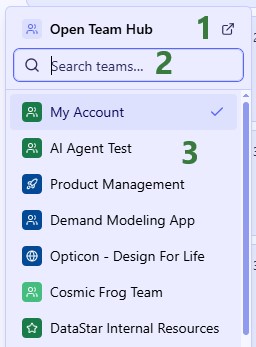
If your organization uses the Teams set of features, you can easily switch teams by clicking on the Switch Teams button:
If you want to open the Team Hub application, click on the icon at the right top, which will open it within the platform on the right-hand side.
You can quickly find the team you want to switch to by typing part of its name in the Search box.
The list of teams the user is part of is shown here; the workspace the user is currently using is indicated by the checkmark.
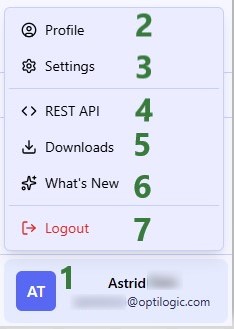
Account Settings
Configure your account by using the options found when clicking on your profile picture:
Click on your profile picture/initials to bring up all options.
Clicking on Profile will open the Profile menu on the right-hand side of the platform. Under Profile you can access:
Overview – username, email, password and a high-level summary of the account.
App Keys – these are used to establish a secure connection to the Optilogic platform and can be created and managed here.
Secrets – may be needed to run certain utilities and can be created here.
Geo Provider Keys – if you have a key for a geocoding provider (Mapbox, Google, Bing, PTV, PC Miler, or Azure Maps), you can enter it here so that the provider will be used for geocoding and distance calculations within Cosmic Frog.
Subscription – review subscription options and payment details.
Usage – shows the usage over time of the current Team the user is in. You can adjust the time window and granularity. Optionally, download your usage information in a CSV file.
Firewall Rules – rules can be created and managed here for allowing certain IP addresses/ranges access.
Clicking on Settings will open the Settings menu on the right-hand side of the platform. Under Settings you can access and configure:
Notifications – enable/disable push notifications and further configure the level and type of notifications under advanced settings.
Apps – set the default app for opening databases, whether autosave is on in Lightning Editor, the order your apps appear in on the sidebar, and manage run configuration settings.
Labs – set whether models can be run from anywhere in the platform and enable/disable access to run summaries.
Test / Stub settings – choose the location for the applications icon rail (left (default), or right), the location in the platform where apps will open (right (default), or left), and your layout mode (auto (default), mobile, or desktop).
Clicking on Downloads opens the Downloads application on the right-hand side of the platform – any files ready for download and previously downloaded will be listed here.
What’s New - find the latest Release Notes for Optilogic applications here.
Click on Logout to sign out of the next-gen Optilogic platform.
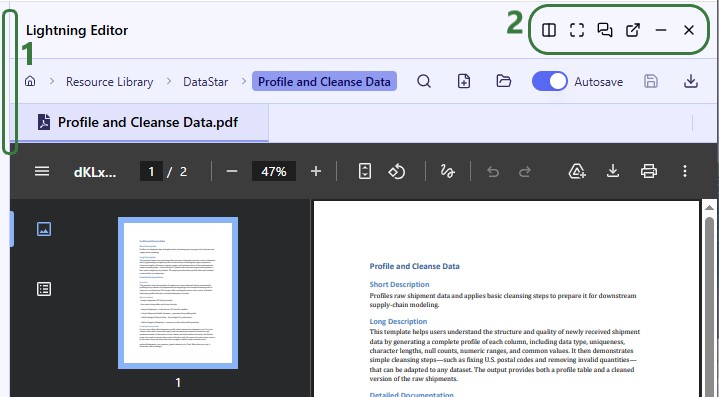
Open Applications
As mentioned under bullet 3d just above, by default, applications will be opened on the right-hand side of the screen next to either the homepage or chat with Ada page:
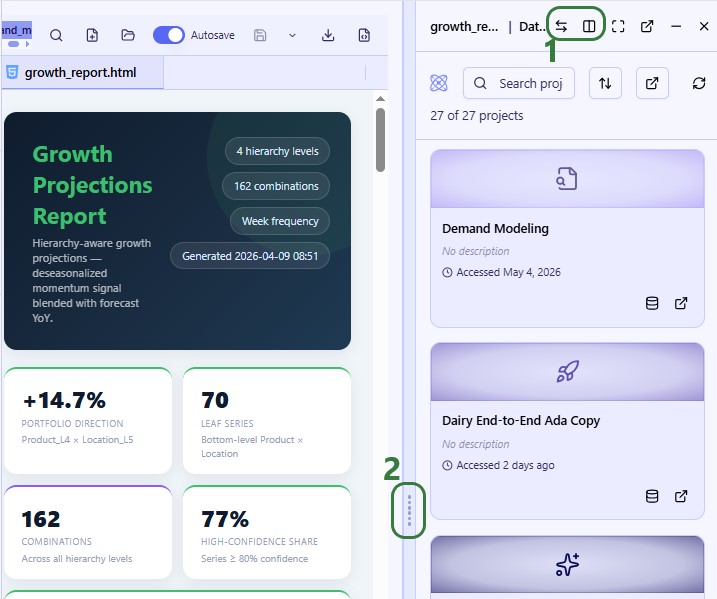
When you hover over the line in between the app and home/chat (to the left, not shown), the cursor will change to 2 arrows pointing away from each other, clicking the mouse and dragging left or right will resize the app area.
When applications are open, options are available at the top right to, respectively: open another application side by side, open the application full screen (no home/chat), enter Agentic mode, pop the application out into a new window, minimize the application (but keep it on the taskbar), or close the application (remove it from the taskbar). Depending on the application that is open, only a subset of these may be available.
Side by Side
When you enter side by side mode, the second application will be shown to the left of the first, taking the place of home/chat. Here, first DataStar was opened and then Lightning Editor by using the Side by Side option:
The options here allow the user to swap the position of the 2 applications that are open side by side and to exit side by side mode which will close the application that was opened second.
Click on and drag the line in between the applications to resize them.
Cosmic Frog
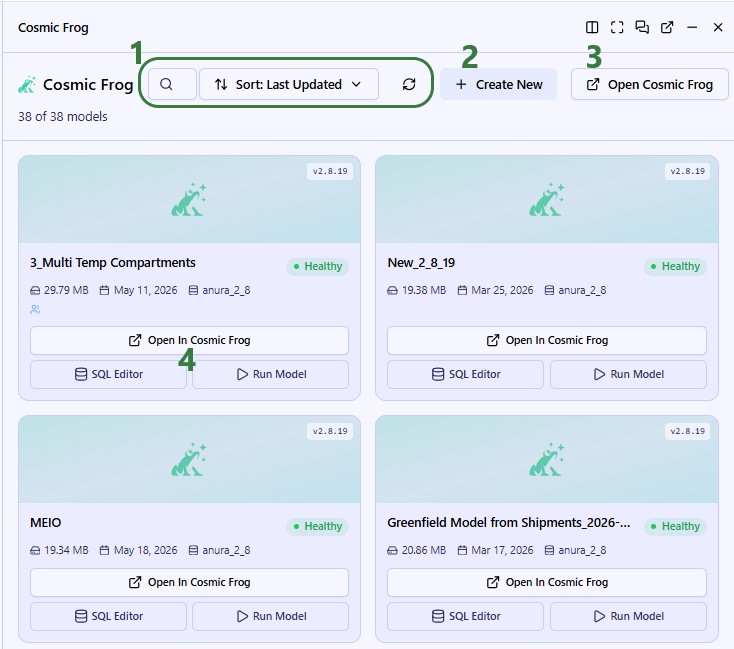
Whilst Cosmic Frog is not yet entirely integrated into the next-gen platform, users can open it, see their model list, and run scenarios from here:
Options to search in the model list and to sort it in different ways are available at the top.
Users can create a new Cosmic Frog model by using this Create New button.
To open Cosmic Frog in a new browser tab in the current platform, click on Open Cosmic Frog.
A model card gives basic information about the model and allows a user to open it in Cosmic Frog in the current platform in a new browser tab, to open it in SQL Editor within the next-gen platform, or to run the model.
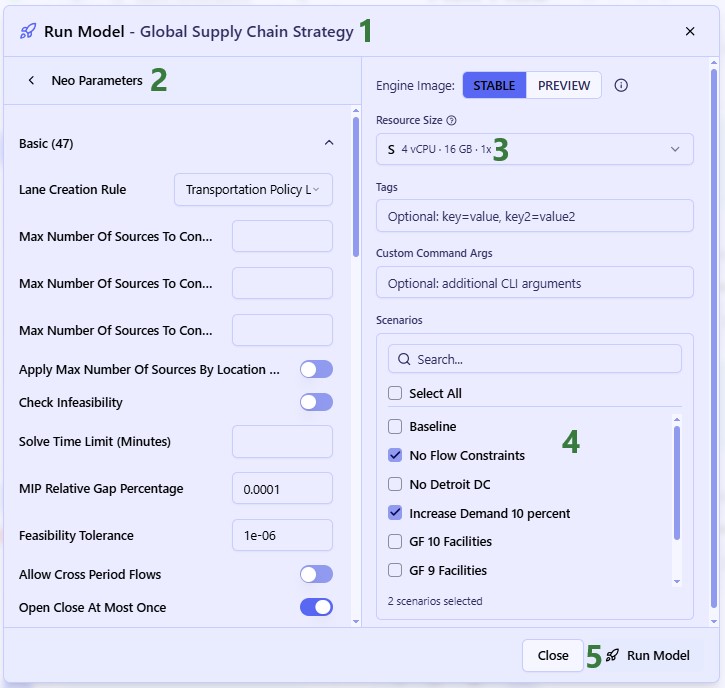
When clicking on Run Model for one of the available models, the following modal comes up:
The Run Model modal for the selected model, Global Supply Chain Strategy in our example.
In the previous step (not shown), we have chosen Neo as the engine to use for our scenario runs, and therefore the Neo Parameters are shown here now. Make any adjustments to them as needed. For an explanation of the technology parameters for all engines, please see Running Models & Scenarios in Cosmic Frog.
Click on Run Model to kick off the scenario(s). Alternatively, click on Close if choosing to not go ahead with any runs.
DataStar
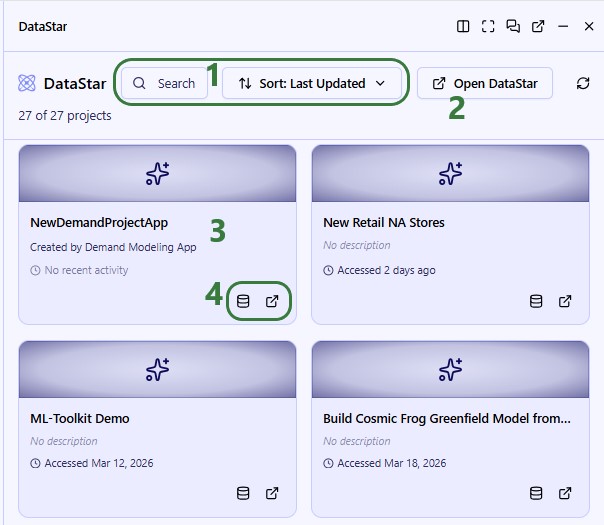
DataStar is also not yet entirely integrated, but projects, macros, and connections can be viewed and macros can be run:
Options to search in the project list and to sort it in different ways are available at the top.
To open DataStar in a new browser tab in the current platform, click on Open DataStar.
Clicking on a project card will open it within the next-gen platform, see next screenshot.
Options to open the DataStar project database in SQL Editor and to open it in DataStar in the current platform in a new browser tab are available from the project card.
The user clicks on the New Retail NA Stores project card to open it:
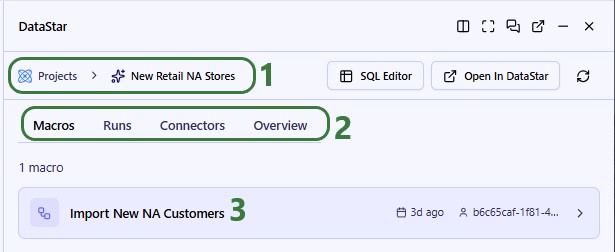
At the top, it is indicated that the project of this name is now open.
We can choose to see the Macros, Runs, Connectors, and an Overview of this DataStar project.
We are looking at the Macros in this project and see that 1 is present. It is named Import New NA Customers and was last run 3 days ago. Clicking on it will open the Macro, see next screenshot.
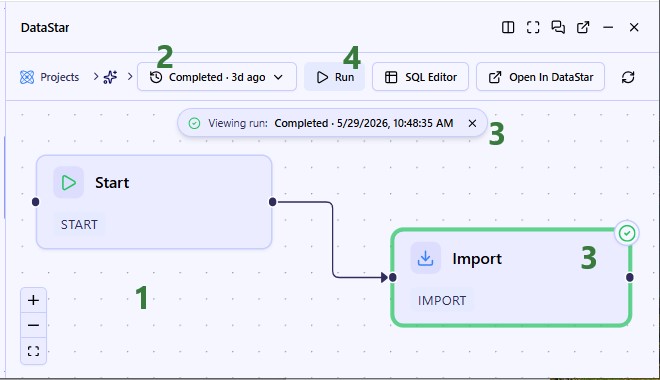
We have clicked on the Import New NA Customers to open it:
The Macro Canvas is now open, showing the simple macro which only has 1 Import task.
From the runs drop-down list, users can choose to see the results of this macro’s past and ongoing runs.
The run that was picked was executed on 5/29/2026 and it completed successfully. We can also see this from the task on the Macro Canvas: it has a green outline and green checkmark at the right top.
To run the macro, click on the Run button.
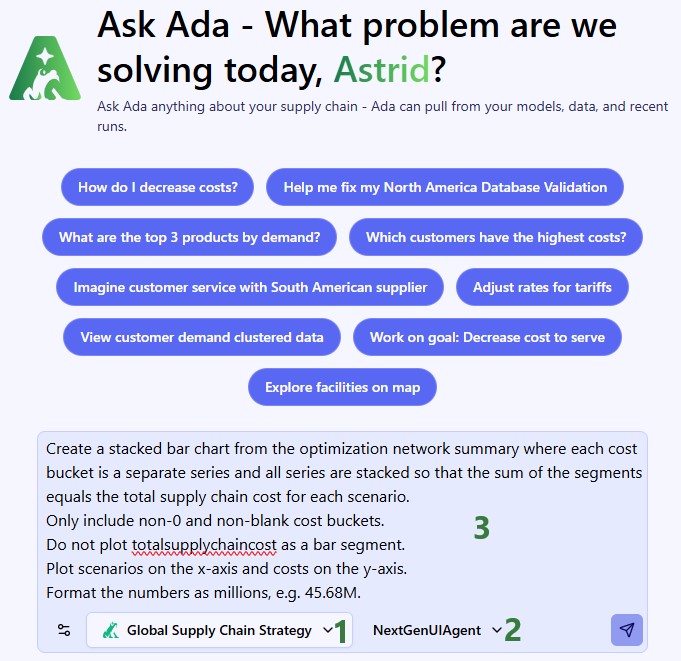
Next Gen UI Agent
The Next Gen UI Agent is one of Ada’s agents and can be accessed through the chat UI. It can help you with anything UI/platform related, like finding things within the platform, creating charts/tables, reporting on KPIs, and guidance on widget creation/removal.
When you are in the chat part of the platform, first select the database(s) you want your prompt to use (if any). This can be 1 or multiple Cosmic Frog models, DataStar projects, or Postgres databases.
From the agents drop-down list, select the Next Gen UI Agent.
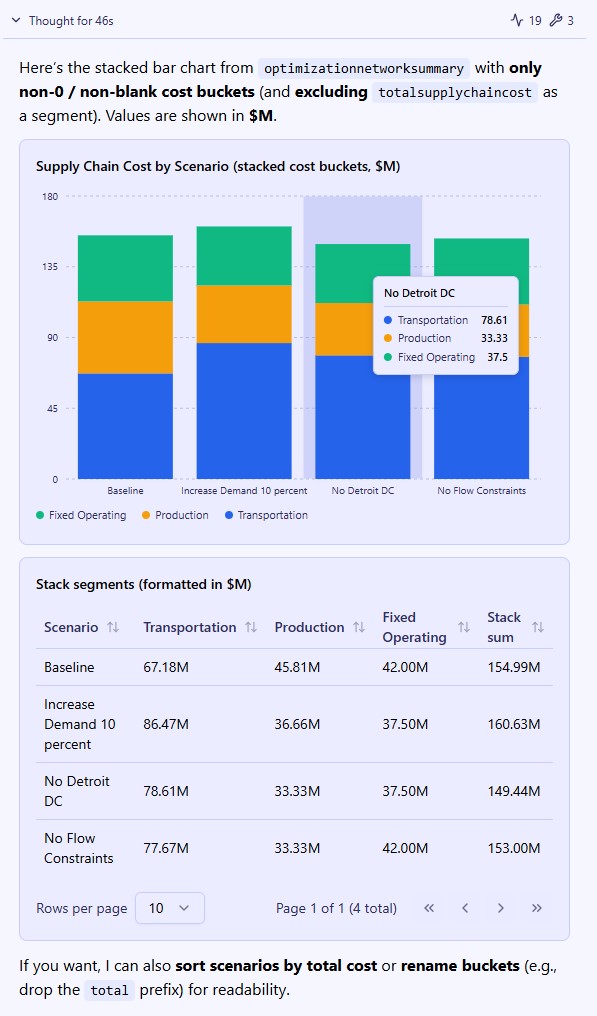
Enter your prompt. Here, we have asked the agent to create a stacked bar chart by scenario from cost outputs located in the Optimization Network Summary output table of the connected database (a Cosmic Frog model named Global Supply Chain Strategy, which is available from the Resource Library).
The response to the prompt is as follows, where at the top the asked for bar chart is shown and the agent proactively added the data used for the chart in a table underneath the chart:
Example Prompts
Here are a few example prompts you can try using the Next Gen UI Agent:
Can you create a chart showing total cost and total revenue for all scenarios in the connected Cosmic Frog model (table Optimization Network Summary, Total Supply Chain Cost and Total Revenue columns)?
Can you create a guided tour on how to find a particular PDF file and view it in the platform?
What are the statistics of my 50 most recent jobs?
Add “Review new historical productions file” to my tasks.
At Optilogic, we have built the next generation (next-gen) platform to complement our AI. It is a modern, unified workspace where users:
Never lose their place: switch between applications like SQL Editor or Run manager without losing context
Engage in a way that is natural to them, whether this is fully AI guided, using AI-as-copilot, or working heads-down in familiar tools
Work in an environment that reduces clutter and only surfaces what matters: the platform grows with your session and persists where you left off
Experience a cohesive framework that handles artifacts and iterative workflows seamlessly
While the next-gen platform is still in development, there is plenty available already for users to start working with it. Especially the AI-first approach will be a gamechanger for many. This documentation gives a high-level overview of the new platform. Please see the separate Getting Started with Ada & Agentic AI documentation for in-depth documentation on Ada, your supply chain modeling partner.
Logging in and First Time Configuration
Optilogic users can log into the next-gen platform at https://ai.optilogic.app, using the same credentials as those used to log into the current platform (on https://optilogic.app).
Once logged in, you are walked through 3 setup windows, shown in the following screenshots.
It is recommended to take the quick tour to learn about the platform. After it completes, you can follow another walkthrough, this one centered around using Ada through the chat UI. If you want to return to either of these tours later, you can find these in the Actions results part of Global Search (Ctrl + Space) after typing “introduction tour” or “Ada tour” in the search textbox.
Home Page and Sidebar
Your Home page will look similar to this:
In the top central part of the platform, Ada is available to immediately dive into any questions and tasks.
Further below, there are additional widgets, in this case a Recent Work one showing all recent DataStar and Cosmic Frog work and a Goals one for users to jump straight back in from where they left off.
The sidebar on the left provides quick access to all features.
Clicking anywhere in the sidebar will expand it:
Click on Home to return to the home page as shown in the previous screenshot.
Click on Chat to open the chat UI full screen, including historical conversations with Ada.
In this area, applications that have been opened will be added to the rail, like a taskbar with open applications. Note that:
Cosmic Frog and DataStar are by default pinned here as these are the most used Optilogic applications. They are greyed out when not open; click on them to open the application.
Use the Apps launcher (next bullet) to open other applications.
Applications can be active multiple times, e.g. 2 instances of Lightning Editor can be active showing 2 different files, see also the next section.
Right-clicking on an application brings up a context menu, see also the next section.
The Apps Launcher can be used to open any of the Optilogic applications, but also to do a global search through files, databases, settings, and tours. Use the Ctrl + Space shortcut to open the Apps Launcher/Global Search at any time. See also the Apps Launcher section further below.
When activity happens within your Optilogic account, notifications alert you to this. This includes notifications for Cosmic Frog model and scenario runs, utilizing geocoding or the Integrity Checker within Cosmic Frog, DataStar Macro runs, database archival, and more. See also the Notifications section further below.
Click on Help & Support to easily access several helpful resources, use the AI Help Guide or to contact Optilogic support. This Help & Support window can also be brought up by using the F1 function key. See also the Help & Support section further below.
Use the Switch Teams option to change context between your own account (“My Account”) and any teams you may be part of. See Getting Started with Optilogic Teams for more information on using the Teams features. See also the Switch Teams section below.
Access your account settings by clicking on your profile picture. These include items like settings, preferences, and signing out. See also the Account Settings section further below.
Applications Added to the Taskbar
When an application has been opened, it is added to the taskbar. If multiple instances of it are active, we can see that too:
The Lightning Editor is showing in the taskbar, the 2 at the right bottom of the icon indicates that 2 instances of this application are active.
Hovering over the Lightning Editor icon in the taskbar brings up the list of active instances. The 1 that is open and showing in the UI, by default to the right-hand side of the Home page or Ada chat, is indicated with a blue dot to the right.
Hovering over an instance in the list of active instances shows the close button to close that specific instance.
At the bottom of the list, a Close All button is available to close all instances of the Lightning Editor with one click.
A context-menu is also available when right-clicking on applications added to the taskbar:
From top to bottom:
Open another instance of this application, in this case of the Lightning Editor.
Close the oldest instance of this application.
Close all instances of this application.
Close all active applications in the taskbar.
Use Side by Side… to see this application next to another. Choosing this option opens the Apps Launcher where you can choose what to show next to this application.
Pin the application to the taskbar, it will then be shown in the part of the sidebar just above (with Cosmic Frog and DataStar), so it can be opened from there immediately. If an application is already pinned to the taskbar, this option changes to Unpin from Taskbar.
Use Move Up and Move Down to change the position of the application in the taskbar.
Apps Launcher
The following modal comes up when clicking on the Apps Launcher in the sidebar:
Use the search textbox to find applications, databases, settings, tours, etc.
At the top of the list, all available applications are listed.
Shortcuts on how to scroll through the list are shown at the bottom.
Notifications
When clicking on Notifications in the sidebar, the notifications list will open up on the right-hand side of the platform, next to the Home page or active chat with Ada:
Use these buttons to, respectively, make the Notifications app full screen, pop it out to a new window, minimize it, or close it.
Here, the number of notifications is shown, users can toggle between showing only unread ones or showing all, and under the 3 horizontal dots button 2 additional options to mark all messages as read and to delete all messages are available.
By default, all notifications are shown; users can switch to Active view to only show notifications of processes which are currently in progress.
For each notification, there is a card which indicates the type of notification, status, and when this activity happened.
For notifications of activities that are listed in the Run Manager application’s job list, this View Progress option is available. It opens the job in the Run Manager application.
It is not shown in the screenshot, but hovering over a Notification card will bring up a checkmark icon and an x icon which can be used to mark the notification as read and to close it.
Help & Support
Clicking on Help & Support in the sidebar brings up the following modal:
Clicking on Contact Support brings up a window where you can write a message to the Optilogic Support team, attach databases/files to it, and submit it.
In the AI Help Guide textbox write what you need help with, and it will create a guided tour for you.
If your organization uses the Teams set of features, you can easily switch teams by clicking on the Switch Teams button:
If you want to open the Team Hub application, click on the icon at the right top, which will open it within the platform on the right-hand side.
You can quickly find the team you want to switch to by typing part of its name in the Search box.
The list of teams the user is part of is shown here; the workspace the user is currently using is indicated by the checkmark.
Account Settings
Configure your account by using the options found when clicking on your profile picture:
Click on your profile picture/initials to bring up all options.
Clicking on Profile will open the Profile menu on the right-hand side of the platform. Under Profile you can access:
Overview – username, email, password and a high-level summary of the account.
App Keys – these are used to establish a secure connection to the Optilogic platform and can be created and managed here.
Secrets – may be needed to run certain utilities and can be created here.
Geo Provider Keys – if you have a key for a geocoding provider (Mapbox, Google, Bing, PTV, PC Miler, or Azure Maps), you can enter it here so that the provider will be used for geocoding and distance calculations within Cosmic Frog.
Subscription – review subscription options and payment details.
Usage – shows the usage over time of the current Team the user is in. You can adjust the time window and granularity. Optionally, download your usage information in a CSV file.
Firewall Rules – rules can be created and managed here for allowing certain IP addresses/ranges access.
Clicking on Settings will open the Settings menu on the right-hand side of the platform. Under Settings you can access and configure:
Notifications – enable/disable push notifications and further configure the level and type of notifications under advanced settings.
Apps – set the default app for opening databases, whether autosave is on in Lightning Editor, the order your apps appear in on the sidebar, and manage run configuration settings.
Labs – set whether models can be run from anywhere in the platform and enable/disable access to run summaries.
Test / Stub settings – choose the location for the applications icon rail (left (default), or right), the location in the platform where apps will open (right (default), or left), and your layout mode (auto (default), mobile, or desktop).
Clicking on Downloads opens the Downloads application on the right-hand side of the platform – any files ready for download and previously downloaded will be listed here.
What’s New - find the latest Release Notes for Optilogic applications here.
Click on Logout to sign out of the next-gen Optilogic platform.
Open Applications
As mentioned under bullet 3d just above, by default, applications will be opened on the right-hand side of the screen next to either the homepage or chat with Ada page:
When you hover over the line in between the app and home/chat (to the left, not shown), the cursor will change to 2 arrows pointing away from each other, clicking the mouse and dragging left or right will resize the app area.
When applications are open, options are available at the top right to, respectively: open another application side by side, open the application full screen (no home/chat), enter Agentic mode, pop the application out into a new window, minimize the application (but keep it on the taskbar), or close the application (remove it from the taskbar). Depending on the application that is open, only a subset of these may be available.
Side by Side
When you enter side by side mode, the second application will be shown to the left of the first, taking the place of home/chat. Here, first DataStar was opened and then Lightning Editor by using the Side by Side option:
The options here allow the user to swap the position of the 2 applications that are open side by side and to exit side by side mode which will close the application that was opened second.
Click on and drag the line in between the applications to resize them.
Cosmic Frog
Whilst Cosmic Frog is not yet entirely integrated into the next-gen platform, users can open it, see their model list, and run scenarios from here:
Options to search in the model list and to sort it in different ways are available at the top.
Users can create a new Cosmic Frog model by using this Create New button.
To open Cosmic Frog in a new browser tab in the current platform, click on Open Cosmic Frog.
A model card gives basic information about the model and allows a user to open it in Cosmic Frog in the current platform in a new browser tab, to open it in SQL Editor within the next-gen platform, or to run the model.
When clicking on Run Model for one of the available models, the following modal comes up:
The Run Model modal for the selected model, Global Supply Chain Strategy in our example.
In the previous step (not shown), we have chosen Neo as the engine to use for our scenario runs, and therefore the Neo Parameters are shown here now. Make any adjustments to them as needed. For an explanation of the technology parameters for all engines, please see Running Models & Scenarios in Cosmic Frog.
Click on Run Model to kick off the scenario(s). Alternatively, click on Close if choosing to not go ahead with any runs.
DataStar
DataStar is also not yet entirely integrated, but projects, macros, and connections can be viewed and macros can be run:
Options to search in the project list and to sort it in different ways are available at the top.
To open DataStar in a new browser tab in the current platform, click on Open DataStar.
Clicking on a project card will open it within the next-gen platform, see next screenshot.
Options to open the DataStar project database in SQL Editor and to open it in DataStar in the current platform in a new browser tab are available from the project card.
The user clicks on the New Retail NA Stores project card to open it:
At the top, it is indicated that the project of this name is now open.
We can choose to see the Macros, Runs, Connectors, and an Overview of this DataStar project.
We are looking at the Macros in this project and see that 1 is present. It is named Import New NA Customers and was last run 3 days ago. Clicking on it will open the Macro, see next screenshot.
We have clicked on the Import New NA Customers to open it:
The Macro Canvas is now open, showing the simple macro which only has 1 Import task.
From the runs drop-down list, users can choose to see the results of this macro’s past and ongoing runs.
The run that was picked was executed on 5/29/2026 and it completed successfully. We can also see this from the task on the Macro Canvas: it has a green outline and green checkmark at the right top.
To run the macro, click on the Run button.
Next Gen UI Agent
The Next Gen UI Agent is one of Ada’s agents and can be accessed through the chat UI. It can help you with anything UI/platform related, like finding things within the platform, creating charts/tables, reporting on KPIs, and guidance on widget creation/removal.
When you are in the chat part of the platform, first select the database(s) you want your prompt to use (if any). This can be 1 or multiple Cosmic Frog models, DataStar projects, or Postgres databases.
From the agents drop-down list, select the Next Gen UI Agent.
Enter your prompt. Here, we have asked the agent to create a stacked bar chart by scenario from cost outputs located in the Optimization Network Summary output table of the connected database (a Cosmic Frog model named Global Supply Chain Strategy, which is available from the Resource Library).
The response to the prompt is as follows, where at the top the asked for bar chart is shown and the agent proactively added the data used for the chart in a table underneath the chart:
Example Prompts
Here are a few example prompts you can try using the Next Gen UI Agent:
Can you create a chart showing total cost and total revenue for all scenarios in the connected Cosmic Frog model (table Optimization Network Summary, Total Supply Chain Cost and Total Revenue columns)?
Can you create a guided tour on how to find a particular PDF file and view it in the platform?
What are the statistics of my 50 most recent jobs?
Add “Review new historical productions file” to my tasks.