

Scenarios let you rapidly explore "what-if" questions against an existing Cosmic Frog model. Define one or more data changes (scenario items), run the scenarios, then compare outputs - all without altering your baseline input data.
Follow these five steps to run your first scenario:
💡 Tip: Use Leapfrog (Cosmic Frog's AI assistant) to create scenarios and items from plain-language prompts - no manual configuration needed.
A scenario defines one or more input-table changes to apply before running a solve. Common examples include:
In the context of this documentation, we mean the following with scenario and scenario item:
In other words: a scenario without any scenario items uses all the data in the input tables as is (often called Baseline); most scenarios will contain 1 or more scenario items to test certain changes as compared to a baseline.
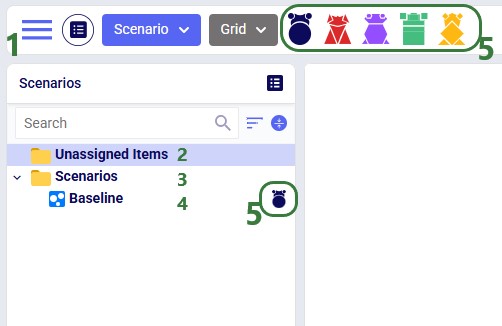
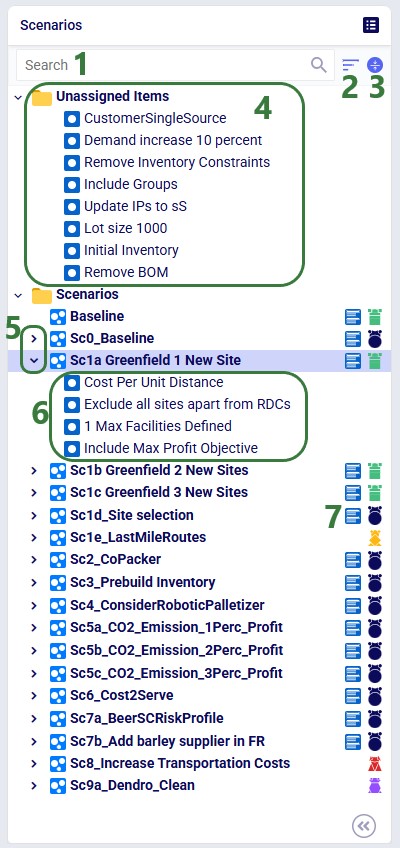
Open the Scenarios module from the Module menu. A freshly opened module looks like this:
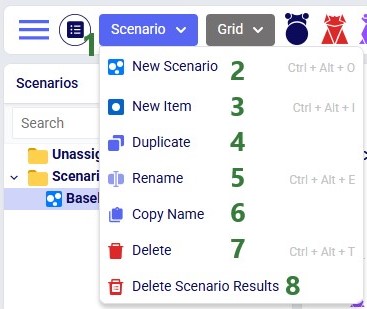
The Scenario drop-down (top of module) provides quick access to common actions:
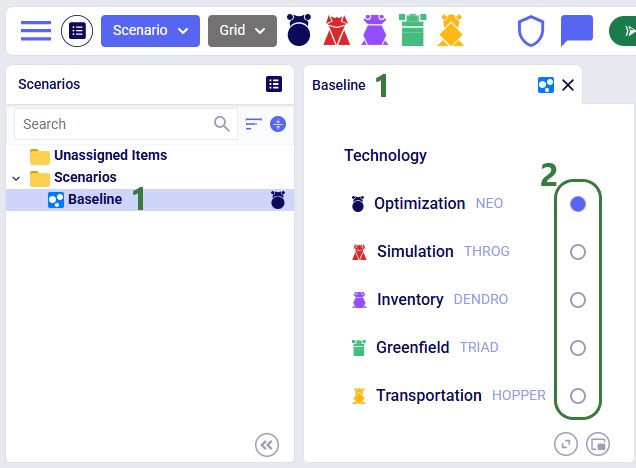
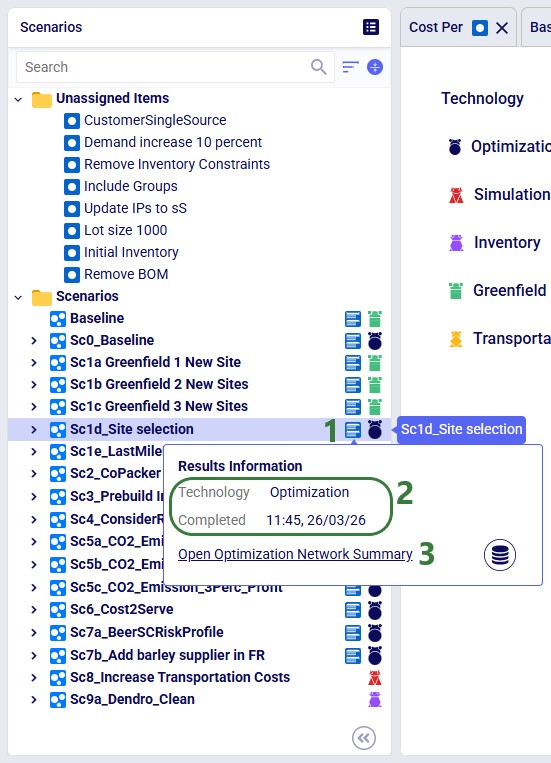
Each scenario is associated with one engine. To change it, select the scenario and use the radio buttons in the central panel:
📝 Note: Running with multiple technologies
You can solve the same scenario with more than one engine sequentially: assign the first technology → run → change technology → run again. Be aware that any scenario edits between runs may cause results to differ for subsequent runs.
💡 Tip: Dendro workflow
To optimize inventory policies with Dendro: first build and validate a Throg (simulation) scenario, then switch its technology to Dendro and run.
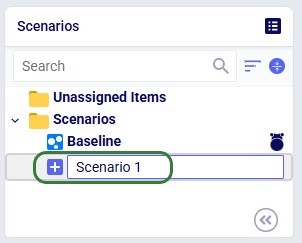
Right-click an existing scenario or the Scenarios folder and choose New Scenario, or use the New Scenario option from the Scenario drop-down menu. Enter a name when prompted:
Select the target scenario, then right-click → New Item (or use the Scenario drop-down). Name the item - its configuration panel opens automatically:
After selecting the table, specify the change in the Actions field. Intelli-type suggests column names as you type:

Once the column to change has been typed in, we can set its new value. In our example we want to set the value of the status column to Exclude:
Intelli-type also validates syntax. Incorrect quote style (need to use single quotes, not double quotes):
Unrecognized column name:
📝 Note: For full Actions syntax, see the Writing Syntax for Actions Help Center article.
By default, a scenario item's action applies to every record in the selected table. Add a filter to restrict which records are changed. Two methods are available:
If Named Filters exist for the selected table, you can apply one directly to the scenario item:
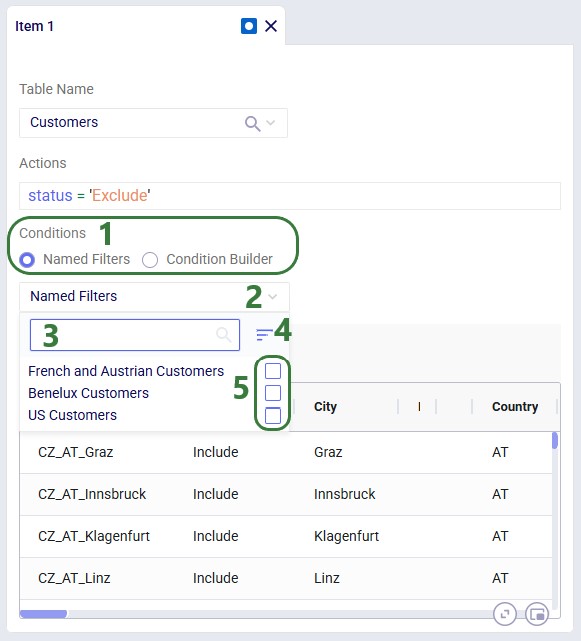
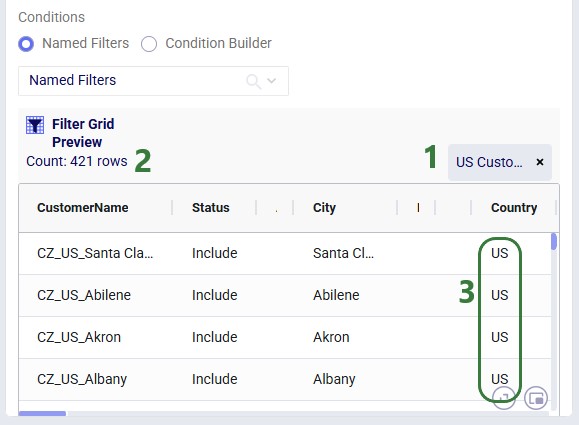
After selecting a filter, the Filter Grid Preview updates to show exactly which records will be affected:
💡 Tip: Why prefer Named Filters?
Named Filters are pre-validated - you have already confirmed they select the right records when creating the filter. The Condition Builder requires you to write syntax manually, which is more error-prone. Named Filters also show a record preview. (Preview for Condition Builder is coming soon.)
📝 Note: One Named Filter per scenario item
Each scenario item supports a maximum of one Named Filter. If you need to combine multiple filter conditions, create a new Named Filter that merges all required conditions.
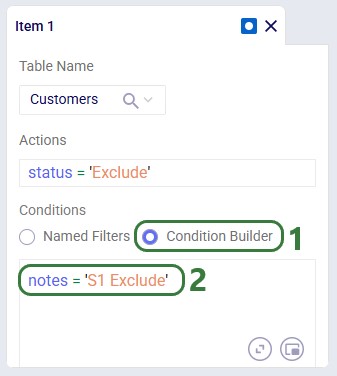
Use the Condition Builder when no applicable Named Filter exists, or for ad hoc conditions:
📝 Note: For condition syntax, see the Writing Syntax for Conditions Help Center article.
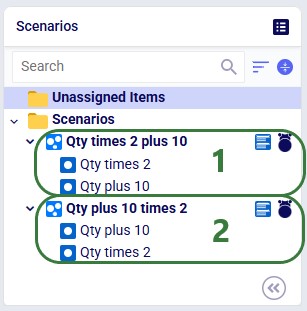
When multiple items modify the same column in the same table, they execute top-to-bottom. Order matters. Consider the following 2 scenarios where both scenario items are applied to the Quantity column in the Customer Demand table:
💡 Tip: Drag items up or down within a scenario to reorder them.
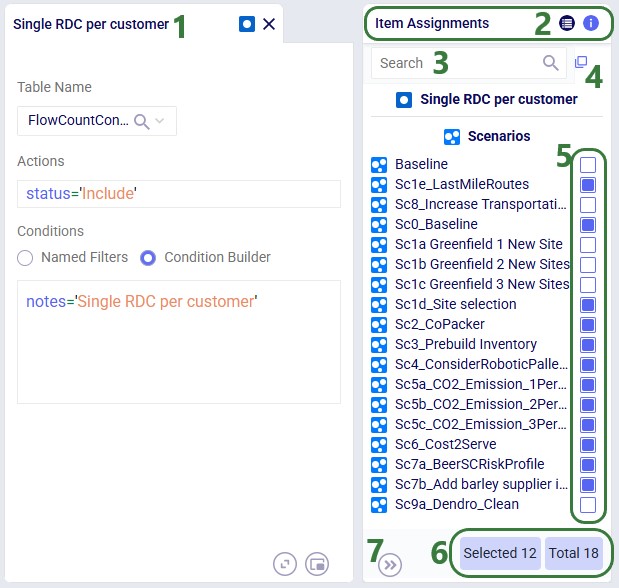
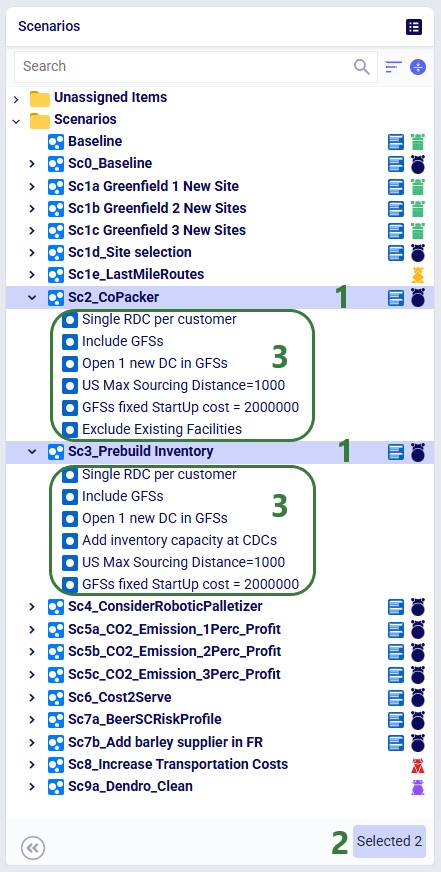
A single scenario item can be shared across multiple scenarios. The Item Assignments panel (right side) appears automatically when an item is selected:
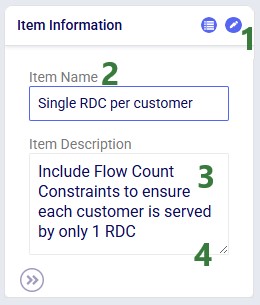
Switch to the Item Information tab on the same panel to edit the item's name or add a description:
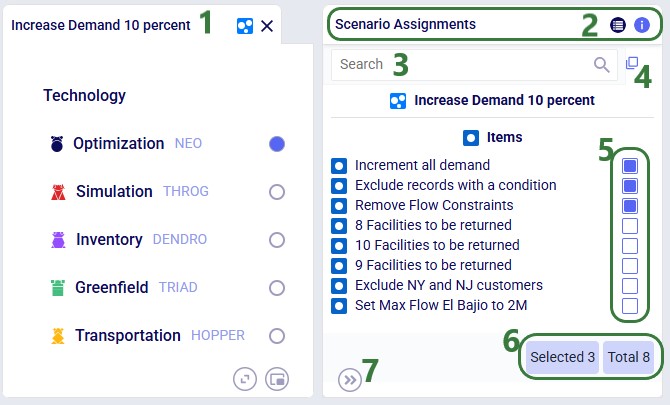
The Scenario Assignments panel (right side) appears when a scenario is selected, showing all available items and which are assigned:
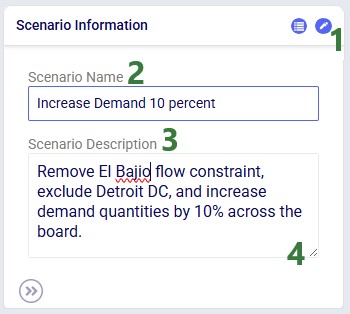
Switch to the Scenario Information tab to edit the scenario name or add a description:
The scenarios list includes several navigation and status indicators that become useful as your model grows:
Click the green Run button (top right in Cosmic Frog), select the scenario(s) to solve, and configure technology parameters. See the Running Models & Scenarios in Cosmic Frog Help Center article for full details.
Sensitivity @ Scale automates demand-quantity and transportation-cost sensitivity analysis with a single click. See the Sensitivity at Scale Scenarios Help Center article for more information.
In addition, there are three S@S-related utilities available in the Utilities module:

📝 Note: See the How to Use & Create Cosmic Frog Model Utilities Help Center article for details on using and building utilities.
Select one or more scenarios or items, then right-click ? Delete or use the Delete option from the Scenario drop-down menu at the top of the module. Key behaviors to keep in mind:
Deleting removes only the two scenarios. Items used exclusively by those scenarios move to Unassigned Items; items shared with other scenarios remain untouched.
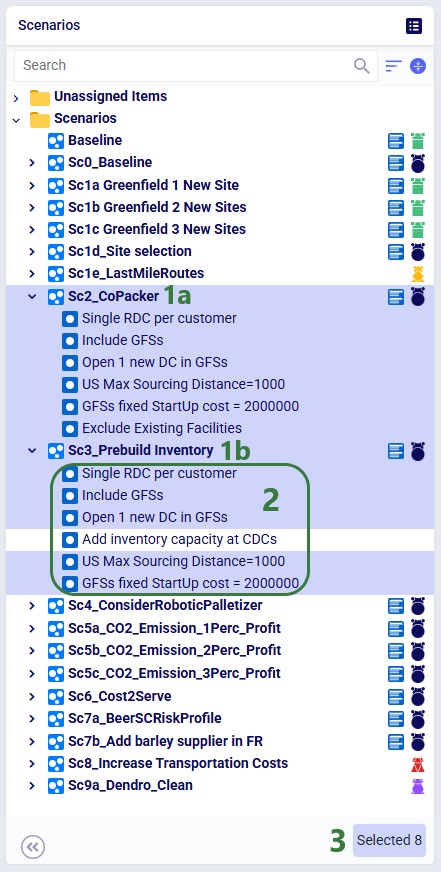
Deleting removes both selected scenarios and all 6 selected items - including from any other scenarios that use them. The one unselected item in these 2 scenarios, "Add Inventory capacity at CDCs", remains.
⚠️ Important: Deleting a scenario item removes it from all scenarios that it is assigned to, not just the selected scenario. Review item assignments before deleting.
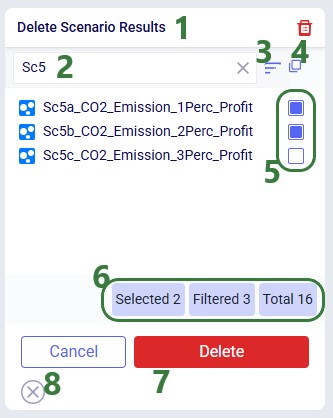
Use Delete Scenario Results (context menu or Scenario drop-down) to clear output data for one or more scenarios without removing the scenarios themselves:
Think through scenario naming conventions ahead of time. You can for example:
Most input tables include Status and Notes fields. A powerful scenario pattern is:
This keeps all data in the model without interfering with the Baseline.
Custom columns let you store alternative values in a table and reference them in scenario items, e.g.:
The Copy Scenarios utility (Utilities module → Copy to a Model) copies a single scenario or all scenarios from one model to another, including all items and assignments.
Use Leapfrog for scenario and item creation, and also for manipulating scenario-specific data.
Leapfrog can create scenarios and scenario items from a plain-language description - ideal for quickly spinning up variations without manually configuring each item. See the specific section on this in the Getting Started with Leapfrog AI Help Center article.
🔧 Leapfrog Use Case: 2026 Demand Projections from 2025 Numbers
Model 2026 demand from 2025 quantities using a custom growth projections table. Leapfrog can be utilized to set this up, so no external tool needs to be used:
Happy scenario modeling! As always, please contact our Support team on support@optilogic.com for any questions or feedback.

Scenarios let you rapidly explore "what-if" questions against an existing Cosmic Frog model. Define one or more data changes (scenario items), run the scenarios, then compare outputs - all without altering your baseline input data.
Follow these five steps to run your first scenario:
💡 Tip: Use Leapfrog (Cosmic Frog's AI assistant) to create scenarios and items from plain-language prompts - no manual configuration needed.
A scenario defines one or more input-table changes to apply before running a solve. Common examples include:
In the context of this documentation, we mean the following with scenario and scenario item:
In other words: a scenario without any scenario items uses all the data in the input tables as is (often called Baseline); most scenarios will contain 1 or more scenario items to test certain changes as compared to a baseline.
Open the Scenarios module from the Module menu. A freshly opened module looks like this:
The Scenario drop-down (top of module) provides quick access to common actions:
Each scenario is associated with one engine. To change it, select the scenario and use the radio buttons in the central panel:
📝 Note: Running with multiple technologies
You can solve the same scenario with more than one engine sequentially: assign the first technology → run → change technology → run again. Be aware that any scenario edits between runs may cause results to differ for subsequent runs.
💡 Tip: Dendro workflow
To optimize inventory policies with Dendro: first build and validate a Throg (simulation) scenario, then switch its technology to Dendro and run.
Right-click an existing scenario or the Scenarios folder and choose New Scenario, or use the New Scenario option from the Scenario drop-down menu. Enter a name when prompted:
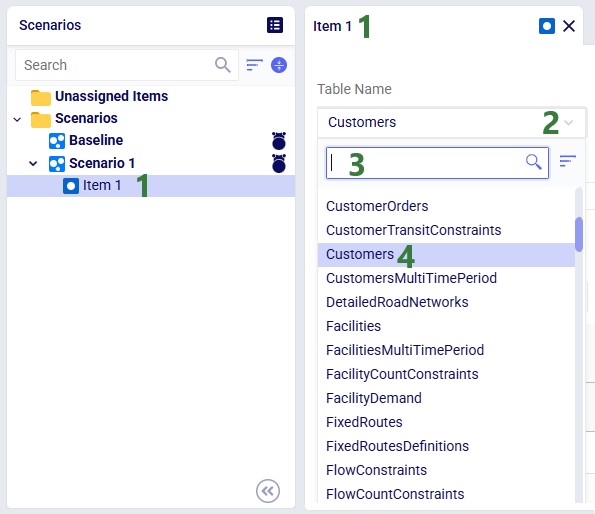
Select the target scenario, then right-click → New Item (or use the Scenario drop-down). Name the item - its configuration panel opens automatically:
After selecting the table, specify the change in the Actions field. Intelli-type suggests column names as you type:
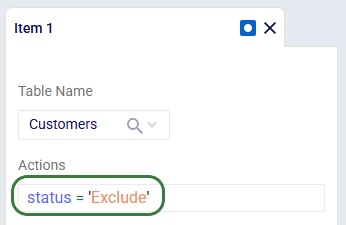
Once the column to change has been typed in, we can set its new value. In our example we want to set the value of the status column to Exclude:
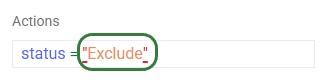
Intelli-type also validates syntax. Incorrect quote style (need to use single quotes, not double quotes):
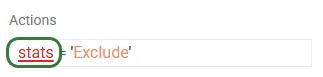
Unrecognized column name:
📝 Note: For full Actions syntax, see the Writing Syntax for Actions Help Center article.
By default, a scenario item's action applies to every record in the selected table. Add a filter to restrict which records are changed. Two methods are available:
If Named Filters exist for the selected table, you can apply one directly to the scenario item:
After selecting a filter, the Filter Grid Preview updates to show exactly which records will be affected:
💡 Tip: Why prefer Named Filters?
Named Filters are pre-validated - you have already confirmed they select the right records when creating the filter. The Condition Builder requires you to write syntax manually, which is more error-prone. Named Filters also show a record preview. (Preview for Condition Builder is coming soon.)
📝 Note: One Named Filter per scenario item
Each scenario item supports a maximum of one Named Filter. If you need to combine multiple filter conditions, create a new Named Filter that merges all required conditions.
Use the Condition Builder when no applicable Named Filter exists, or for ad hoc conditions:
📝 Note: For condition syntax, see the Writing Syntax for Conditions Help Center article.
When multiple items modify the same column in the same table, they execute top-to-bottom. Order matters. Consider the following 2 scenarios where both scenario items are applied to the Quantity column in the Customer Demand table:
💡 Tip: Drag items up or down within a scenario to reorder them.
A single scenario item can be shared across multiple scenarios. The Item Assignments panel (right side) appears automatically when an item is selected:
Switch to the Item Information tab on the same panel to edit the item's name or add a description:
The Scenario Assignments panel (right side) appears when a scenario is selected, showing all available items and which are assigned:
Switch to the Scenario Information tab to edit the scenario name or add a description:
The scenarios list includes several navigation and status indicators that become useful as your model grows:
Click the green Run button (top right in Cosmic Frog), select the scenario(s) to solve, and configure technology parameters. See the Running Models & Scenarios in Cosmic Frog Help Center article for full details.
Sensitivity @ Scale automates demand-quantity and transportation-cost sensitivity analysis with a single click. See the Sensitivity at Scale Scenarios Help Center article for more information.
In addition, there are three S@S-related utilities available in the Utilities module:
📝 Note: See the How to Use & Create Cosmic Frog Model Utilities Help Center article for details on using and building utilities.
Select one or more scenarios or items, then right-click ? Delete or use the Delete option from the Scenario drop-down menu at the top of the module. Key behaviors to keep in mind:
Deleting removes only the two scenarios. Items used exclusively by those scenarios move to Unassigned Items; items shared with other scenarios remain untouched.
Deleting removes both selected scenarios and all 6 selected items - including from any other scenarios that use them. The one unselected item in these 2 scenarios, "Add Inventory capacity at CDCs", remains.
⚠️ Important: Deleting a scenario item removes it from all scenarios that it is assigned to, not just the selected scenario. Review item assignments before deleting.
Use Delete Scenario Results (context menu or Scenario drop-down) to clear output data for one or more scenarios without removing the scenarios themselves:
Think through scenario naming conventions ahead of time. You can for example:
Most input tables include Status and Notes fields. A powerful scenario pattern is:
This keeps all data in the model without interfering with the Baseline.
Custom columns let you store alternative values in a table and reference them in scenario items, e.g.:
The Copy Scenarios utility (Utilities module → Copy to a Model) copies a single scenario or all scenarios from one model to another, including all items and assignments.
Use Leapfrog for scenario and item creation, and also for manipulating scenario-specific data.
Leapfrog can create scenarios and scenario items from a plain-language description - ideal for quickly spinning up variations without manually configuring each item. See the specific section on this in the Getting Started with Leapfrog AI Help Center article.
🔧 Leapfrog Use Case: 2026 Demand Projections from 2025 Numbers
Model 2026 demand from 2025 quantities using a custom growth projections table. Leapfrog can be utilized to set this up, so no external tool needs to be used:
Happy scenario modeling! As always, please contact our Support team on support@optilogic.com for any questions or feedback.


