

Utilities enable powerful modelling capabilities for use cases like integration to other services or data sources, repeatable data transformation or anything that can be supported by Python! System Utilities are available as a core capability in Cosmic Frog for use cases like LTL rate lookups, TransitMatrix time & distance generation, and copying items like Maps and Dashboards from one model to another. More useful System Utilities will become available in Cosmic Frog over time. Some of these System Utilities are also available in the Resource Library where they can be downloaded from, and then customized and made available to modelers for specific projects or models. In this Help Article we will cover both how to use use System Utilities as well as how to customize and deploy Custom Utilities.
The “Using and Customizing Utilities” resource in the Resource Library includes a helpful 15-minute video on Cosmic Frog Model Utilities and users are encouraged to watch this.
In this Help Article, System Utilities will be covered first, before discussing the specifics of creating one’s own Utilities. Finally, how to use and share Custom Utilities will be explained as well.
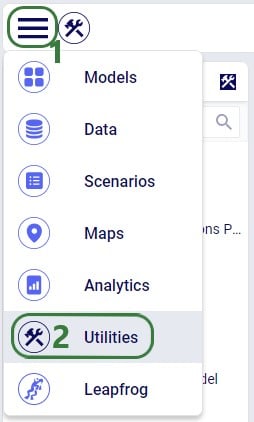
Users can access utilities within Cosmic Frog by going to the Utilities section via the Module Menu drop-down:
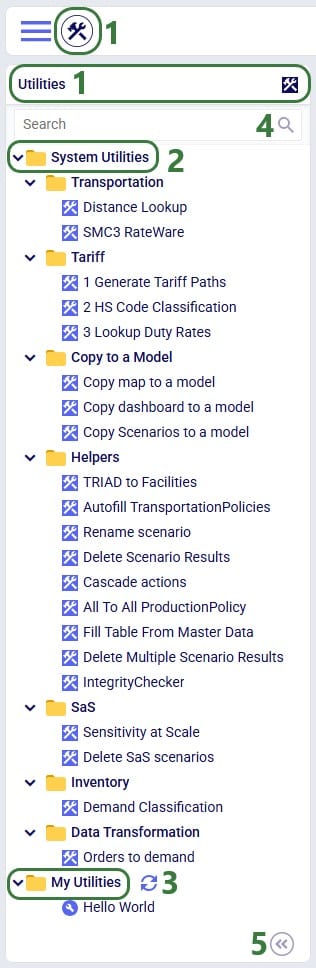
Once in the Utilities section, user will see the list of available utilities:
The appendix of this Help Article contains a table of all System Utilities and their descriptions.
Utilities vary in complexity by how many input parameters a user can configure and range from those where no parameters need to be set at all to those where many can be set. Following screenshot shows the Orders to Demand utility which does not require any input parameters to be set by the user:

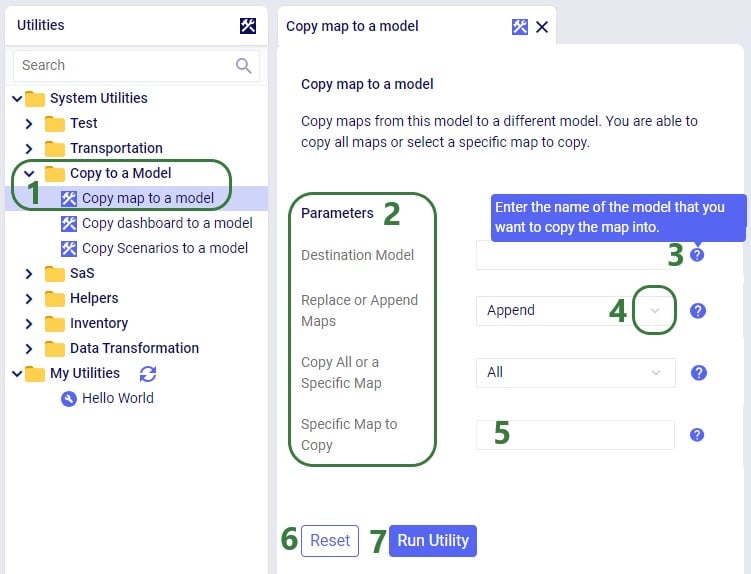
The Copy map to a model utility shown in the next screenshot does require several parameters to be set by the user:
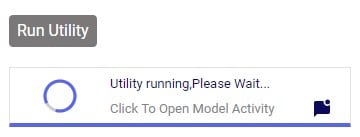
When the Run Utility button has been clicked, a message appears beneath it briefly:
Clicking on this message will open the Model Activity pane to the right of the tab(s) with open utilities:

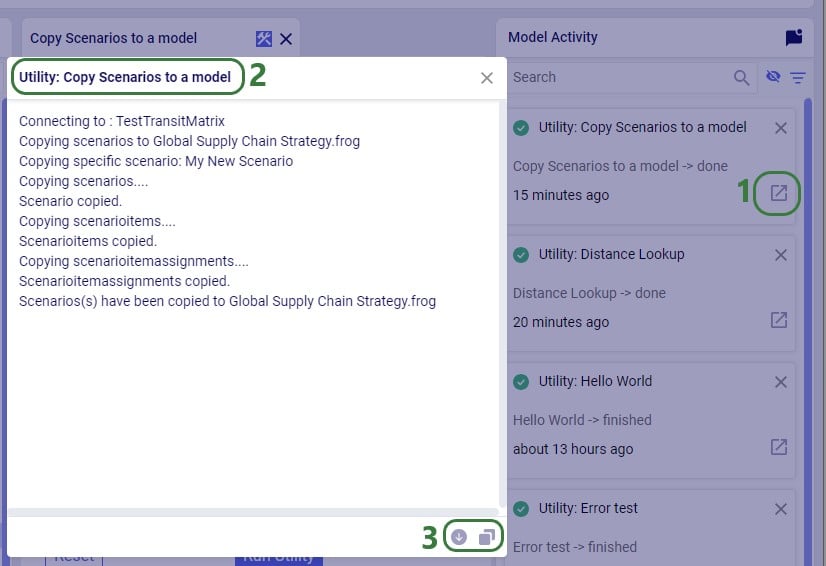
Users will not only see activities related to running utilities in the Model Activity list. Other actions that are executed within Cosmic Frog will be listed here too, like for example when user has geocoded locations by using the Geocode tool on the Customers / Facilities / Suppliers tables or when user makes a change in a master table and chooses to cascade these changes to other tables.
Please note that the following System Utilities have separate Help Articles where they are explained in more detail:
The utilities that are available in the Resource Library can be downloaded by users and then customized to fit the user’s specific needs. Examples are to change the logic of a data transformation, apply similar logic but to a different table, etc. Or users may even build their own utilities entirely. If a user updates a utility or creates a new one, they can share these back with other users so they can benefit from them as well.
Utilities are Python scripts that contain a specific structure which will be explained in this section. They can be edited directly in the Atlas application on the Optilogic platform or users can download the Python file that is being used as a starting point and edit it using an IDE (Integrated Development Environment) installed on their computer. A rich text editor geared towards coding, like for example Visual Studio Code, will work fine too for most. An advantage of working locally is that user can take advantage of code completion features (auto-completion while typing, showing what arguments functions need, catch incorrect syntax/names, etc.) by installing an extension package like for example IntelliSense (for Visual Studio Code). The screenshots of the Python files underlying the utilities that follow in this documentation are taken while working with them in Visual Studio Code locally and on a machine that has the IntelliSense extension package installed.
A great resource on how to write Python scripts for Cosmic Frog models is this “Scripting with Cosmic Frog” video. In this video, the cosmicfrog Python library, which adds specific functionality to the existing Python features to work with Cosmic Frog models, is covered in some detail.
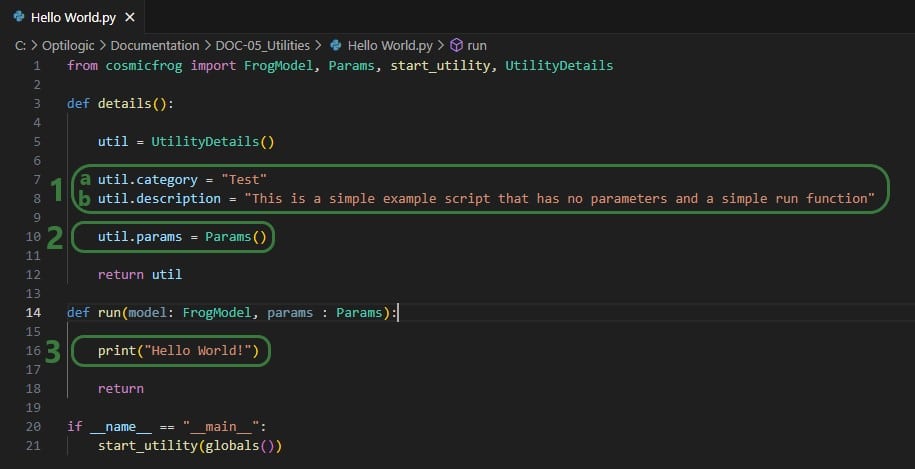
We will start by looking at the Python file of the very simple Hello World utility. In this first screenshot, the parts that can stay the same for all utilities are outlined in green:

Next, onto the parts of the utility’s Python script that users will want to update when customizing / creating their own scripts:
Now, we will discuss how input parameters, which users can then set in Cosmic Frog, can be added to the details function. After that we will cover different actions that can be added to the run function.
If a utility needs to be able to take any inputs from a user before running it, these are created by adding parameters in the details function of the utility’s Python script:

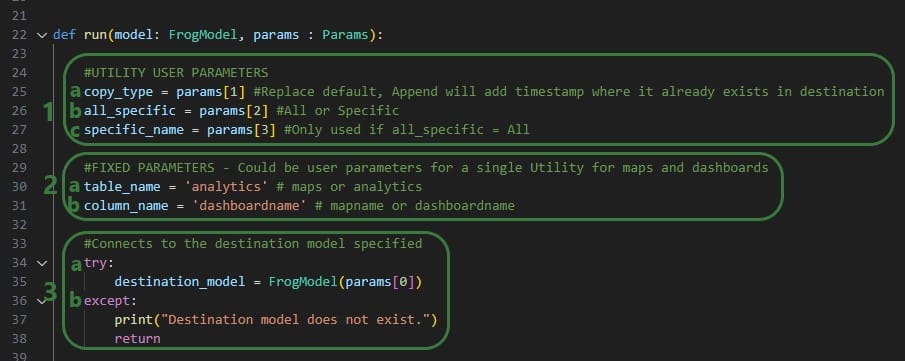
We will take a closer look at a utility that uses parameters and map the arguments of the parameters back to what the user sees when the utility is open in Cosmic Frog, see the next 2 screenshots: the numbers in the script screenshot are matched to those in the Cosmic Frog screenshot to indicate what code leads to what part of the utility when looking at it in Cosmic Frog. These screenshots use the Copy dashboard to a model utility of which the Python script (Copy dashboard to a model.py) was downloaded from the Resource Library.
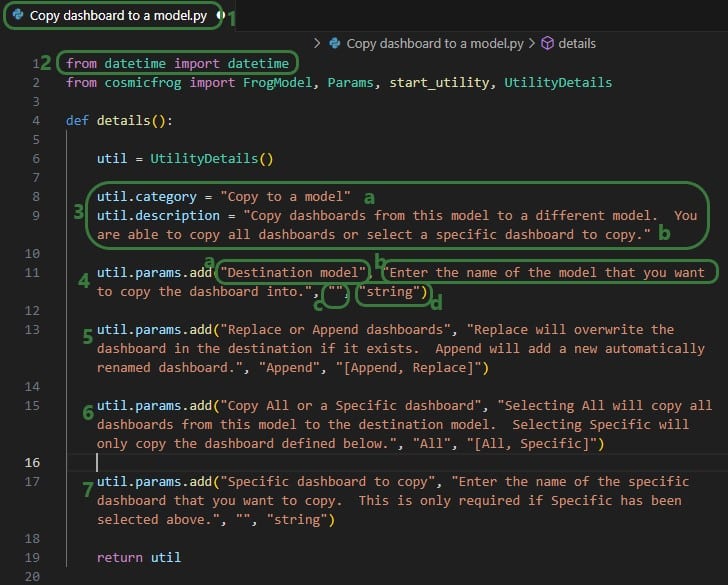
Note that Python lists are 0-indexed, meaning that the first parameter (Destination Model in this example) is referenced by typing params[0], the second parameter (Replace of Append dashboards) by typing params[1], etc. We will see this in the code when adding actions to the run function below too.
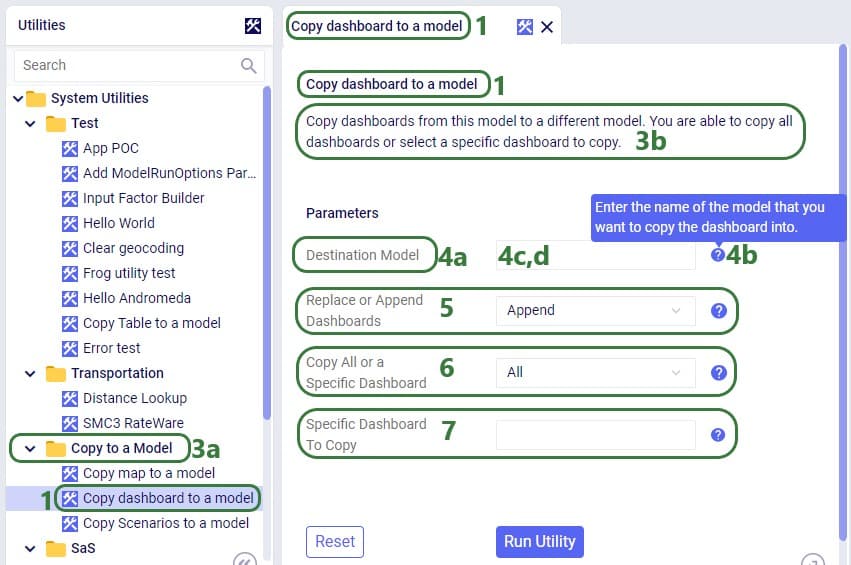
Now let’s have a look at how the above code translates to what a user sees in the Cosmic Frog user interface for the Copy dashboard to a model System Utility (note that the numbers in this screenshot match with those in the above screenshot):
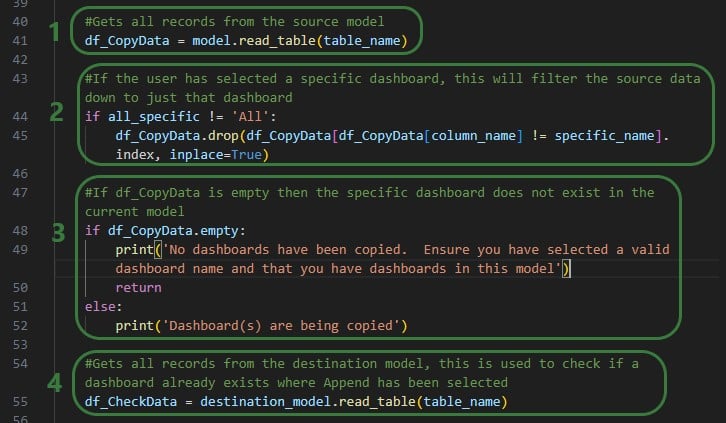
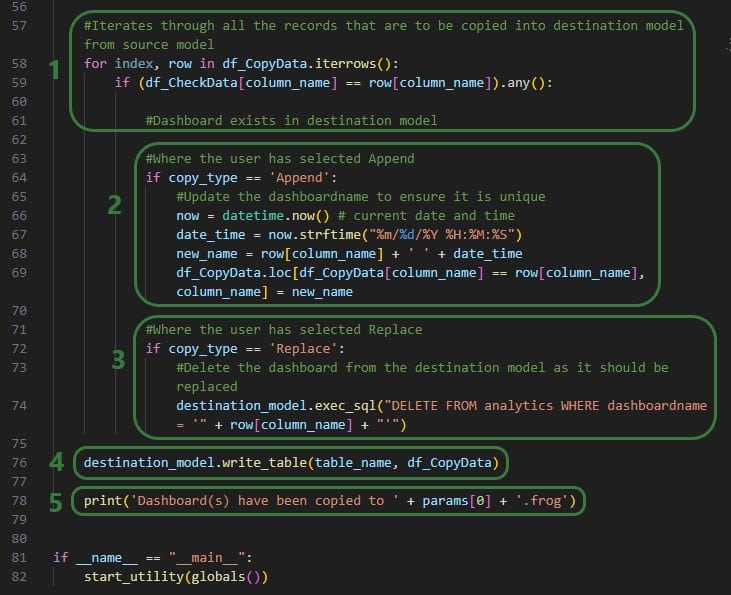
The actions a utility needs to perform are added to the run function of the Python script. These will be different for different types of utilities. We will cover the actions the Copy dashboard to a model utility uses at a high level and refer to Python documentation if user is interested in understanding all the details. There are a lot of helpful resources and communities online where users can learn everything there is to know about using & writing Python code. A great place to start is on the Python for Beginners page on python.org. This page also mentions how more experienced coders can get started with Python. Also note that text in green font that follows a hash sign are comments to add context to code.
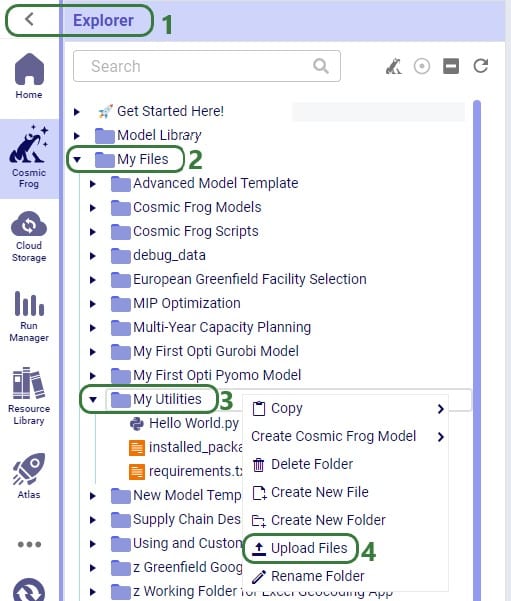
For a custom utility to be showing in the My Utilities category of the utilities list in Cosmic Frog, it needs to be saved under My Files > My Utilities in the user’s Optilogic account:
Note that if a Python utility file is already in user’s Optilogic account, but in a different folder, user can click on it and drag it to the My Utilities folder.
For utilities to work, a requirements.txt file which only contains the text cosmicfrog needs to be placed in the same My Files > My Utilities folder (if not there already):

A customized version of the Copy dashboard to a model utility was uploaded here, and a requirements.txt file is present in the same folder too.
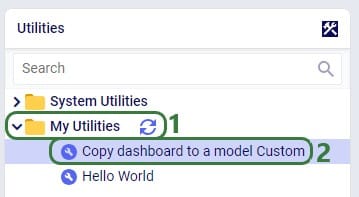
Once a Python utility file is uploaded to My Files > My Utilities, it can be accessed from within Cosmic Frog:
If users want to share custom utilities with other users, they can do so by right-clicking on it and choosing the “Send Copy of File” option:

The following form then opens:

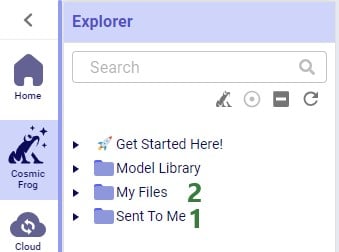
When a custom utility has been shared with you by another user, it will be saved under the Sent To Me folder in your Optilogic account:
Should you have created a custom utility that you feel a lot of other users can benefit from and you are allowed to share outside of your organization, then we encourage you to submit it into Optilogic’s Resource Library. Click on the Contribute button at the left top of the Resource Library and then follow the steps as outlined in the “How can I add Python Modules to the Resource Library?” section towards the end of the “How to use the Resource Library” help article.
Utility names and descriptions by category:

Utilities enable powerful modelling capabilities for use cases like integration to other services or data sources, repeatable data transformation or anything that can be supported by Python! System Utilities are available as a core capability in Cosmic Frog for use cases like LTL rate lookups, TransitMatrix time & distance generation, and copying items like Maps and Dashboards from one model to another. More useful System Utilities will become available in Cosmic Frog over time. Some of these System Utilities are also available in the Resource Library where they can be downloaded from, and then customized and made available to modelers for specific projects or models. In this Help Article we will cover both how to use use System Utilities as well as how to customize and deploy Custom Utilities.
The “Using and Customizing Utilities” resource in the Resource Library includes a helpful 15-minute video on Cosmic Frog Model Utilities and users are encouraged to watch this.
In this Help Article, System Utilities will be covered first, before discussing the specifics of creating one’s own Utilities. Finally, how to use and share Custom Utilities will be explained as well.
Users can access utilities within Cosmic Frog by going to the Utilities section via the Module Menu drop-down:
Once in the Utilities section, user will see the list of available utilities:
The appendix of this Help Article contains a table of all System Utilities and their descriptions.
Utilities vary in complexity by how many input parameters a user can configure and range from those where no parameters need to be set at all to those where many can be set. Following screenshot shows the Orders to Demand utility which does not require any input parameters to be set by the user:
The Copy map to a model utility shown in the next screenshot does require several parameters to be set by the user:
When the Run Utility button has been clicked, a message appears beneath it briefly:
Clicking on this message will open the Model Activity pane to the right of the tab(s) with open utilities:
Users will not only see activities related to running utilities in the Model Activity list. Other actions that are executed within Cosmic Frog will be listed here too, like for example when user has geocoded locations by using the Geocode tool on the Customers / Facilities / Suppliers tables or when user makes a change in a master table and chooses to cascade these changes to other tables.
Please note that the following System Utilities have separate Help Articles where they are explained in more detail:
The utilities that are available in the Resource Library can be downloaded by users and then customized to fit the user’s specific needs. Examples are to change the logic of a data transformation, apply similar logic but to a different table, etc. Or users may even build their own utilities entirely. If a user updates a utility or creates a new one, they can share these back with other users so they can benefit from them as well.
Utilities are Python scripts that contain a specific structure which will be explained in this section. They can be edited directly in the Atlas application on the Optilogic platform or users can download the Python file that is being used as a starting point and edit it using an IDE (Integrated Development Environment) installed on their computer. A rich text editor geared towards coding, like for example Visual Studio Code, will work fine too for most. An advantage of working locally is that user can take advantage of code completion features (auto-completion while typing, showing what arguments functions need, catch incorrect syntax/names, etc.) by installing an extension package like for example IntelliSense (for Visual Studio Code). The screenshots of the Python files underlying the utilities that follow in this documentation are taken while working with them in Visual Studio Code locally and on a machine that has the IntelliSense extension package installed.
A great resource on how to write Python scripts for Cosmic Frog models is this “Scripting with Cosmic Frog” video. In this video, the cosmicfrog Python library, which adds specific functionality to the existing Python features to work with Cosmic Frog models, is covered in some detail.
We will start by looking at the Python file of the very simple Hello World utility. In this first screenshot, the parts that can stay the same for all utilities are outlined in green:
Next, onto the parts of the utility’s Python script that users will want to update when customizing / creating their own scripts:
Now, we will discuss how input parameters, which users can then set in Cosmic Frog, can be added to the details function. After that we will cover different actions that can be added to the run function.
If a utility needs to be able to take any inputs from a user before running it, these are created by adding parameters in the details function of the utility’s Python script:
We will take a closer look at a utility that uses parameters and map the arguments of the parameters back to what the user sees when the utility is open in Cosmic Frog, see the next 2 screenshots: the numbers in the script screenshot are matched to those in the Cosmic Frog screenshot to indicate what code leads to what part of the utility when looking at it in Cosmic Frog. These screenshots use the Copy dashboard to a model utility of which the Python script (Copy dashboard to a model.py) was downloaded from the Resource Library.
Note that Python lists are 0-indexed, meaning that the first parameter (Destination Model in this example) is referenced by typing params[0], the second parameter (Replace of Append dashboards) by typing params[1], etc. We will see this in the code when adding actions to the run function below too.
Now let’s have a look at how the above code translates to what a user sees in the Cosmic Frog user interface for the Copy dashboard to a model System Utility (note that the numbers in this screenshot match with those in the above screenshot):
The actions a utility needs to perform are added to the run function of the Python script. These will be different for different types of utilities. We will cover the actions the Copy dashboard to a model utility uses at a high level and refer to Python documentation if user is interested in understanding all the details. There are a lot of helpful resources and communities online where users can learn everything there is to know about using & writing Python code. A great place to start is on the Python for Beginners page on python.org. This page also mentions how more experienced coders can get started with Python. Also note that text in green font that follows a hash sign are comments to add context to code.
For a custom utility to be showing in the My Utilities category of the utilities list in Cosmic Frog, it needs to be saved under My Files > My Utilities in the user’s Optilogic account:
Note that if a Python utility file is already in user’s Optilogic account, but in a different folder, user can click on it and drag it to the My Utilities folder.
For utilities to work, a requirements.txt file which only contains the text cosmicfrog needs to be placed in the same My Files > My Utilities folder (if not there already):
A customized version of the Copy dashboard to a model utility was uploaded here, and a requirements.txt file is present in the same folder too.
Once a Python utility file is uploaded to My Files > My Utilities, it can be accessed from within Cosmic Frog:
If users want to share custom utilities with other users, they can do so by right-clicking on it and choosing the “Send Copy of File” option:
The following form then opens:
When a custom utility has been shared with you by another user, it will be saved under the Sent To Me folder in your Optilogic account:
Should you have created a custom utility that you feel a lot of other users can benefit from and you are allowed to share outside of your organization, then we encourage you to submit it into Optilogic’s Resource Library. Click on the Contribute button at the left top of the Resource Library and then follow the steps as outlined in the “How can I add Python Modules to the Resource Library?” section towards the end of the “How to use the Resource Library” help article.
Utility names and descriptions by category:


