

To enable users to build basic Cosmic Frog for Excel Applications to interact directly with Cosmic Frog from within Excel without needing to write any code, Optilogic has developed the Cosmic Frog for Excel Application Builder (also referred to as App Builder in this documentation). In this App Builder, users can build their own workflows using common actions like creating a new model, connecting to an existing model, importing & exporting data, creating & running scenarios, and reviewing outputs. Once a workflow has been established, the App can be deployed so it can be shared with other users. These other users do not need to build the workflow of the App again, they can just use the App as is. In this documentation we will take a user through the steps of a complete workflow build, including App deployment.
You can download the Cosmic Frog for Excel – App Builder from the Resource Library. A video showing how the App Builder is used in a nutshell is included; this video is recommended viewing before reading further. After downloading the .zip file from the Resource Library and unzipping it on your local computer, you will find there are 2 folders included: 1) Cosmic_Frog_For_Excel_App_Builder, which contains the App Builder itself and this is what this documentation will focus on, and 2) Cosmic_Frog_For_Excel_Examples, which contains 3 examples of how the App Builder can be used. This documentation will not discuss these examples in detail; users are however encouraged to browse through them to get an idea of the types of workflows one can build with the App Builder.
The Cosmic_Frog_For_Excel_App_Builder folder contains 1 subfolder and 1 Macro-enabled Excel file (.xlsm):

When ready to start building your first own basic App, open the Cosmic_Frog_For_Excel_Builder_v1.xlsm file; the next section will describe the steps a user needs to take to start building.
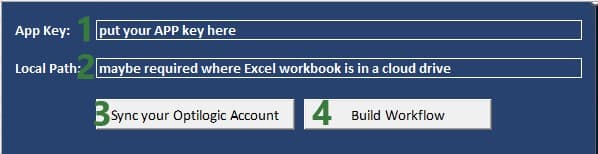
When you open the Cosmic_Frog_For_Excel_App_Builder_v1.xlsm file in Excel, you will find there are 2 worksheets present in the workbook, Start and Workflow. The top of the Start worksheet looks like this:
Going to the Workflow worksheet and clicking on the Cosmic Frog tab in the ribbon, we can see the actions that are available to us to create our basic Cosmic Frog for Excel Applications:

We will now walk through building and deploying a simple App to illustrate the different Actions and their configurations. This workflow will: connect to a Greenfield model in my Optilogic account, add records to the Customer and CustomerDemand tables, create a new scenario with 2 new scenario items in it, run this new scenario, and then export the Greenfield Facility Summary output table from the Cosmic Frog model into a worksheet of the App. As a last step we will also deploy the App.
On the Workflow worksheet, we will start building the workflow by first connecting to an existing model in my Optilogic account:

The following screenshot shows the Help tab of the “Connect To Or Create Model Action”:
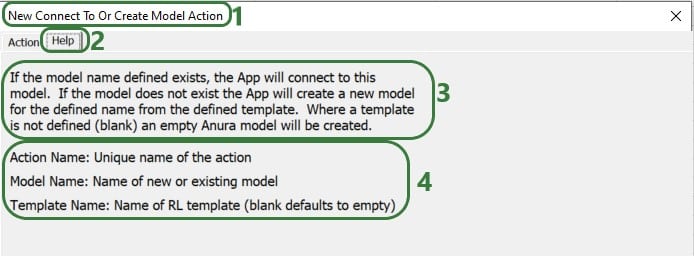
In the remainder of the documentation, we will not show the Help tab of each action. Users are however encouraged to use these to understand what the action does and how to configure it.
After creating an action, the details of it will be added to 2 columns in the Workflow worksheet, see screenshot below. The first action of the workflow will use columns A & B, the next action C & D, etc. When adding actions, the placement on the Workflow worksheet is automatic and user does not need to do or change anything. Blue fields contain data that cannot be changed, white fields are user inputs when setting up the action and can be changed in the worksheet itself too.

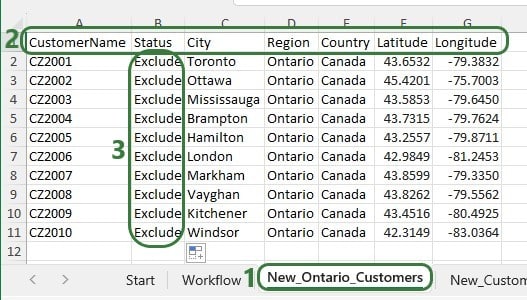
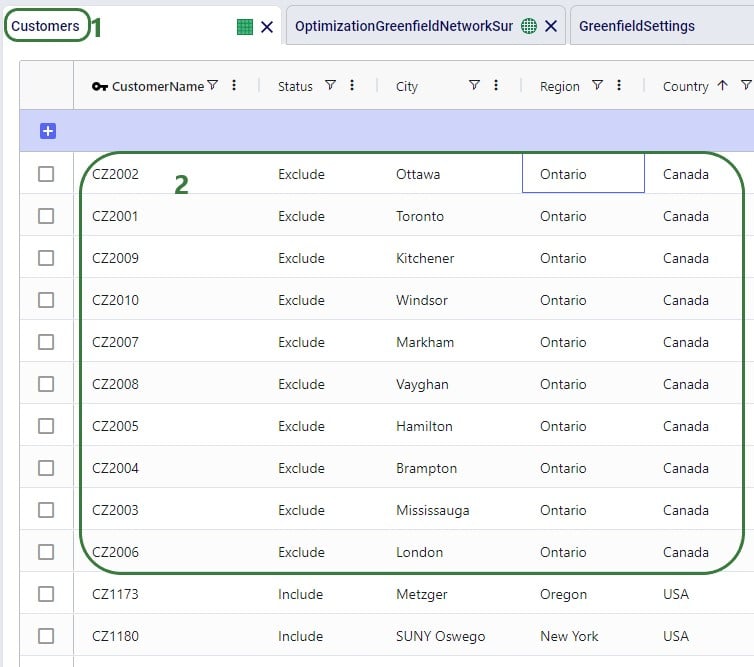
The United States Greenfield Facility Selection model we are connecting to contains about 1.3k customer locations in the US which have demand for 3 products: Rockets, Space Suits, and Consumables. As part of this workflow, we will add 10 customers located in the state of Ontario in Canada to the Customers table and add demand for each of these customers for each product to the CustomerDemand table. The next 2 screenshots show the customer and customer demand data that will be added to this existing model.

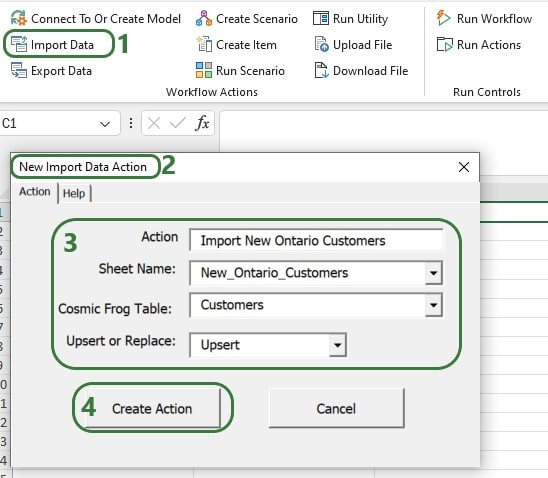
First, we will use an Import Data action to append the new customers to the Customers table in the model we are connecting to:
Next, use the Import Data Action again to upsert the data contained in the New_CustomerDemand worksheet to the CustomerDemand table in the Cosmic Frog model, which will be added to columns E & F. After these 2 Import Data actions have been added, our workflow now looks like this:

Now that the new customers and their demand have been imported into the model, we will add several actions to create a new scenario where the new customers will be included. In this scenario, we will also remove the Max Number of New Facilities value, so the Greenfield algorithm can optimize the number of new facilities just based on the costs specified in the model. After setting up the scenario, an action will be added to run it.
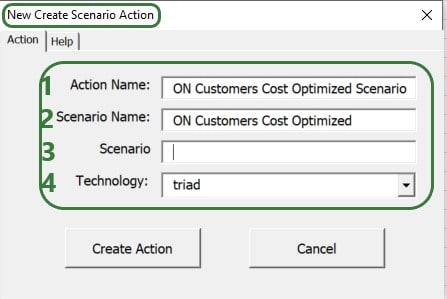
Use the Create Scenario action to add a new scenario to the model:
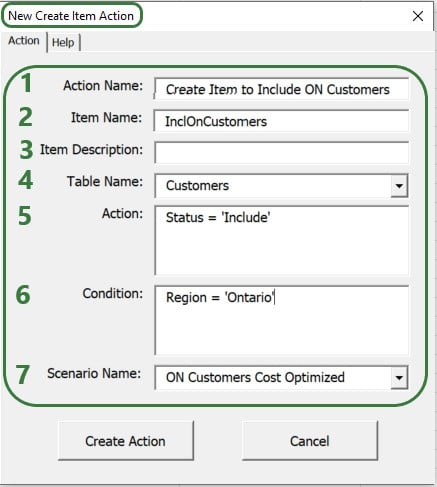
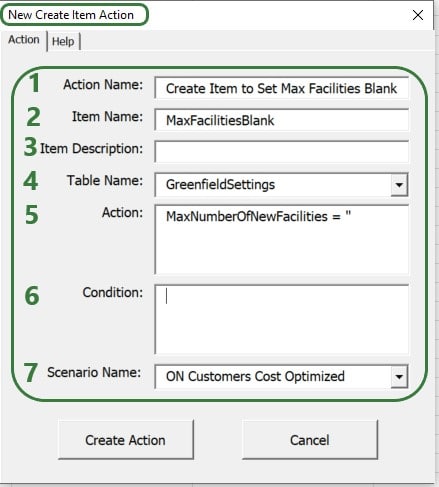
Then, use 2 Create Item Actions to 1) include the Ontario customers and 2) remove the Max Number Of New Facilities value:
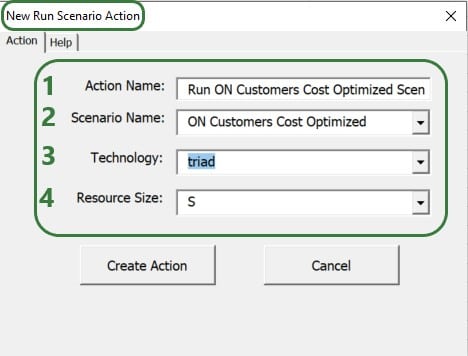
After setting up the scenario and its 2 items, the next step of the workflow will be to run it. We add a Run Scenario action to the workflow to do so:
The configuration of this action takes following inputs:
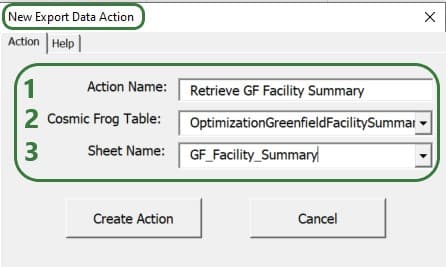
We now have a workflow that connects to an existing US Greenfield model, adds Ontario customers and their demand to this model, then creates and runs a new scenario with 2 items in this Cosmic Frog model. After running the scenario, we want to export the Optimization Greenfield Facility Summary output table from the Cosmic Frog model and load it into a new worksheet in the App. We do so by adding an Export Data Action to the workflow:
After adding the above actions to the workflow, the workflow worksheet now looks like the following 2 screenshots from column G onwards (columns A-F contain the first 3 actions as shown in a screenshot further above):

Columns G-H contain the details of the action that created the new ON Customers Cost Optimized scenario, and columns I-J & K-L contain the details of the actions that added the 2 scenario items to this scenario.

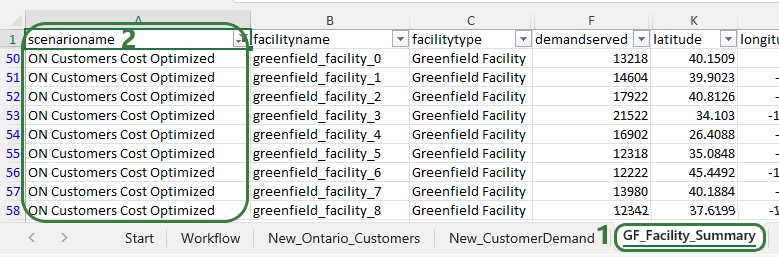
Columns M-N contain the details of the action that will run the scenario that was added and columns O-P those of the action that will export the selected output table (Optimization Greenfield Facility Summary) into the GF_Facility_Summary worksheet of the App.
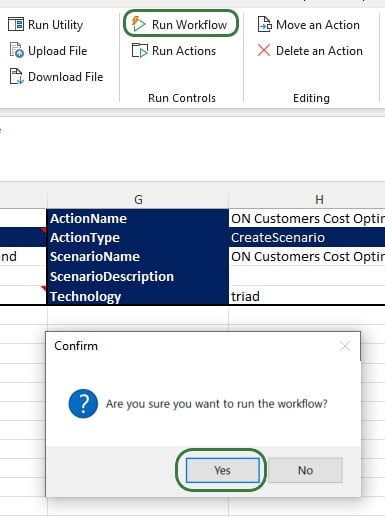
To run the completed Workflow, all we need to do is click on the Run Workflow action and confirm we want to run it:
After kicking off the workflow, if we switch to the Start worksheet, details of the run and its progress are shown in rows 9-11:

Looking on the Optilogic Platform, we can also check the progress of the App run and the Cosmic Frog model changes:
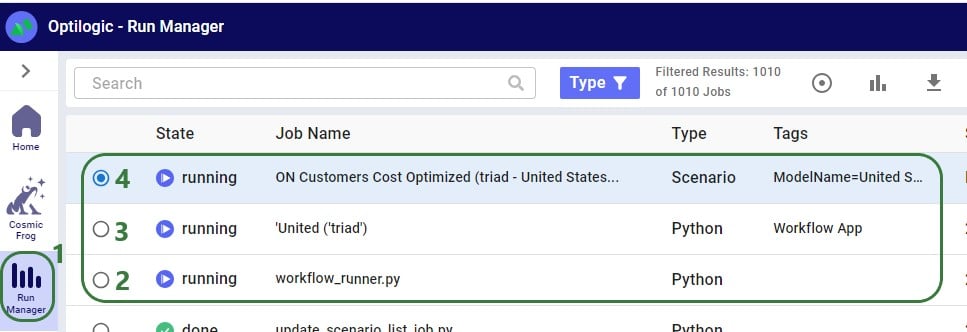
Once the run is done all 3 jobs will have their State changed to Done, unless an error occurred in which case the State will say Error.
Checking the United Stated Greenfield Facility Selection model itself in the Cosmic Frog application on cosmicfrog.com:
Once the App is finished running, we see that a worksheet named GF_Facility_Summary was added to the App Builder:
There are several other actions that users of the App Builder can incorporate into a workflow or use to facilitate workflow building. We will cover these now. Feel free to skip ahead to the “Deploying the App” section if your workflow is complete at this stage.
Additional actions that can be incorporated into workflows are the Run Utility, Upload File, and Download File actions. The Run Utility action can be used to run a Cosmic Frog Utility (a Python script), which currently can be a Utility downloaded from the Resource Library or a Utility specifically built for the App.
There are currently 4 Utilities available in the Resource Library:

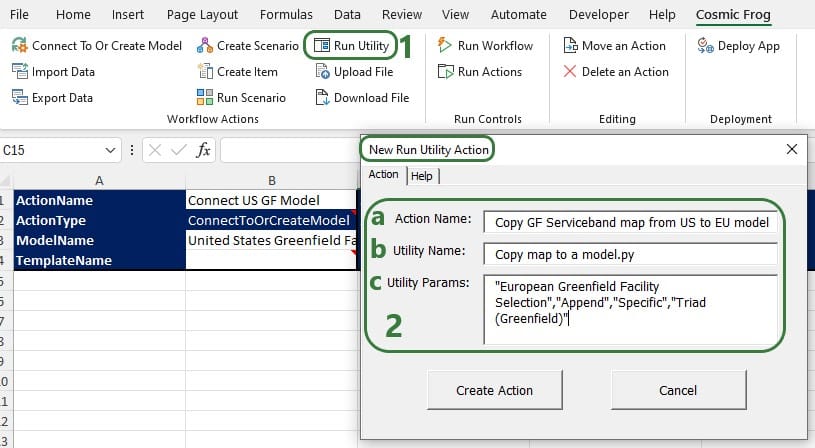
After downloading the Python file of the Utility you want to use in your workflow, you need to copy it into the working_files_do_not_change folder that is located in the same folder as where you saved the App Builder. Now you can start using it as part of the Run Utility action. In the below example, we will use the Python script from the Copy Map to a Model Resource Library Utility to copy a map and all its settings from one model (“United States Greenfield Facility Selection”, the model connected to in a previous action) to another (“European Greenfield Facility Selection”):
The parameters of the Copy Dashboard to a Model Utility are the same as those of the Copy Map to a Model Utility:
The Orders to Demand and Delete SaS Scenarios utilities do not have any parameters that need to be set, so the Utility Params part of the Run Utility action can be left blank when using these utilities.
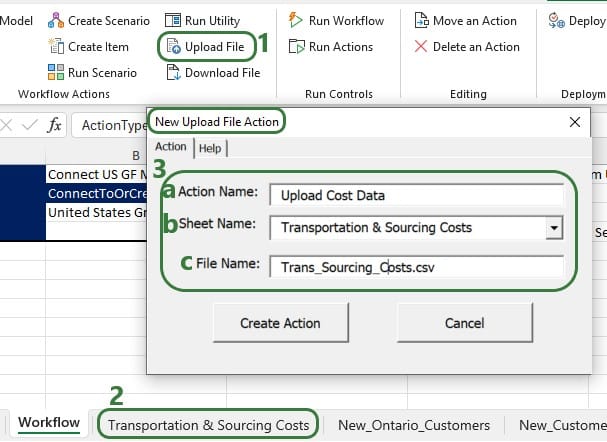
The Upload File action can be used to take a worksheet in the App Builder and upload it as a .csv file to the Optilogic platform:
Files that get uploaded to the Optilogic platform are placed in a specific working folder related to the App Builder, the name and location of which are shown in this screenshot:

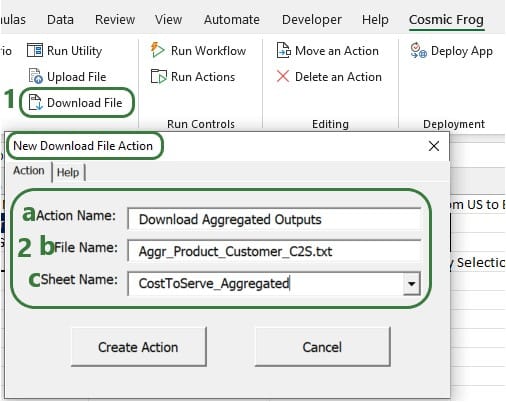
The Download File action can be used to download a .txt file from the Optilogic platform and load it into a worksheet in the App:
Other actions that facilitate workflow building are the Move an Action, Delete an Action, and Run Actions actions, which will be discussed now. If the order of some actions needs to be changed, you do not need to remove and re-add them, you can use the Move an Action action to move them around:

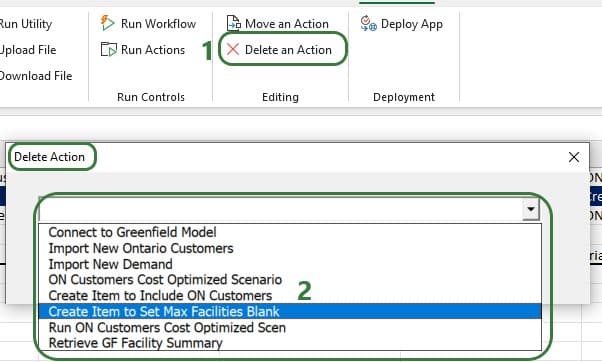
It is also possible that an action needs to be removed from a Workflow. For this, the “Delete an Action” action can be used, rather than manually deleting it from the Workflow worksheet and trying to move other actions in its place:
Instead of running a complete workflow, it is also possible to only run a subset of the actions that are part of the workflow:

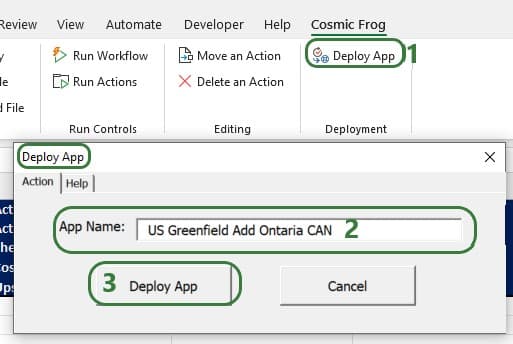
Once a workflow has been completed in the Cosmic Frog for Excel App Builder, it can be deployed so other users can run the same workflow without having to build it first. This section covers the Deployment steps.
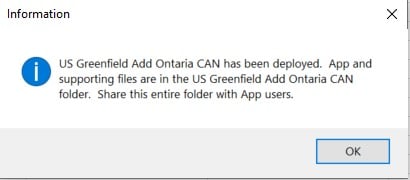
The following message will come up after the app had been deployed:
Looking in the folder mentioned in this message, we see the following contents:


Congratulations on building & deploying your own Cosmic Frog for Excel App!
If you want to build Apps that go beyond what can be done using the App Builder, you can do so too. This may require some coding using Excel VBA, Python, and/or SQL. Detailed documentation walking through this can be found in this Getting Started with Cosmic Frog for Excel Applications article on Optilogic’s Help Center.

To enable users to build basic Cosmic Frog for Excel Applications to interact directly with Cosmic Frog from within Excel without needing to write any code, Optilogic has developed the Cosmic Frog for Excel Application Builder (also referred to as App Builder in this documentation). In this App Builder, users can build their own workflows using common actions like creating a new model, connecting to an existing model, importing & exporting data, creating & running scenarios, and reviewing outputs. Once a workflow has been established, the App can be deployed so it can be shared with other users. These other users do not need to build the workflow of the App again, they can just use the App as is. In this documentation we will take a user through the steps of a complete workflow build, including App deployment.
You can download the Cosmic Frog for Excel – App Builder from the Resource Library. A video showing how the App Builder is used in a nutshell is included; this video is recommended viewing before reading further. After downloading the .zip file from the Resource Library and unzipping it on your local computer, you will find there are 2 folders included: 1) Cosmic_Frog_For_Excel_App_Builder, which contains the App Builder itself and this is what this documentation will focus on, and 2) Cosmic_Frog_For_Excel_Examples, which contains 3 examples of how the App Builder can be used. This documentation will not discuss these examples in detail; users are however encouraged to browse through them to get an idea of the types of workflows one can build with the App Builder.
The Cosmic_Frog_For_Excel_App_Builder folder contains 1 subfolder and 1 Macro-enabled Excel file (.xlsm):
When ready to start building your first own basic App, open the Cosmic_Frog_For_Excel_Builder_v1.xlsm file; the next section will describe the steps a user needs to take to start building.
When you open the Cosmic_Frog_For_Excel_App_Builder_v1.xlsm file in Excel, you will find there are 2 worksheets present in the workbook, Start and Workflow. The top of the Start worksheet looks like this:
Going to the Workflow worksheet and clicking on the Cosmic Frog tab in the ribbon, we can see the actions that are available to us to create our basic Cosmic Frog for Excel Applications:
We will now walk through building and deploying a simple App to illustrate the different Actions and their configurations. This workflow will: connect to a Greenfield model in my Optilogic account, add records to the Customer and CustomerDemand tables, create a new scenario with 2 new scenario items in it, run this new scenario, and then export the Greenfield Facility Summary output table from the Cosmic Frog model into a worksheet of the App. As a last step we will also deploy the App.
On the Workflow worksheet, we will start building the workflow by first connecting to an existing model in my Optilogic account:
The following screenshot shows the Help tab of the “Connect To Or Create Model Action”:
In the remainder of the documentation, we will not show the Help tab of each action. Users are however encouraged to use these to understand what the action does and how to configure it.
After creating an action, the details of it will be added to 2 columns in the Workflow worksheet, see screenshot below. The first action of the workflow will use columns A & B, the next action C & D, etc. When adding actions, the placement on the Workflow worksheet is automatic and user does not need to do or change anything. Blue fields contain data that cannot be changed, white fields are user inputs when setting up the action and can be changed in the worksheet itself too.
The United States Greenfield Facility Selection model we are connecting to contains about 1.3k customer locations in the US which have demand for 3 products: Rockets, Space Suits, and Consumables. As part of this workflow, we will add 10 customers located in the state of Ontario in Canada to the Customers table and add demand for each of these customers for each product to the CustomerDemand table. The next 2 screenshots show the customer and customer demand data that will be added to this existing model.
First, we will use an Import Data action to append the new customers to the Customers table in the model we are connecting to:
Next, use the Import Data Action again to upsert the data contained in the New_CustomerDemand worksheet to the CustomerDemand table in the Cosmic Frog model, which will be added to columns E & F. After these 2 Import Data actions have been added, our workflow now looks like this:
Now that the new customers and their demand have been imported into the model, we will add several actions to create a new scenario where the new customers will be included. In this scenario, we will also remove the Max Number of New Facilities value, so the Greenfield algorithm can optimize the number of new facilities just based on the costs specified in the model. After setting up the scenario, an action will be added to run it.
Use the Create Scenario action to add a new scenario to the model:
Then, use 2 Create Item Actions to 1) include the Ontario customers and 2) remove the Max Number Of New Facilities value:
After setting up the scenario and its 2 items, the next step of the workflow will be to run it. We add a Run Scenario action to the workflow to do so:
The configuration of this action takes following inputs:
We now have a workflow that connects to an existing US Greenfield model, adds Ontario customers and their demand to this model, then creates and runs a new scenario with 2 items in this Cosmic Frog model. After running the scenario, we want to export the Optimization Greenfield Facility Summary output table from the Cosmic Frog model and load it into a new worksheet in the App. We do so by adding an Export Data Action to the workflow:
After adding the above actions to the workflow, the workflow worksheet now looks like the following 2 screenshots from column G onwards (columns A-F contain the first 3 actions as shown in a screenshot further above):
Columns G-H contain the details of the action that created the new ON Customers Cost Optimized scenario, and columns I-J & K-L contain the details of the actions that added the 2 scenario items to this scenario.
Columns M-N contain the details of the action that will run the scenario that was added and columns O-P those of the action that will export the selected output table (Optimization Greenfield Facility Summary) into the GF_Facility_Summary worksheet of the App.
To run the completed Workflow, all we need to do is click on the Run Workflow action and confirm we want to run it:
After kicking off the workflow, if we switch to the Start worksheet, details of the run and its progress are shown in rows 9-11:
Looking on the Optilogic Platform, we can also check the progress of the App run and the Cosmic Frog model changes:
Once the run is done all 3 jobs will have their State changed to Done, unless an error occurred in which case the State will say Error.
Checking the United Stated Greenfield Facility Selection model itself in the Cosmic Frog application on cosmicfrog.com:
Once the App is finished running, we see that a worksheet named GF_Facility_Summary was added to the App Builder:
There are several other actions that users of the App Builder can incorporate into a workflow or use to facilitate workflow building. We will cover these now. Feel free to skip ahead to the “Deploying the App” section if your workflow is complete at this stage.
Additional actions that can be incorporated into workflows are the Run Utility, Upload File, and Download File actions. The Run Utility action can be used to run a Cosmic Frog Utility (a Python script), which currently can be a Utility downloaded from the Resource Library or a Utility specifically built for the App.
There are currently 4 Utilities available in the Resource Library:
After downloading the Python file of the Utility you want to use in your workflow, you need to copy it into the working_files_do_not_change folder that is located in the same folder as where you saved the App Builder. Now you can start using it as part of the Run Utility action. In the below example, we will use the Python script from the Copy Map to a Model Resource Library Utility to copy a map and all its settings from one model (“United States Greenfield Facility Selection”, the model connected to in a previous action) to another (“European Greenfield Facility Selection”):
The parameters of the Copy Dashboard to a Model Utility are the same as those of the Copy Map to a Model Utility:
The Orders to Demand and Delete SaS Scenarios utilities do not have any parameters that need to be set, so the Utility Params part of the Run Utility action can be left blank when using these utilities.
The Upload File action can be used to take a worksheet in the App Builder and upload it as a .csv file to the Optilogic platform:
Files that get uploaded to the Optilogic platform are placed in a specific working folder related to the App Builder, the name and location of which are shown in this screenshot:
The Download File action can be used to download a .txt file from the Optilogic platform and load it into a worksheet in the App:
Other actions that facilitate workflow building are the Move an Action, Delete an Action, and Run Actions actions, which will be discussed now. If the order of some actions needs to be changed, you do not need to remove and re-add them, you can use the Move an Action action to move them around:
It is also possible that an action needs to be removed from a Workflow. For this, the “Delete an Action” action can be used, rather than manually deleting it from the Workflow worksheet and trying to move other actions in its place:
Instead of running a complete workflow, it is also possible to only run a subset of the actions that are part of the workflow:
Once a workflow has been completed in the Cosmic Frog for Excel App Builder, it can be deployed so other users can run the same workflow without having to build it first. This section covers the Deployment steps.
The following message will come up after the app had been deployed:
Looking in the folder mentioned in this message, we see the following contents:
Congratulations on building & deploying your own Cosmic Frog for Excel App!
If you want to build Apps that go beyond what can be done using the App Builder, you can do so too. This may require some coding using Excel VBA, Python, and/or SQL. Detailed documentation walking through this can be found in this Getting Started with Cosmic Frog for Excel Applications article on Optilogic’s Help Center.


